DHCP RELAY over L2TPv3
Introduction
A DHCP relay agent allows the DHCP clients to obtain IP addresses from a DHCP server that is not configured on the same LAN.
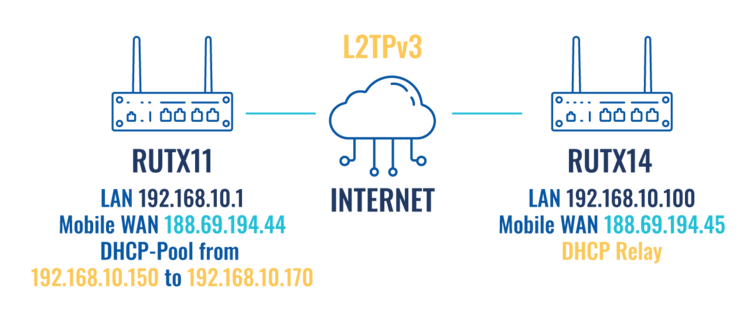
This article provides a configuration example with details on how to set-up a DHCP relay over a L2TPv3 VPN.
Prerequisites
You will need:
- Two RUT or RUTX devices (one as Server and other as Client)
- A PC acting as a Host for testing
- Both routers must have a Public Static or Public Dynamic IP addresses
Configuration Scheme
DHCP Server Settings
DHCP Pool
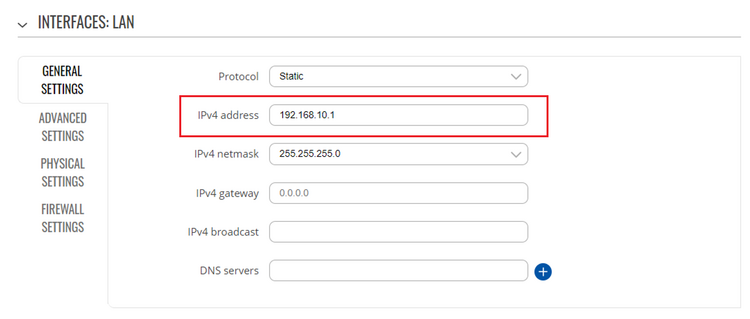
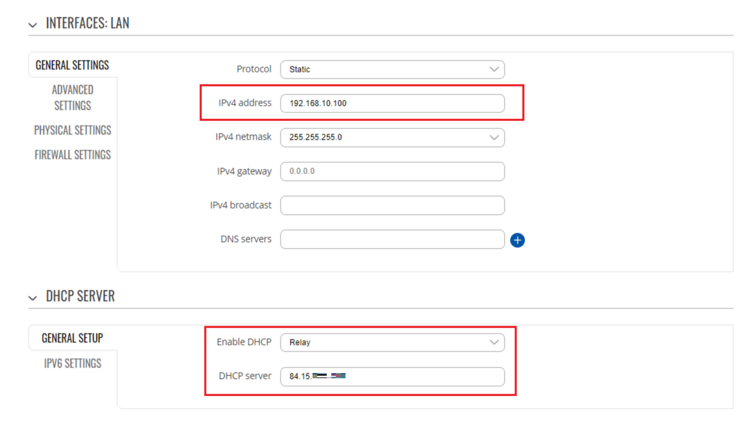
Login to the router's WebUI and navigate to Network → Interfaces → Ethernet LAN. Click the 'Edit' button on the right side of the interface to set the LAN network address.
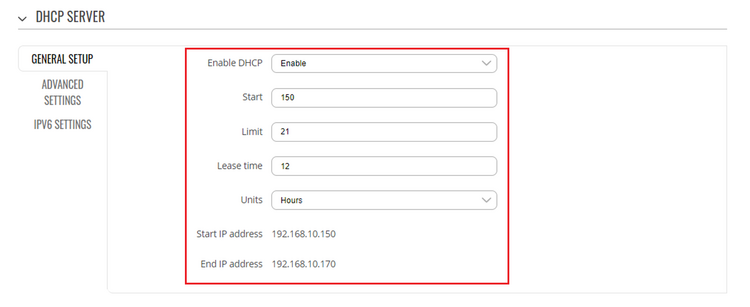
Under DHCP SERVER set parameters for the DHCP pool.
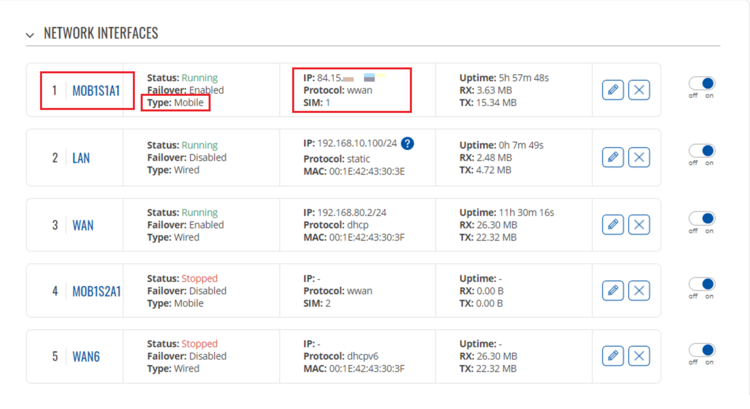
Set up Mobile WAN as Main WAN
Enter to the router’s WebUI, go to Network → Interfaces press mouse click on the Mobile Wan interface, then drag it to the 1st position and then press Save & Apply.
Create L2TPv3 instance
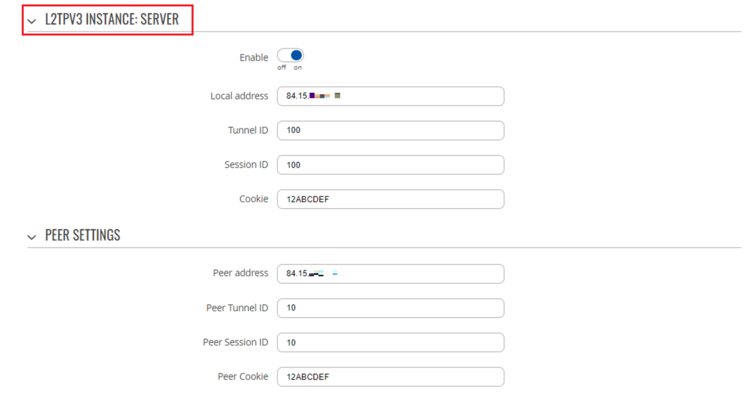
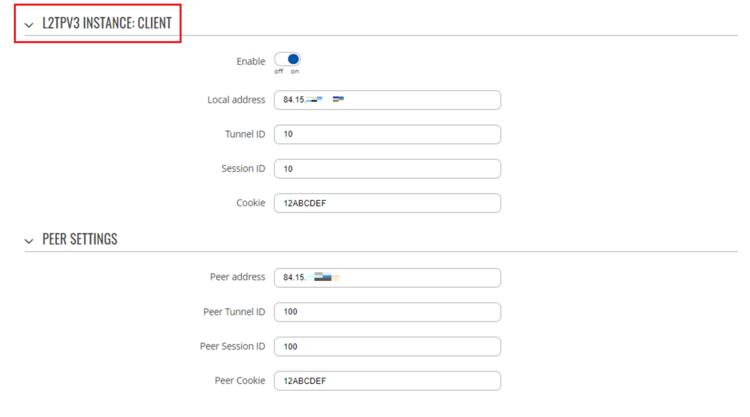
Go to router’s WebUI, under Service → VPN → L2TP → L2TPv3 and create new L2TPV3 instance.
LOCAL SETTING
Local address: 84.15.XXX.XXX
Tunnel ID: 100
Session ID: 100
Cookie: 12ABCDEF
PEER SETTING
Peer address: 84.15.XXX.XXX
Peer Tunnel ID: 10
Peer Session ID: 10
Peer Cookie: 12ABCDEF
INSTANCE SETTING
Bridge to: LAN
MTU: 1500
Encapsulation: IP
Layer 2 specific header type: Linux Default
Note: Specify on "Local address" your mobile WAN public IP. Local value for Tunnel ID, session ID and Cookie must match with the peer values being used at the other end.
DHCP Client Settings (Relay)
DHCP Relay
Enter the router's WebUI, go to Network → Interface → LAN → DHCP Server and change the "Enable DHCP" field value from Enable to Relay and type in the DHCP Server the IP address of the server. Click Save & Apply.
Note: The IPv4 address of the LAN interface is different from the server's LAN interface address, this is necessary to avoid conflicts.
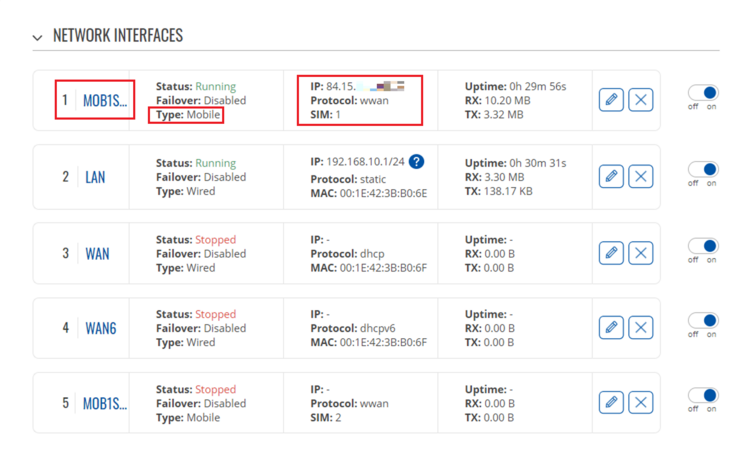
Set up Mobile WAN as Main WAN
Enter to the router’s WebUI, go to Network → Interfaces press mouse click on the Mobile Wan interface, then drag it to the 1st position and then press Save & Apply.
Modify Enable-DHCP-renew firewall rule
Enter in the router’s WebUI, go to Network → Firewall → Traffic rules to additionally allow destination port 67.
Create L2TPv3 instance
Go to router’s WebUI, under Service → VPN → L2TP → L2TPv3 and create new L2TPV3 instance.
LOCAL SETTING
Local address: 84.15.XXX.XXX
Tunnel ID: 10
Session ID: 10
Cookie: 12ABCDEF
PEER SETTING
Peer address: 84.15.XXX.XXX
Peer Tunnel ID: 100
Peer Session ID: 100
Peer Cookie: 12ABCDEF
INSTANCE SETTING
Bridge to: LAN
MTU: 1500
Encapsulation: IP
Layer 2 specific header type: Linux Default
Note: Specify on "Local address" your mobile WAN public IP. Local value for Tunnel ID, session ID and Cookie must match with the peer values being used at the other end.
Testing DHCP over L2TPv3
To test the realy settings go to DHCP server to check that devices are able to recieve IP addresses in the range 192.168.10.150 - 192.168.10.170 either via LAN port or Wi-Fi. Access the CLI and run cat /tmp/dhcp.leases to list all DHCP clients.
Asking for the Address Resolution Protocol (ARP) table is also an other method to find hosts on the LAN network.

