How to manually set a Wi-Fi channel?
Why do Wi-Fi channels even exist?
Think of Wi-Fi as a kind of highway road. The road is split into multiple lanes to keep the traffic moving smoothly and to avoid unnecessary collisions. In the world of Wi-Fi, those multiple lanes would be called channels. Each Wi-Fi signal is split into multiple channels to reduce Wi-Fi congestion and to avoid unnecessary increased ping time and packet loss. Each Wi-Fi band has its own channels. 2.4GHz Wi-Fi uses one set of channels and 5GHz Wi-Fi uses a different set of channels.
Why choosing an optimal Wi-Fi channel is important?
Choosing the right channel has some important advantages for your Wi-Fi network stability and performance. It helps prevent interference from other devices, like your neighbor's Wi-Fi, IoT devices, or other wireless gadgets that operate in the same Wi-Fi frequency. This interference can increase ping time, and contribute to bigger packet loss. Sometimes even the Wi-Fi speed can slow down. When the least crowded Wi-Fi channel is chosen you can get rid of those problems or at least make them less annoying.
Manually setting an optimal Wi-Fi channel
Our Teltonika Networks devices which have Wi-Fi capabilities support automatic channel selection. It is turned on by default. But not in every scenario this automatic selection does its job properly. Sometimes, when the router is set up, the automatically chosen channel is not crowded but after a few months new devices join your surroundings and “poison” that Wi-Fi channel.
Performing Wi-Fi channel analysis
Using a RUTOS device
In firmware 7.5 Teltonika Networks engineers added a new channel analysis feature. It allows to perform a scan of the surrounding Wi-Fi signals and shows which signal occupies what channel. Then the device administrator can visually check the graph and set the Wi-Fi channel manually according to the findings. To perform a Wi-Fi channel analysis on a RUTOS device that has Wi-Fi capabilities, follow these steps:
- Connect to device’s WebUI.
- Go to Status → Wireless → Channel Analysis.
- Select panel 2.4 GHZ for 2.4GHz Wi-Fi. For 5GHz Wi-Fi select panel 5 GHZ.
- Press

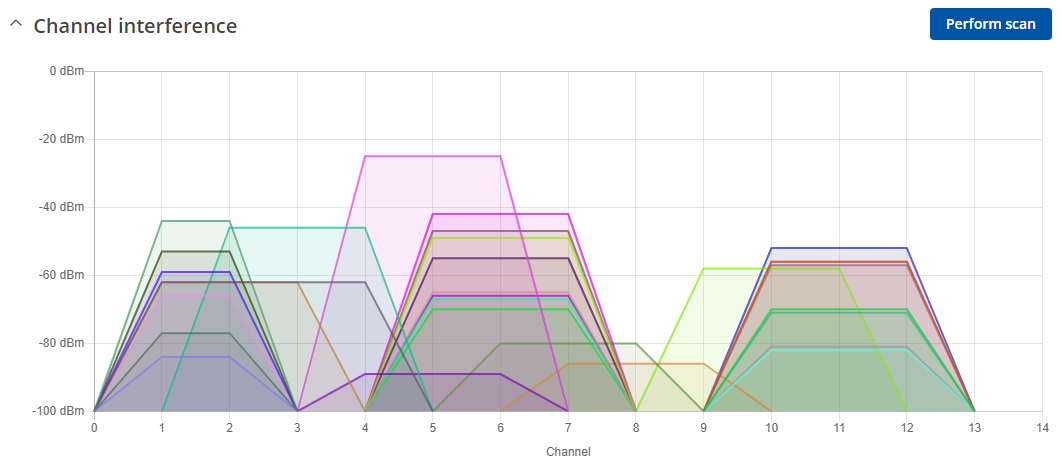
In the channel interference graph, you will see which Wi-Fi uses what channel. Since Wi-Fi channels also have a width parameter, you can see which Wi-Fi signal occupies which surrounding channels.

In this scenario (view the graph above) channel 8 would be a good choice. It is quite empty and has quite small interference from other Wi-Fi signals. On the other hand, channels 1, 2, 6, and 11 would be a bad choice.
If you want a more compact view, you can select the panel RATING on the same WebUI web page. It will show how many access points i.e., Wi-Fi signals, have occupied which channel. Also, you will see each channel’s general rating.
Using third-party software
If you do not have a Teltonika Networks device with firmware 7.5 and/or newer. You could install a third-party Wi-Fi scanner app on your smartphone. Go to your app store, either Google Play Store or IOS app store. Depending on your device’s operating system, download a Wi-Fi scanner app. Using your downloaded app visually check the information. After viewing the scan results take note which channel is less crowded.
Setting a fixed Wi-Fi channel
After reviewing the Wi-Fi channel analysis results you will need to manually change your RUTOS device's Wi-Fi channel. To do that follow these steps:
- Go to Network → Wireless → SSIDs.
- Select your devices Wi-Fi radio.
- In the General Setup section change the Channel parameter. Select the channel according to your findings in the Wi-Fi channel scanner.
In our scenario, we noticed that channel 8 is a good choice, so we will change our Wi-Fi channel to 8.

Note: after applying the settings, your device’s Wi-Fi will stop working for a couple of seconds.

