QSG TRM200
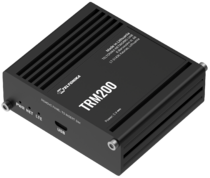
This Wiki page contains the online version of the Quick Start Guide (QSG) for the TRM200 4G modem. Here you will find an overview of the various components on the front and back of a TRM200 device, hardware installation instructions, first login information, device specifications, and general safety information. It is highly recommended to acquaint yourself with the Quick Start Guide before using the device. You can also locate a printed version of the Quick Start Guide in the packaging box of your device.
 |
 |
 |
Safety information
Before starting operating the device, please review recommendations and precautions to minimize the possibility of accidents. Safety precautions presented are supplementary and subject to the local safety regulations. When various operations are executed on the device, the user must fully follow the safety instructions and recommendations provided with the device.
General
| Radio specifications | |
|---|---|
| RF technologies | 2G, 3G, 4G |
| Max RF power | 25dBm@4G, 26dBm@3G, 32dBm@GSM900, 30dBm@GSM1800 |
| Bundled accessories specifications* | |
| Mobile antenna | 698~960/1710~2690 MHz, 50 Ω, VSWR<3, gain** 4 dBi, omnidirectional, SMA male connector |
* Order code dependant.
** Higher gain antenna can be connected to compensate for cable attenuation when a cable is used. The user is responsible for the compliance with the legal regulations.
Compliance
TRM200 router must be used in compliance with any and all applicable national and international laws and with any special restrictions regulating the utilization of the communication module in prescribed applications and environments.
CE Declaration of Conformity
| [BG] Bulgarian | С настоящото TELTONIKA NETWORKS декларира, че този TRM200 е в съответствие със съществените изисквания и други разпоредби на Директиви 2014/53/ЕU, 2011/65/ЕU. |
| [HR] Croatian | Ovim TELTONIKA NETWORKS izjavljuje da je ovaj TRM200 u skladu s bitnim zahtjevima i ostalim relevantnim odredbama Direktive 2014/53/EU, 2011/65/EU. |
| [CZ] Czech | Společnost TELTONIKA NETWORKS tímto prohlašuje, že tento TRM200 splňuje základní požadavky a další ustanovení směrnic 2014/53/EU, 2011/65/EU. |
| [DK] Danish | TELTONIKA NETWORKS erklærer hermed, at denne TRM200 er i overensstemmelse med de væsentlige krav og andre bestemmelser i direktiv 2014/53/EU, 2011/65/EU. |
| [NL] Dutch | Hereby, TELTONIKA NETWORKS declares that this TRM200 is in compliance with the essential requirements and other relevant provisions of Richtlijnen 2014/53/EU, 2011/65/EU. |
| [EE] Estonian | Käesolevaga kinnitab TELTONIKA NETWORKS seadme TRM200 vastavust Direktiivide 2014/53/EU, 2011/65/EU põhinõuetele ja nimetatud direktiivist tulenevatele teistele asjakohastele sätetele. |
| [FI] Finish | TELTONIKA NETWORKS vakuuttaa täten että TRM200 tyyppinen laite on Direktiivien 2014/53/EU, 2011/65/EU oleellisten vaatimusten ja sitä koskevien direktiivin muiden ehtojen mukainen. |
| [FR] French | TELTONIKA NETWORKS déclare par la présente que ce TRM200 est conforme aux exigences essentielles et autres dispositions des Directives 2014/53/EU, 2011/65/EU. |
| [DE] German | TELTONIKA NETWORKS erklärt hiermit, dass dieses TRM200 den grundlegenden Anforderungen und anderen Bestimmungen der Richtlinien 2014/53/EU, 2011/65/EU entspricht. |
| [GR] Greek | Η TELTONIKA NETWORKS δηλώνει ότι το παρόν TRM200 συμμορφώνεται με τις βασικές απαιτήσεις και άλλες διατάξεις των Οδηγιών 2014/53/ΕU, 2011/65/ΕU. |
| [HU] Hungarian | A TELTONIKA NETWORKS kijelenti, hogy ez a TRM200 megfelel a 2014/53/EU, 2011/65/EU irányelvek alapvető követelményeinek és egyéb rendelkezéseinek. |
| [IE] Irish | Leis seo, dearbhaíonn TELTONIKA NETWORKS go gcomhlíonann an TRM200 seo bunriachtanais agus forálacha ábhartha eile Threoir 2014/53/EU, 2011/65/EU. |
| [IT] Italian | Con la presente, TELTONIKA NETWORKS dichiara che questo TRM200 è conforme ai requisiti essenziali e ad altre disposizioni pertinenti della Direttive 2014/53/EU, 2011/65/EU. |
| [LV] Latvian | TELTONIKA NETWORKS ar šo paziņo, ka šis TRM200 atbilst pamatprasībām un citiem Direktīvas 2014/53/EU, 2011/65/EU noteikumiem. |
| [LT] Lithuanian | Šiuo dokumentu UAB TELTONIKA NETWORKS deklaruoja, kad šis TRM200 atitinka esminius reikalavimus ir kitas 2014/53/EU, 2011/65/EU Direktyvų nuostatas. |
| [MT] Maltese | TELTONIKA NETWORKS b'dan tiddikjara li dan TRM200 jikkonforma mar-rekwiżiti essenzjali u dispożizzjonijiet oħra tad-Direttivi 2014/53/EU, 2011/65/EU. |
| [NO] Norwegian | TELTONIKA NETWORKS erklærer herved at denne TRM200 er i samsvar med de grunnleggende kravene og andre bestemmelser i Direktivene 2014/53/EU, 2011/65/EU. |
| [PL] Polish | TELTONIKA NETWORKS niniejszym oświadcza, że niniejszy TRM200 jest zgodny z zasadniczymi wymaganiami i innymi postanowieniami Dyrektyw 2014/53/EU, 2011/65/EU. |
| [PT] Portuguese | A TELTONIKA NETWORKS declara que esta TRM200 cumpre os requisitos essenciais e outras disposições das Directivas 2014/53/EU, 2011/65/EU. |
| [RO] Romanian | TELTONIKA NETWORKS declară prin prezenta că acest TRM200 este în conformitate cu cerințele esențiale și cu alte dispoziții ale Directivelor 2014/53/EU, 2011/65/EU. |
| [SK] Slovak | Spoločnosť TELTONIKA NETWORKS týmto vyhlasuje, že tento TRM200 spĺňa základné požiadavky a ďalšie ustanovenia smerníc 2014/53/EU, 2011/65/EU. |
| [SI] Slovenian | TELTONIKA NETWORKS izjavlja, da je ta TRM200 skladen z bistvenimi zahtevami in drugimi določbami Direktiv 2014/53/EU, 2011/65/EU. |
| [ES] Spanish | TELTONIKA NETWORKS declara por la presente que este TRM200 cumple los requisitos esenciales y otras disposiciones de las Directivas 2014/53/EU, 2011/65/EU. |
| [SE] Swedish | TELTONIKA NETWORKS förklarar härmed att denna TRM200 uppfyller de grundläggande kraven och andra bestämmelser i Direktiven 2014/53/EU och 2011/65/EU. |
Markings
Detailed compliance information is available at the following internet address: wiki.teltonika-networks.com/view/Certificates.
 |
This sign means that is necessary to read the User's Manual before you start using the device. |
 |
This sign on the package means that all used electronic and electric equipment should not be mixed with general household waste. |
 |
Hereby, TELTONIKA NETWORKS declares that this TRM200 is in compliance with the essential requirements and other relevant provisions of Directives 2014/53/EU, 2011/65/EU. The full text of the EU Declaration of Conformity is available at the following internet address: https://wiki.teltonika-networks.com/view/TRM200_CE/RED |
 |
Hereby, TELTONIKA NETWORKS declares that this TRM200 is in compliance with Radio Equipment Regulations 2017, The Restriction of the Use of Certain Hazardous Substances in Electrical and Electronic Equipment Regulations 2012. The full text of the UK Declaration of Conformity is available at the following internet address: https://wiki.teltonika-networks.com/view/TRM200_UKCA |
RF Exposure
This device meets the official requirements for exposure to radio waves. This device is designed and manufactured not to exceed the emission limits for exposure to radio frequency (RF) energy set by authorized agencies. The device must be used with a minimum separation of 20 cm from a person’s body to ensure compliance with RF exposure guidelines. Failure to observe these instructions could result in your RF exposure exceeding the applicable limits.
External antennas used with RUTM52 must be installed to provide a distance of at least 20 cm from any people and must not be co-located or operated in conjunction with any other antenna or transmitter.
Any external antenna gain must meet RF exposure and maximum radiated output power limits of the applicable rule section.
| Operating Frequency / Maximum transmission power | ||
|---|---|---|
| GSM | GSM900 | 880-915, 880-915 MHz, 32 dBm |
| GSM1800 | 1710-1785, 1710-1785, 30 dBm | |
| WCDMA | B1 | 1920-1980, 1920-1980 MHz, 26 dBm |
| B8 | 880-915, 880-915 MHz, 24 dBm | |
| LTE-FDD | B1 | 1920-1980, 1920-1980 MHz, 25 dBm |
| B3 | 1710-1785, 1710-1785 MHz, 24 dBm | |
| B7 | 2500-2570, 2500-2570 MHz, 24 dBm | |
| B8 | 880-915, 880-915 MHz, 24 dBm | |
| B20 | 832-862, 832-862 MHz, 25 dBm | |
| B28 | 703-736, 703-736 MHz, 25 dBm | |
| LTE-TDD | B38 | 2570-2620 MHz, 25 dBm |
| B40 | 2300-2400 MHz, 25 dBm | |
Product Safety and Use
Operating conditions
- Operating temperature: -40° to +75° Celsius
- Humidity should be in the range of 10% to 90% (non-condensing). Only use the device in dry environments.
- Out of direct sunlight
- Away from heat source, corrosive substances, salts, and flammable gases
Attention: operation outside the permissible range can considerably shorten the service life of the device.
Faulty and damaged products
- Do not attempt to disassemble the device or its accessories.
- Only qualified personnel must service or repair the device or its accessories.
- If your device or its accessories have been submerged in water punctured or subjected to a severe fall, do not use until they have been checked at an authorized service center.
Electrical safety
- Only use approved accessories.
- Do not connect with incompatible products or accessories.
- It is recommended to ground devices with grounding terminals before connecting them to power. Failure to ground appropriately might result in a shock hazard. The cross-sectional area of the protective grounding conductor should be at least 1mm2.
Product handling
- You alone are responsible for how you use your device and any consequences related to its use.
- Use of your device is subject to safety measures designed to protect users and their environment.
- Always treat your device and its accessories with care and keep it in a clean and dust-free place.
- Do not expose your device or its accessories to open flames or lit tobacco products, liquid, moisture, or high humidity.
- Do not drop, throw or try to bend your device or its accessories.
- Do not use harsh chemicals, cleaning solvents, or aerosols to clean the device or its accessories.
- Do not paint your device or its accessories.
- Do not attempt to disassemble your device (exemptions for devices that require disassembly for SIM insertion) or its accessories: it does not contain any user-serviceable parts. For safety reasons, the equipment should be opened only by qualified personnel.
- Make sure to use ESD personal protective equipment while the equipment is serviced.
- Do not use your device in an enclosed environment where heat dissipation is poor.
- Prolonged use in such space may cause excessive heat and raise ambient temperature, which will lead to the automatic shutdown of your device or the disconnection of the mobile network connection for your safety. To use your device again after such a shutdown, cool it in a well-ventilated place before turning it on.
- Please check all national laws and local regulations for the disposal of electronic products.
- Do not operate the device where ventilation is restricted.
- Do not use or install this product near water to avoid fire or shock hazards.
- Avoid exposing the equipment to rain or damp areas.
- Arrange power and Ethernet cables so that they are not likely to be stepped on or have items placed on them.
- Ensure that the voltage and the rated current of the power source match the device’s requirements. Do not connect the device to an inappropriate power source.
- During a thunderstorm, no operations should be carried out on the device and cables.
- The unit must be powered off where blasting is in progress and explosive atmospheres are present or near medical life support equipment.
- Do not leave your device and its accessories within reach of small children or allow them to play with it. They could hurt themselves or others and could accidentally damage the device. Your device contains small parts with sharp edges that may cause an injury choking hazard.
- Like any wireless device, this device operates using radio signals, which cannot guarantee connection in all conditions. Therefore, you must never rely solely on any wireless device for emergency communications or otherwise use the device in situations where the interruption of data connectivity could lead to death, personal injury, property damage, data, or other loss.
- The device may become warm during regular use.
Quick Start Guide
Front view
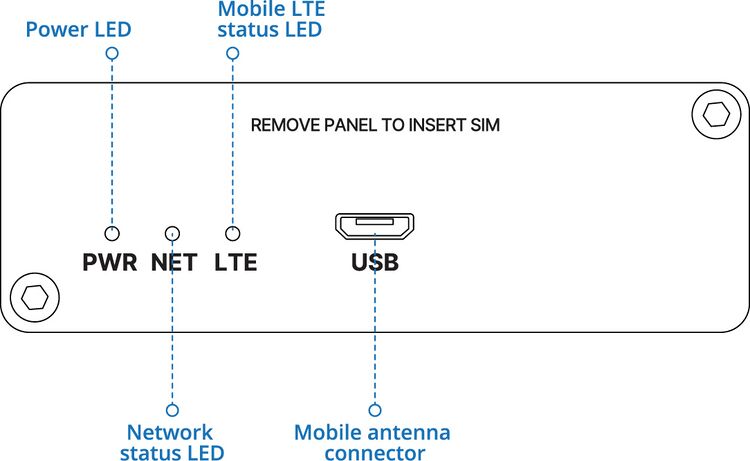
Back view

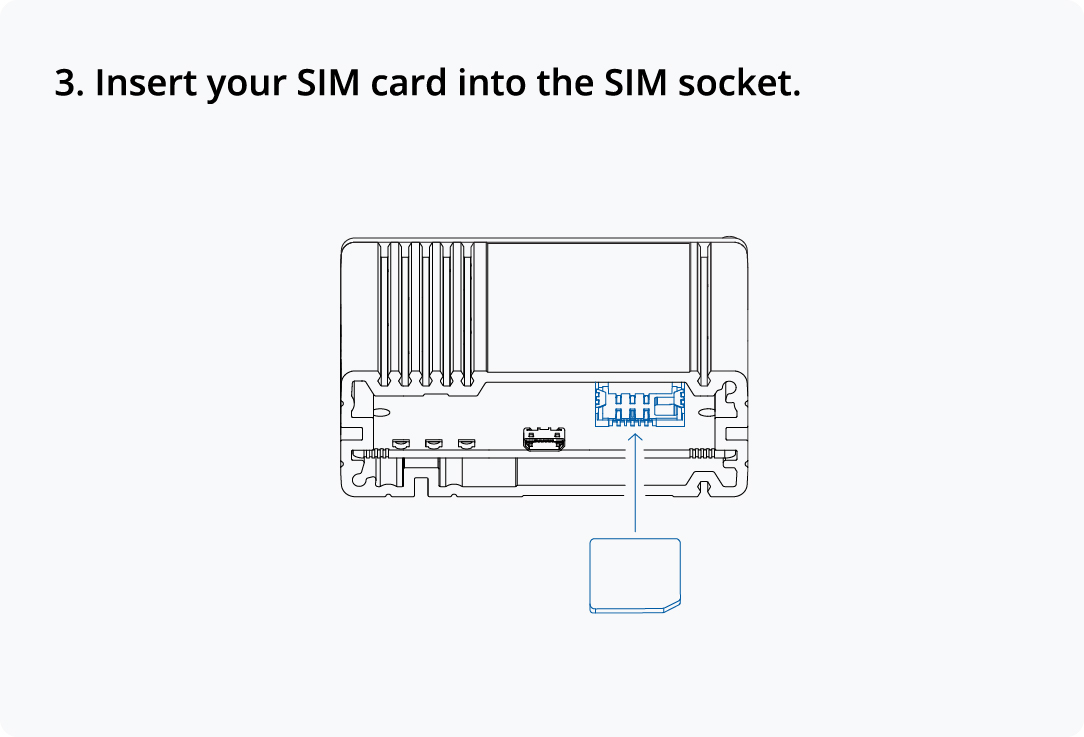
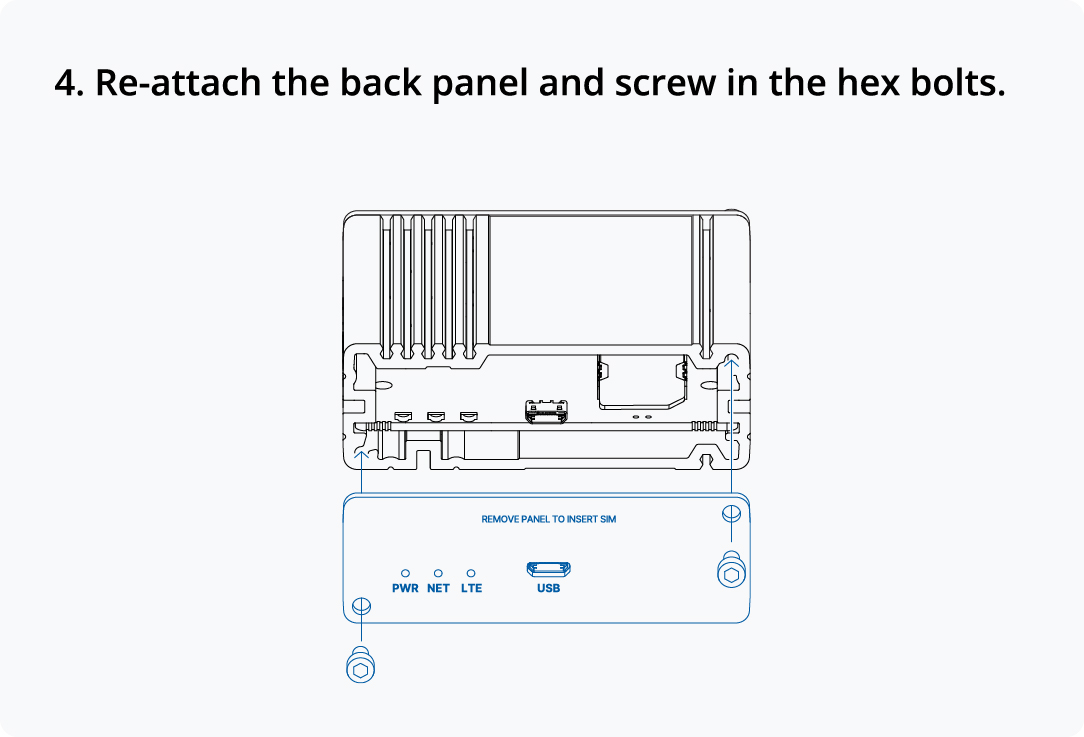
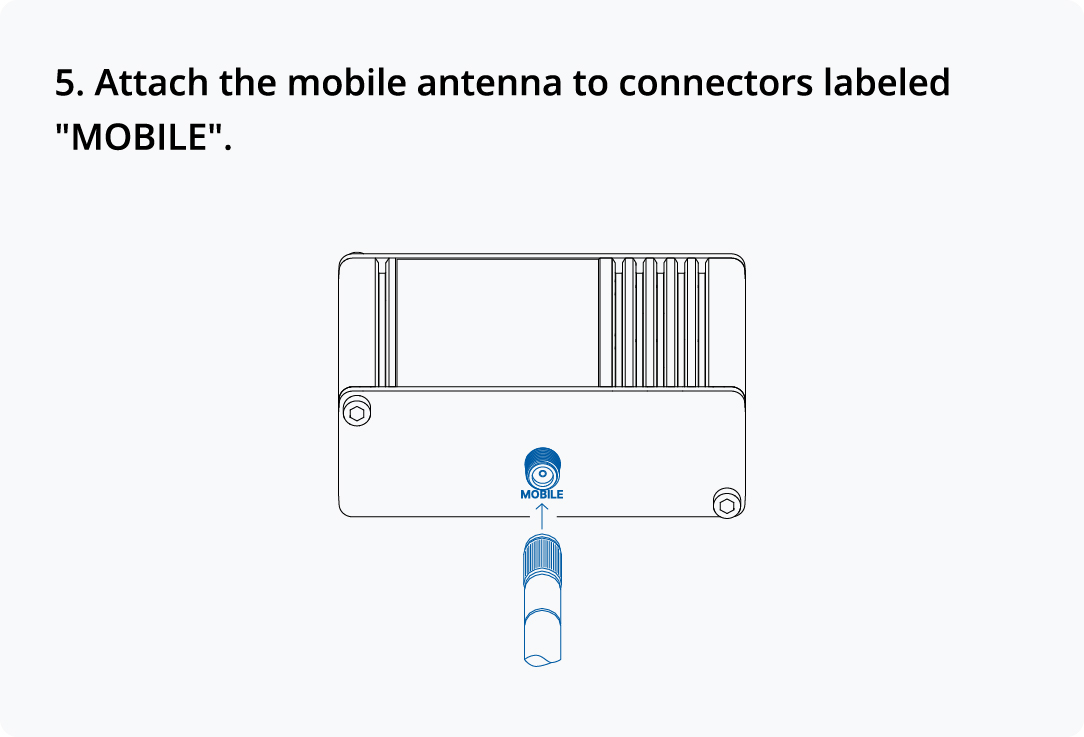
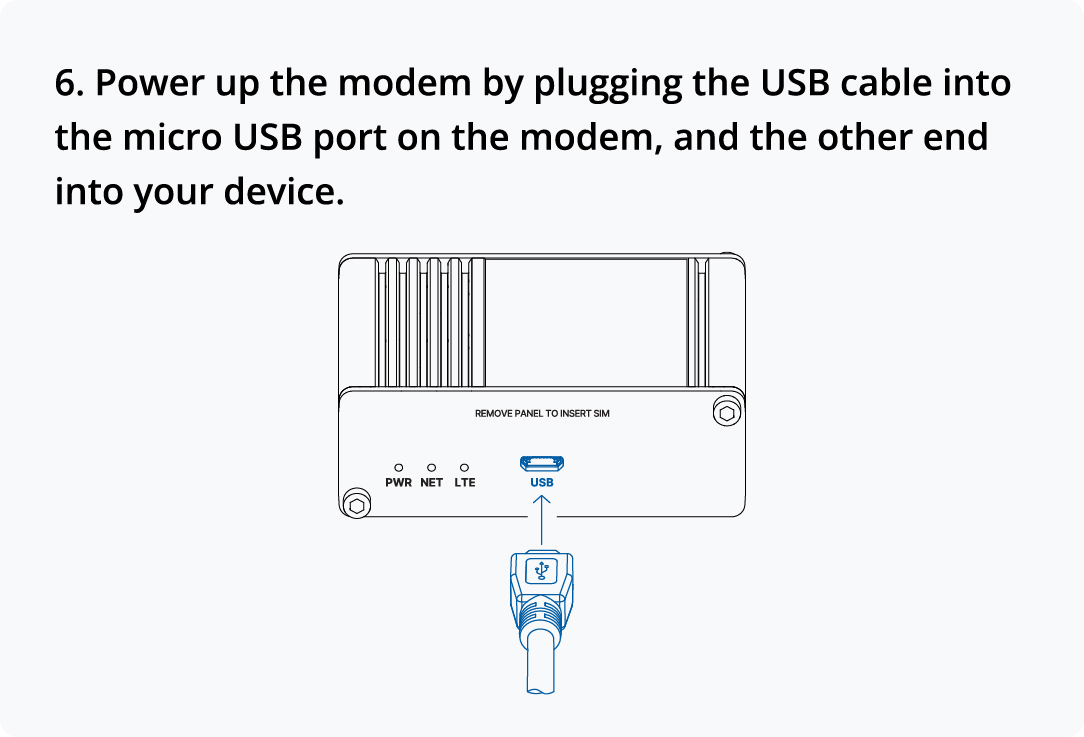
Hardware installation
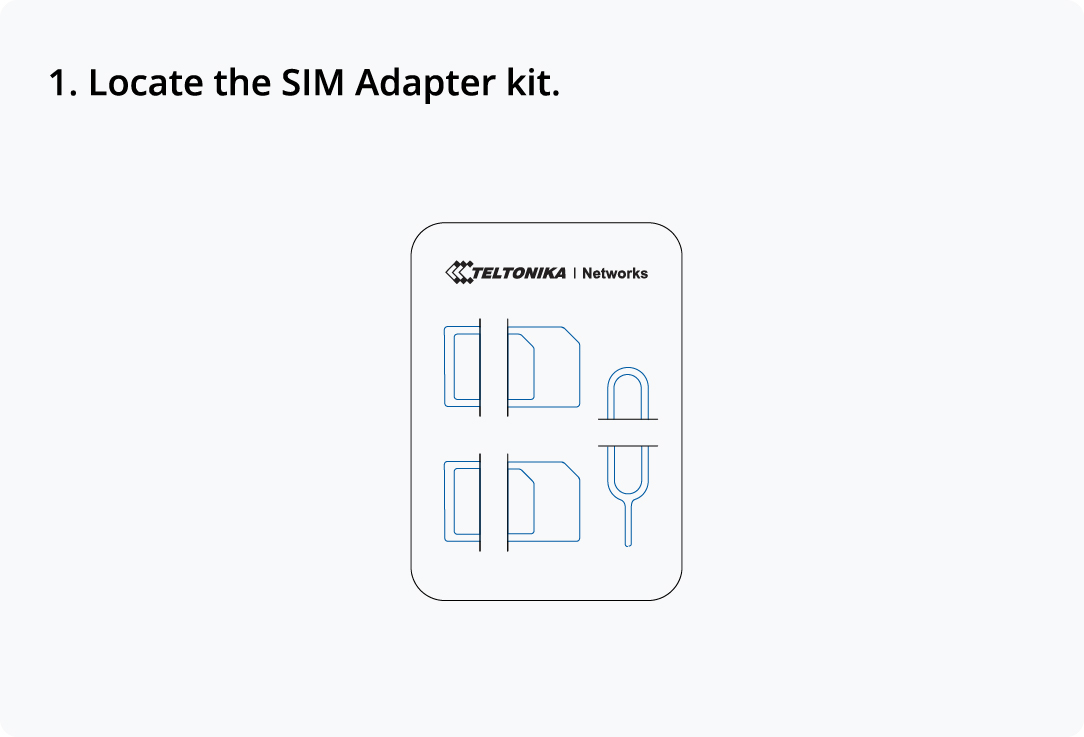 |
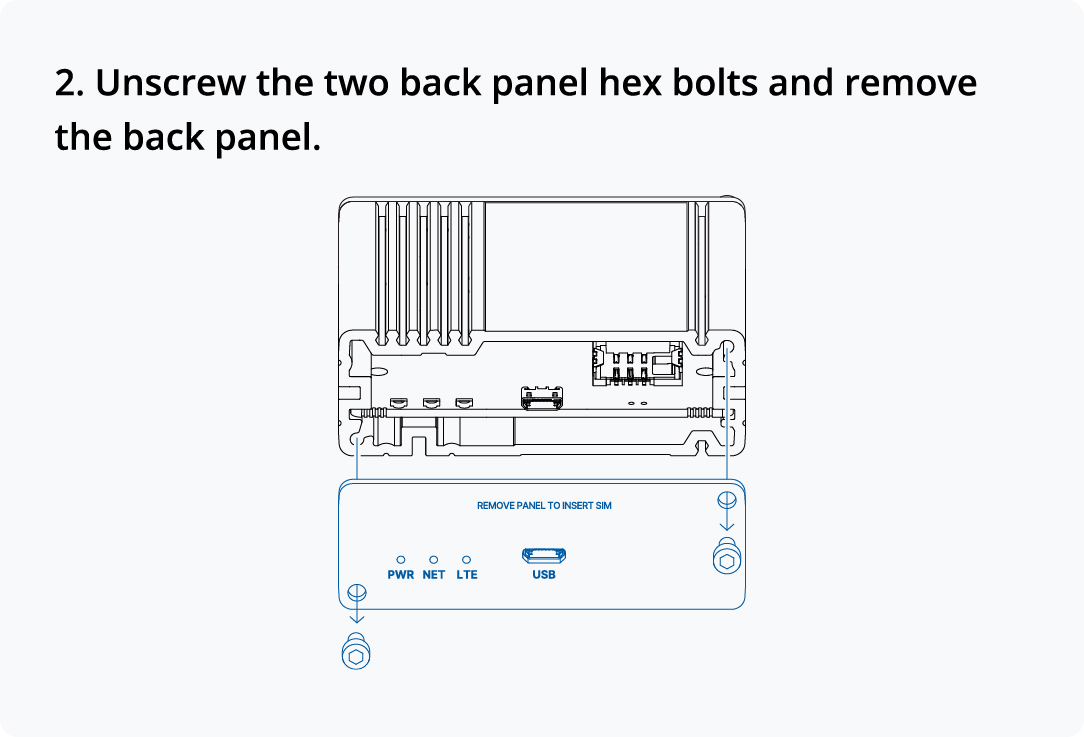 |
 |
 |
 |
 |
Device Setup
Windows
Device Startup
Make sure that you have the below listed driver installed before proceeding further.
Driver link: wiki.teltonika-networks.com/view/TRM200_Downloads
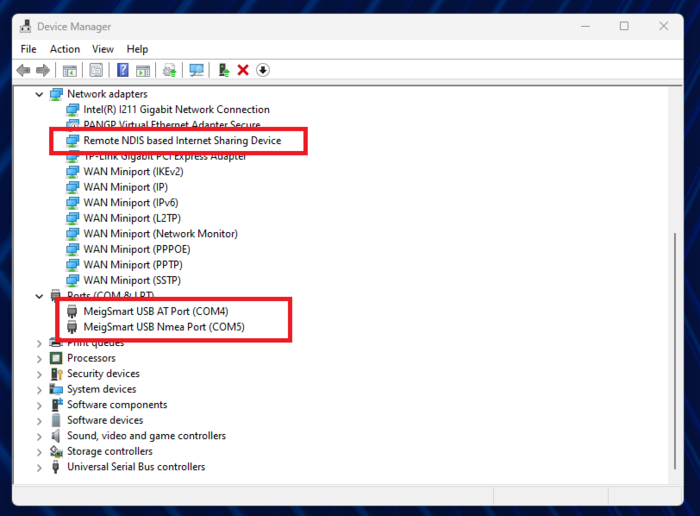
When the device is connected, open Device Manager on the end device and verify that three(the number may differ depending on the end device) USB ports and an RNDIS control device appear under the device list.
Step 1: Accessing the AT Port
1. Identify the AT Port for the modem; in this example, it’s COM4.
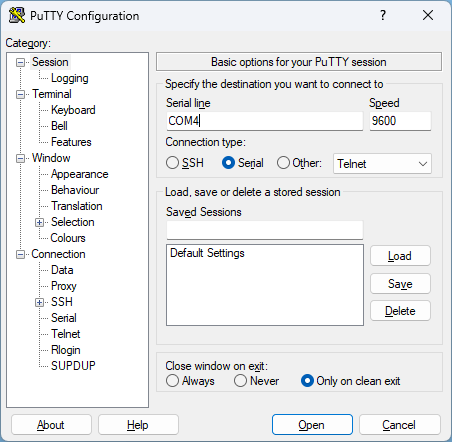
2. Open Putty on your computer to access the AT command interface.
3. In Putty add the following information as shown below:
Step 2: Check and Unlock the SIM Card
1. In the Putty window, send the following AT command to check SIM status:
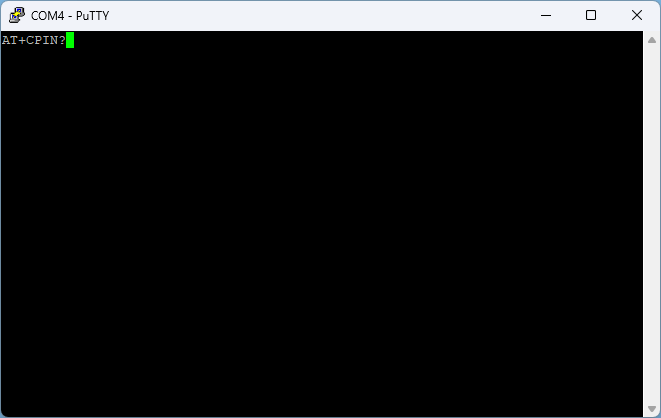 |
- If the response shows: +CPIN: SIM PIN, the SIM card is locked.
- If response shows+CME ERROR: 10 make sure SIM card is correctly inserted and NET led is blinking. If not, powercycle the device.
2. To unlock the SIM, send the command with the PIN code (replace 0000 with the actual PIN)
AT+CPIN=0000
3. Verify that the SIM is unlocked by running the command again:
AT+CPIN?
- The response should display +CPIN: READY.
Step 3: Check and Configure APN
1. Verify the current APN configuration by sending:
AT+CGDCONT?
Response:
 AT+CGDCONT?
 +CGDCONT: 1,"IPV4V6","","",0,0,0,0,0,0
 +CGDCONT: 8,"IPV4V6","IMS","",0,0,0,1,0,1
- Look for an entry with an empty APN, which indicates that configuration is required.
2. Configure the APN for Tele2 with the following command (enter your mobile providers APN):
AT+CGDCONT=1,"IP","internet.tele2.lt"
Response:
+CGDCONT: 1,"IP","internet.tele2.lt","",0,0,0,0,0,0
+CGDCONT: 8,"IPV4V6","IMS","",0,0,0,1,0,1
3. Confirm the new APN is set by running:
AT+CGDCONT?
- The response should now display internet.tele2.lt as the APN.
Step 4: Restart the Module
1. Restart the module with the following commands:
AT+CFUN=4
- Wait for the module to shut down.
AT+CFUN=1
2. Verify the module has restarted by observing status messages in Putty.
Step 5: Verify Connection to Operator
1. Check if the modem has connected to the operator by running this command:
AT+COPS?
- The response should show the operator’s code (e.g., 24603 for Tele2).
Step 6: Verify Connection to Operator
Make sure your current Internet connection is disabled (Ethernet or Wi-Fi).
1. Open Command Prompt on your computer.
2. Run a ping test to verify connectivity:
ping google.com
- Successful replies indicate the internet connection is active.
The setup for TRM200 is now complete, and the device should be connected to the internet through the configured APN.
Linux
GUI Guide
Step 1: Connect the Device
Start by plugging the USB cable into the TRM200 and then into a USB port on the end device. Once connected, the system will detect the USB device, and you can verify this using the dmesg command. The output should look similar to the following:
[30920.977007] usb 3-1: new high-speed USB device number 21 using xhci_hcd
[30921.103326] usb 3-1: New USB device found, idVendor=2dee, idProduct=4d57, bcdDevice= 1.00
[30921.103331] usb 3-1: New USB device strings: Mfr=1, Product=2, SerialNumber=3
[30921.103332] usb 3-1: Product: Mobile Composite Device Bus
[30921.103333] usb 3-1: Manufacturer: Marvell
[30921.103334] usb 3-1: SerialNumber: XXXXXXXXXXXXXXX
[30921.113133] rndis_host 3-1:1.0 usb0: register 'rndis\_host' at usb-0000:00:14.0-1, RNDIS device, XX:XX:XX:XX:XX:XX
[30921.136291] rndis_host 3-1:1.0 enx0e1083300cc0: renamed from usb0
Step 2: Enable USB Ports
By default, the USB ports of the TRM200 are not enabled. To configure the device (e.g., SIM unlock, APN change), you must manually associate the USB device with the usbserial driver. This requires the following steps:
a. Identify the idVendor and idProduct values from the dmesg output. In this example, the values are idVendor=2dee and idProduct=4d57. b. Inform the Linux kernel to associate the device with the option driver. Run the following command, replacing <VENDOR_ID> and <PRODUCT_ID> with the actual values:
echo <VENDOR_ID> <PRODUCT_ID> | sudo tee /sys/bus/usb-serial/drivers/option1/new_id
If the path /sys/bus/usb-serial/drivers/option1/new_id is not available, follow these additional steps:
- Unplug the USB cable from the end device.
- Execute sudo modprobe option to load the option driver.
- Run the echo command again and then reconnect the USB cable.
Step 3: Verify USB Ports
After executing the command, the USB ports should be visible in the dmesg output. For example:
[94749.055742] option 3-1:1.2: GSM modem (1-port) converter detected
[94749.055805] usb 3-1: GSM modem (1-port) converter now attached to  ttyUSB0
[94749.055920] option 3-1:1.3: GSM modem (1-port) converter detected
[94749.055982] usb 3-1: GSM modem (1-port) converter now attached to ttyUSB1
[94749.056550] option 3-1:1.4: GSM modem (1-port) converter detected
[94749.056621] usb 3-1: GSM modem (1-port) converter now attached to ttyUSB2
[94749.056797] option 3-1:1.5: GSM modem (1-port) converter detected
[94749.056952] usb 3-1: GSM modem (1-port) converter now attached to ttyUSB3
Once the ports are enabled and detected, the TRM200 is ready for configuration.
Step 4: Access Mobile Network Settings
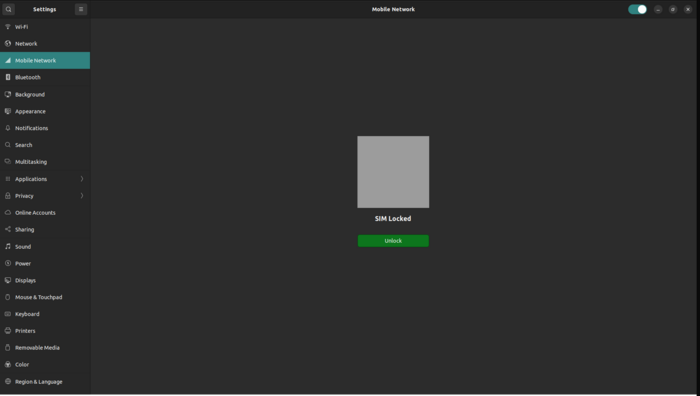
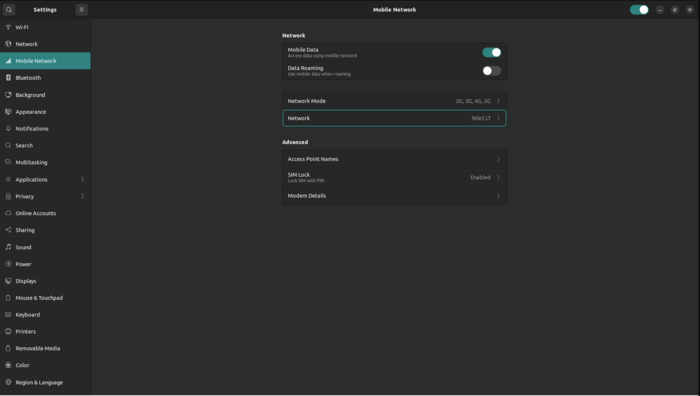
After preparing the TRM200, navigate to the device settings. You should see a Mobile Network tab, which is dedicated to controlling the module. Picture. If the SIM card is locked with a PIN code, you will be prompted to unlock it. The interface will display a window for entering the PIN.
 |
Step 5: Adjust Network Settings
Once the SIM is unlocked, additional settings will become available. These include:
- Roaming Settings: Enable or disable roaming.
- Mobile Data Accessibility: Configure data usage preferences.
- Network Mode and Selection: Choose the preferred network mode (e.g., LTE, 3G) and network operator.
- APN Settings: Define or modify access point settings based on your SIM provider.
- Modem Details: View detailed information about the modem.
 |
Step 6: Configure the Access Point Name (APN)
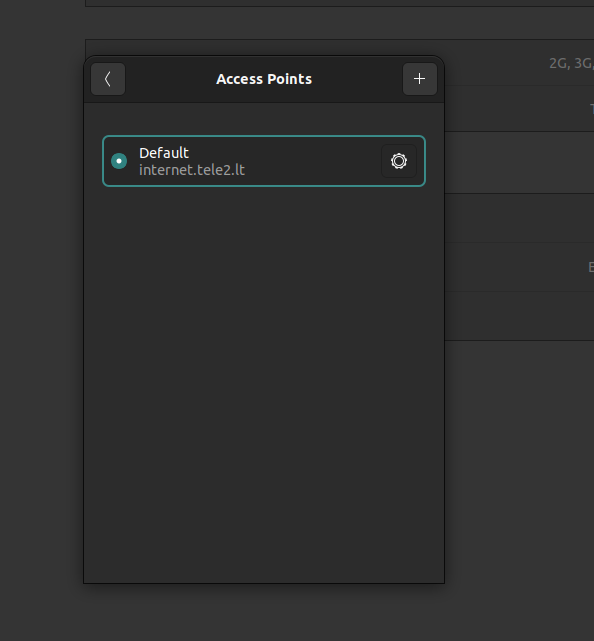
To establish a data connection, ensure the correct APN is configured. It can be configured in Access Point Names page. By default, the APN should be automatically selected by the SIM card. If the default APN is incorrect, navigate to the Access Point Names page. Edit the configuration with the APN details provided by your SIM card provider. Once configured, select the updated APN as the active profile.
 |
When all settings are applied, you can verify connection status by sending PING to some server to verify connection:
kutaviciusti@kutaviciusti:~$ ping google.com
PING google.com (142.250.74.142) 56(84) bytes of data.
64 bytes from arn11s11-in-f14.1e100.net (142.250.74.142): icmp_seq=1 ttl=107 time=58.3 ms
64 bytes from arn11s11-in-f14.1e100.net (142.250.74.142): icmp_seq=2 ttl=107 time=58.2 ms
64 bytes from arn11s11-in-f14.1e100.net (142.250.74.142): icmp_seq=3 ttl=107 time=60.1 ms
64 bytes from arn11s11-in-f14.1e100.net (142.250.74.142): icmp_seq=4 ttl=107 time=59.0 ms
^C
--- google.com ping statistics ---
4 packets transmitted, 4 received, 0% packet loss, time 3001ms
rtt min/avg/max/mdev = 58.173/58.884/60.067/0.761 ms
CLI Guide
The modem can also be configured directly using the USB port. This method requires a terminal application, such as microcom or minicom, to establish communication with the modem over a serial connection.
In this example, microcom will be used:
1. Identify the appropriate USB port for the modem. For this setup, use /dev/ttyUSB1.
2. Open a terminal and use the following command to connect:
sudo microcom -p /dev/ttyUSB1
3. Once connected, the modem can be managed using AT commands. These commands allow you to configure settings such as network preferences, APN, and other advanced options.
Step 1: Check and Unlock the SIM Card
1. In the Command window, send the following AT command to check SIM status:
AT+CPIN?
- If the response shows: +CPIN: SIM PIN, the SIM card is locked.
- If response shows+CME ERROR: 10 make sure SIM card is correctly inserted and NET led is blinking. If not, powercycle the device.
2. To unlock the SIM, send the command with the PIN code (replace 0000 with the actual PIN)
AT+CPIN=0000
3. Verify that the SIM is unlocked by running the command again:
AT+CPIN?
- The response should display +CPIN: READY.
Step 2: Check and Configure APN
1. Verify the current APN configuration by sending:
AT+CGDCONT?
Response:
 AT+CGDCONT?
 +CGDCONT: 1,"IPV4V6","","",0,0,0,0,0,0
 +CGDCONT: 8,"IPV4V6","IMS","",0,0,0,1,0,1
- Look for an entry with an empty APN, which indicates that configuration is required.
2. Configure the APN for Tele2 with the following command (enter your mobile providers APN):
AT+CGDCONT=1,"IP","internet.tele2.lt"
Response:
+CGDCONT: 1,"IP","internet.tele2.lt","",0,0,0,0,0,0
+CGDCONT: 8,"IPV4V6","IMS","",0,0,0,1,0,1
3. Confirm the new APN is set by running:
AT+CGDCONT?
- The response should now display internet.tele2.lt as the APN.
Step 4: Restart the Module
1. Restart the module with the following commands:
AT+CFUN=4
- Wait for the module to shut down.
AT+CFUN=1
2. Verify the module has restarted by observing status messages in Putty.
Step 5: Verify Connection to Operator
1. Check if the modem has connected to the operator by running this command:
AT+COPS?
- The response should show the operator’s code (e.g., 24603 for Tele2).
Then you can close application and verify connection with same way as before.
SIM card recommendations
- Before installing the SIM cards, please apply a thin layer of dielectric grease to the SIM card contacts for devices used in environments with high-vibration levels. This will help avoid SIM cards losing touch with the SIM slot and prevent unexpected failures.
- Industrial Grade SIM cards are recommended for devices requiring a long lifespan used in environments with extreme temperatures, corrosive or extra humid climates, or hard-to-reach locations.
