RMS Tags
Summary
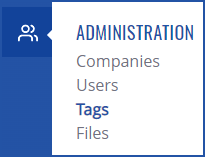
The Tags can be found under the Administration section in the left sidebar and is used to create Tags that can later have devices assigned to them. And users can utilize functionality for various management purposes. Like device filtering by building, location, floor etc. This section of the RMS user manual provides an overview of the Tags section.
View Tags
To manage all created tags go to the RMS web page, Left sidebar panel, (Administration → Tags), this will take you to the Tags overview.
An example of different Tags created for demonstration purposes.
You are able to:
- Create new tags or remove selected tag(s).
- Search by name, description and filter by company.
- Do such actions as: view tagged devices metrics, edit tag, delete tag or view Action tag logs.
- Change table settings and refresh all the data.
Add new Tag
Create new Tag
The Create new tag function is used to add new tags to your RMS company.
 To create a new tag go to the RMS web page, Left sidebar panel, (Administration → Tags) and click on Actions button and select + Create tag (Actions → + Create tag). This will open a create tag window:
In create tag window:
- Specify the company that will be the owner of the tag.
- Specify the name of the tag.
- Provide the description for the tag (optional).
- Choose a color for the tag.
- If you're creating an Action tag, add new actions here.
- At the top of your screen you will get a notification: Tag created successfully.
- The newly created tag will be visible in the Tags table.
Create Action tag
Action tag is tag with user selected actions inside it. This tag can be assigned on to devices, that RMS will execute on the specified order on online devices, or the action will be added to task queue and will be pending, until the device will become online on RMS.
 Here, the user can:
- Drag an action to change the order of execution or remove the action.
- Select an action type, the user can choose from:
- Upload firmware file and choose firmware file from your RMS company's Files list.
- Upload backup file and choose backup configuration file from your RMS company's Files list.
- Execute task manager group and choose a Task manager group.
- Apply device configuration and choose configuration template that was saved in Device configuration.
- Choose the file that is associated with the task.
- User can select up to 4 actions and all action types must be unique.
Once created it can be identified by capital "A" near the tag name specifying that it is an Action tag: ![]()
View action tag logs
In the Tags page, in Actions column, by selecting on "page" icon an action tag logs window will be opened:

 In this window, you will be able to:
- Filter by action status.
- Filter by action type.
- Filter by device.
- View detailed information about the action.
Assign tags to device list
To add tags to your device(s) list, see Manage tag(s).
Move your mouse pointer to the Top control Devices menu and select Assign tags to device list (Devices → Assign tags to device list).
To assign tags to devices from the file, see Assign tags from file.
Manage tag(s)
To manage tag(s) for your device(s) in RMS, go to the RMS web page, Left sidebar panel, (Management → Devices), select desired devices and click on Device submenu. There you'll have an option to Manage tag(s).


