SSHFS
Introduction
In computing, SSHFS (SSH Filesystem) is a filesystem client to mount and interact with directories and files located on a remote server or workstation over a normal SSH connection. The client interacts with the remote file system via the SSH File Transfer Protocol (SFTP), a network protocol providing file access, file transfer, and file management functionality over any reliable data stream that was designed as an extension of the Secure Shell protocol (SSH) version 2.0.
Note: For Teltonika devices, SSHFS can be installed from the System → Package Manager as an additional package.
Configuration overview and prerequisites
Before we begin, let's overview the configuration that we are attempting to achieve and the prerequisites that make it possible.
Prerequisites:
- Any Rut or TRB device.
- Ubuntu VM to host OpenSSH server.
- VirtualBox or VMware to install the Ubuntu VM
We will be testing this feature over local network 192.168.0.0/24. For you, if you want to test it over WAN, your SSH Server machine needs to be accessible via Public IP or Hostname over the WAN network.
Configuration Scheme

In the picture, configuration scheme of this example has been displayed. RUT device is connected to the Ubuntu VM machine locally.
Ubuntu VM Installation and Configuration
As mentioned above, VM of Ubuntu Linux is required to host the OpenSSH server. OpenSSH server will allow the Teltonika router to access Ubuntu machine’s filesystem over SSH connection.
1. Get the Ubuntu Linux OS Desktop image from here
2. Install the image in the virtual box application. Make sure that Ubuntu machine is perfectly running and put the machine in the same network as that of the router. For this, go to network settings option of the virtual machine and select Bridged Adapter and select the same adapter to which your Teltonika router is connected.
3. To verify your VM network, go to Settings-> Network option on the Ubuntu VM.
Here you can see that VM machine is in network of 192.168.0.0/24, which is same as the LAN network of the router. If VM doesn’t show router network range IP, try to turn OFF the adapter on the same settings option as above picture and then turn it ON again.
4. Next, we need to install OpenSSH package in the Ubuntu machine. Open the terminal and issue the following commands:
sudo apt update
sudo apt-get install openssh-server
Now, enable the SSH service, and start it.
sudo systemctl enable ssh
sudo systemctl start ssh
Check the status of the SSH service with below command:
sudo systemctl status ssh
Result of the above command should be like this:

Active (running) indicates that SSH service is fully functional and running on the machine.
5. Further, we need to allow SSH connection on ufw. Configure firewall and open port 22 with following commands:
sudo ufw allow ssh
Enable SSH with below command
sudo ufw enable
Lastly, check the firewall status to see if rules have been configured or not:
sudo ufw status
Result of the above command should be like this:

Above screenshot shows that two ufw rules for port 22 are active.
Configuring Router
Once Ubuntu machine is configured as above. Now, router will be configured to use SSHFS service. Make sure that router has internet connectivity because user need to download the SSHFS package over the internet. If the SSHFS package is already installed in the router, then there is no need for internet connectivity unless you are testing your setup over WAN network.
1. Go to System → Package manager, install SSHFS package.

2. Go to System → Administration → Storage Memory Expansion → SSHFS section page:
- Enable the SSHFS
- IP address of Ubuntu Linux Machine, which has OpenSSH server running on it, in this case, it is 192.168.0.56
- Port number of the Ubuntu machine via which it will be connected, in this case, it is 22
- Username of Ubuntu machine
- Password of Ubuntu machine
- A folder in device. Mount points must reside in the root / folder
- A remote mount path that will be mounted

After applying above configurations on the router, click on Save & Apply button.
Testing
After the configuration part is completed, now it’s the time to test the setup and see if it is working as intended or not. You can test it on your router to see if the filesystem has been successfully mounted or not.
- Go to router’s CLI and change directory to /sshmount and list the contents of the directory. You will see that Ubuntu machine’s directory /home/aves contents can be found there.
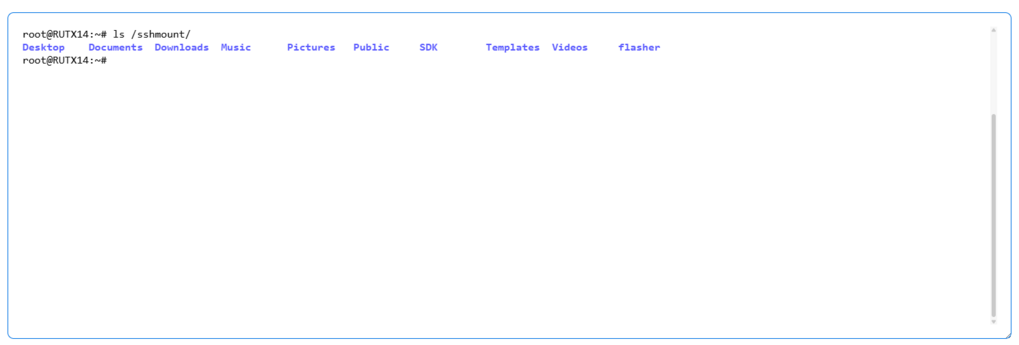

Here you can read, write, and modify the files over SSH. Every time, when user makes any changes in the filesystem through router, they will automatically get reflected on the Ubuntu machine.