TSW202 Administration
The information in this page is updated in accordance with firmware version TSW2_R_01.08.
Summary
This page is an overview of the Administration section of TSW202 devices.
General
The General section is used to set up some of device managerial parameters, such as changing device name. For more information on the General section, refer to figure and table below.

| Field | Value | Description |
|---|---|---|
| General settings | ||
| Language | English | Spanish | Japanese | Portuguese | Turkish | German; default: English | Currently active language of Web interface. |
| Data analytics | off | on; default: off | Enables the collection of data, which is used to improve the quality and user experience of our products. It includes sending information about the device and the usage of the Web interface. The data is collected in compliance with the Privacy policy. |
| Device name and hostname | ||
| Device name | string; default: TSW202 | Device model name. |
| Hostname | string; default: Teltonika-TSW202.com | Device hostname. This can be used for communication with other LAN hosts. |
| Reset Button Configuration | ||
| Action | The type of action when the reset button is triggered. | |
| Min time | integer [0..60]; default: none | Minimum time (in seconds) the button needs to be held to perform an action. |
| Max time | integer [1..60]; default: none | Maximum time (in seconds) the button can be held to perform an action, after which no action will be performed. |
| Enable | off | on; default: on | Enables the action. |
Date & Time
Summary
Network Time Protocol (NTP) is a networking protocol for clock synchronization between computer systems over packet-switched, variable-latency data networks. This chapter is an overview of the NTP section for TSW202 devices.
General
The Time Synchronization section lets you select time zone and synchronize the time.
The figure below is an example of the Time Synchronization section and the table below provides information about the fields contained in that section:

| Field | Value | Description |
|---|---|---|
| Current system time | time; default: none | Current local time of the device. |
| Sync with browser | -(interactive button) | Click to synchronize device time and time zone to browsers, if your device time or time zone is not correct. |
| Time zone | time zone; default: UTC | The device will sync time in accordance with the selected time zone. |
NTP
This section is used to configure NTP client and time servers.
Time Synchronization
This section is used to configure the device's time settings.

| Field | Value | Description |
|---|---|---|
| Enable NTP Client | off | on; default: on | Turns NTP on or off. |
| Save time to flash | off | on; default: off | Saves last synchronized time to flash memory. |
| Force Servers | off | on; default: off | Forces unreliable NTP servers. |
| Update interval (in seconds) | integer; default: 86400 | How often the device will update the time. |
| Offset frequency | integer; default: 0 | Adjusts the minor drift of the clock so that it will run more accurately. |
| Count of time synchronizations | integer; default: none | The amount of times the device will perform time synchronizations. Leave empty in order to set to infinite. |
Time Servers
This section is used to specify which time servers the device will use for time synchronization. To add more time servers to the list, click the 'Add' button.

| Field | Value | Description |
|---|---|---|
| Hostname | ip | url; default: 0.openwrt.pool.ntp.org | NTP servers that this device uses to sync time. |
| Delete button | -(interactive) button | Deletes hostname. |
User Settings
Change Password
The User settings section is used to change the password of the current user.

System Users
Summary
The System Users page is used to add new user accounts that can access the device with different user credentials than the default ones. The newly added users can be assigned to one of two groups, either of which can be modified to limit WebUI read/write access rights for users belonging to each specific group.
This page is unrelated to SSH users. By default, there is one SSH user named "root" and it shares the same password as the default WebUI user named "admin".
This manual page provides an overview of the Users page in TSW202 devices.
Groups
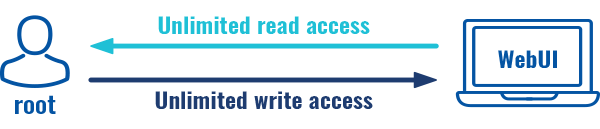
The Groups section lists available user groups of which there are three:

- root - highest level of authority. Key elements that define this group:
- has unlimited read/write access;
- additional users cannot be added to this group;
- access rights for this group cannot be modified.
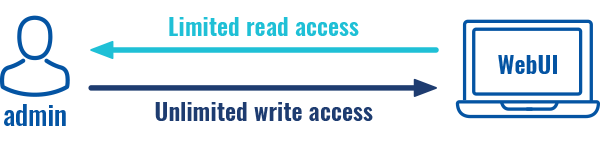
- admin - second highest level of authority. Key elements that define this group:
- limited read access; by default, users belonging to this group cannot view these pages:
- System → Administration → Users Settings → System Users
- System → Maintenance → Backup
- System → Firmware
- System → Maintenance → CLI
- limited write access; by default, users belonging to this group cannot view these pages:
- System → Administration → Users Settings → System Users
- System → Maintenance → Backup
- System → Firmware
- System → Maintenance → CLI
- System → Administration → Access Control → General
- access rights can be modified.
- limited read access; by default, users belonging to this group cannot view these pages:
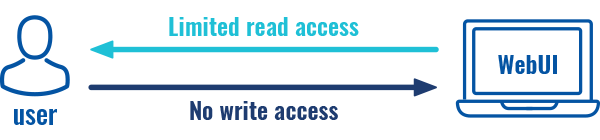
- user - lowest level of authority. Key elements that define this group:
- no write access;
- limited read access; by default, users belonging to this group cannot view these pages:
- System → Administration → Users Settings → System Users;
- System → Firmware
- System → Maintenance → Backup
- System → Administration → Access Control
- System → Maintenance → Troubleshoot
- Network
- access rights can be modified.


Additional note: you can view and/or edit settings for each group by clicking the 'Edit' button next to them. More on information on how to edit group access settings is located in the following section of this manual page.
Group Settings (edit group)
A group's parameters can be set in its Group Settings page. To access the Groups Settings page, click the 'Edit' button next to the group's name. Below is an example of the Group Settings section:

| Field | Value | Description |
|---|---|---|
| Write action | Allow | Deny; default: Allow | Specifies whether to deny or allow write access for users belonging the group. |
| Write access | path(s) to page(s); default: in the picture above | Controls the ability of users to change and execute the contents (e.g. admin/network/lan). |
| Read action | Allow | Deny; default: Deny | Specifies whether to deny or allow read access for users belonging the group. |
| Read access | path(s) to page(s); default: in the picture above | Controls the ability of users to navigate the contents (e.g. admin/network/*) |
Examples
The easiest way to master the syntax is to navigate to page that you want to generate a path for and the copy the path from the URL of that page.
For example, to specify the path to the Network → Mobile page, navigate to the page, copy the page's URL address starting from the symbol "#" and paste it into one of the access fields:

However, the VPN window contains links to many different types of VPN pages. If you want to specify only one of them, you can do it as well. For example, to to specify the path to the IPsec page, add "/ipsec" to the path string:
services/vpn/ipsec
An asterisk (*) in the path string means that the every page from that point on is included in that path. For example, to generate a path that includes pages in the Services menu tab:
services/*
Or to simply include everything in the entire WebUI (if this path is combined with Read action: Deny, users from that group will not be able to login to the WebUI):
*
Users
The Users section lists all created users and provides the possibility to change their passwords and the group they belong to (with the exception of the default user "admin" which always belongs to the root group).
By default, there is only one user called "admin":

User Settings (edit user)
Each user's password and group parameters can be set in their User Settings pages. To access the User Settings page, click the 'Edit' button next to the user's name.
However, you may want to add a new user at first. This can be done from the Add New User section below:

- create a username;
- create a password for the user (must contain at least 8 characters, including at least one upper case letter and one digit);
- click the 'Add' button;
- click the 'Edit' next to newly added user.
Below is an example of a newly added user's settings page:

| Field | Value | Description |
|---|---|---|
| Username | string; default: none | Displays the user's name. |
| New password | string; default: none | |
| Confirm new password | string; default: none | Repeat the new password. |
| Group | admin | user; default: user | The group to which the user belongs. |
| Enable SSH access | off | on; default: off | Enables SSH access (only for 'root' users). |
Add New User
The Add New User section is used to create additional users that can access the WebUI. After a new user is added, it will appear in the Users section.

| Field | Value | Description |
|---|---|---|
| Username | string; default: none | A custom name for the new user. |
| Password | string; default: none | |
| Group | admin | user; default: user | The group to which the user belongs. |
Access Control
General
The Access Control page is used to manage local access to device.

Important: turning on remote access leaves your device vulnerable to external attackers. Make sure you use a strong password.
SSH

| Field | Value | Description |
|---|---|---|
| PAM | Disabled | Enabled; default: Disabled | You can change PAM configuration . |
| Enable SSH access | off | on; default: on | Turns SSH access from the local network (LAN) on or off. |
| Port | integer [0..65535]; default: 22 | Selects which port to use for SSH access. |
| Authentication type | Password | Key-based only | Use both; default: Password |
|
| Public keys | -(input field) | Public keys for ssh key-based authentication. Each individual key must be specified on a new line. |
HTTP

| Field | Value | Description |
|---|---|---|
| PAM | Disabled | Enabled; default: Disabled | You can change PAM configuration here. |
| Enable HTTP access | off | on; default: on | Turns HTTP access from the local network (LAN) to the device WebUI on or off. |
| HTTP Port | integer [0..65535]; default: 80 | Selects which port to use for HTTP access. |
HTTPS

| Field | Value | Description |
|---|---|---|
| PAM | Disabled | Enabled; default: Disabled | You can change PAM configuration here. |
| Enable HTTPS access | off | on; default: on | Turns HTTPS access from the local network (LAN) to the device WebUI on or off. |
| Redirect to HTTPS | off | on; default: off | Redirects connection attempts from HTTP to HTTPS. |
| HTTPS Port | integer [0..65535]; default: 443 | Selects which port to use for HTTPS access. |
| Certificate file | -(interactive button) | Download certificate file from device. Used for browsers to reach HTTPS connection. |
CLI

| Field | Value | Description |
|---|---|---|
| Enable CLI | off | on; default: on | Turns CLI access from the local network (LAN) on or off. |
| Port range | range of integers [0..65534]-[1..65535]; default: 4200-4220 | Selects which ports to use for CLI access. |
| Shell limit | integer [1..10]; default: 5 | Maximum number of active CLI connections. |
PAM

Modify PAM Auth

| Field | Value | Description |
|---|---|---|
| Enable | off | on; default: on | Turns the PAM auth on or off. |
| Module | TACACS+ | Radius | Local; default: Local | Specifies the PAM module that implements the service. |
| Type | Required | Requisite | Sufficient | Optional; default: Optional | Determines the continuation or failure behavior for the module |
| WebUI PAM auth option: Enable for all users | off | on; default: off | Turn on PAM authentication for all users. It will allow login with users that are not created on the device. |
| WebUI PAM auth option: Select users | -(list) | Select users for PAM authentication. |
| Radius: Enable for all users | off | on; default: off | Turn on PAM authentication for all users. It will allow login with users that are not created on the device. |
| Radius: Require Message-Authenticator | off | on; default: on | Require and validate Message-Authenticator RADIUS attribute on Access-Request replies. |
| TACACS+/Radius: Server | ip4 | ip6; default: none | The IP address of the RADIUS server |
| TACACS+/Radius: Secret | string; default: none | RADIUS shared secret |
| TACACS+/Radius: Port | integer [0..65535]; default: 49/1812 | RADIUS server authentication port |
| Radius: Timeout | integer [3..10]; default: 3 | Timeout in seconds waiting for RADIUS server reply. |
Security
The Security tab provides the possibility to enable/disable blocking IP's service and delete blocked devices from the list.
Login Attempts

| Field | Value | Description |
|---|---|---|
| Source | IP address | Shows the IP address from which the connection failed. |
| Destination | IP address | Shows yours device IP adress |
| Port (protocol) | Port number | Shows the port number from which the connection failed. |
| Status | Attempt count | Blocked | Shows the number of failed attempts to connect to device. Indicates whether the source address is blocked or not. |
| Reset | Check box | Allows you to select multiple IP addresses. |
| Actions | -(interactive button) | Allows you to select multiple IP addresses. |
| Unblock all | -(interactive button) | Deletes instance. |
| Unblock selected | -(interactive button) | Unblocks selected source adresses from the list. |
IP Block Settings
IP Block Settings can be found by pressing 'Settings' button under security tab:


| Field | Value | Description |
|---|---|---|
| Enable | off | on; default: on | Enable or disable blocking IP's if they have reached the set amount of failed times. |
| Type | Timed blocking | Permanent blocking; default: Timed blocking | You can choose an option of a blocking type. |
| Fail count | integer [1..1000]; default: 10 | An amount of times IP address can try to access SSH or WebUI before being blocked. |
| Clean after reboot | off | on; default: off | If enabled, blocked loging attempts list will be cleared on device reboot. |
Profiles
Summary
Configuration profiles provide a way to create multiple distinct device configuration sets and apply them to the device based on current user requirements. This chapter is an overview of the Profiles page in TSW202 devices.
Configuration Profiles
This section displays user defined configuration profiles:

To create a new profile, configure the device in accordance with your needs, go to this page, enter a custom name for the profile and click the 'Add' button. You can also choose to create a profile without any previous configurations. A new profile with the given name will appear in the "configuration profiles" list:

The 'Apply' button applies the adjacent configuration on the device.
Scheduler
The Profile Scheduler provides a possibility to set up a schedule of when the device should use one profile configuration or another.
Check Profile Scheduler Instance Example to get a better understanding at how Profile Scheduler Instances works.
General Configuration
The General Configuration section is used to enable the Scheduler itself. Created instances won't work unless this option is turned on.

Profile Scheduler Instances
The Profile Scheduler Instances section allows you to create profile Instances to be enabled during specific time intervals. To add a new Instance click Add button.
Note: new Instance can only be created if there is at least one custom profile created.

Profile Scheduler Instance Configuration
This page is used to configure profile, time and day of selected scheduler instance. Refer to the figure and table below for information on the Profile Scheduler Instance Configuration fields:

| Field | Value | Description |
|---|---|---|
| Enable | off | on; default: off | Enable selected instance for scheduler. |
| Profile | profiles; default: none | Select profile which will be applied during specified time interval. |
| Interval Type | Weekdays | Month Days; default: Weekdays | Depending on your needs select whether you want to configure weekdays or specific month days. |
| Start Time | time; default: 12:00 | Enter time of the start of interval in which scheduler will switch profiles. |
| End Time | time; default: 12:00 | Enter time of the end of interval in which scheduler will switch profiles back. |
| Interval Type: Weekdays | ||
| Start Day | Weekday [Monday..Sunday]; default: Sunday | Select a day of the start of interval in which scheduler will switch profiles. |
| End Day | Weekday [Monday..Sunday]; default: Sunday | Select a day of the end of interval in which scheduler will switch profiles back. |
| Interval Type: Month Days | ||
| Start Day | Day of month [1..31]; default: 1 | Select a day of the start of interval in which scheduler will switch profiles. |
| End Day | Day of month [1..31]; default: 1 | Select a day of the end of interval in which scheduler will switch profiles back. |
| Force last day | off | on; default: off | Force intervals to accept last day of month as valid option if selected day doesn't exist in ongoing month. |
Profile Scheduler Instance Example
Scheduler will use profile instance if it is enabled and it's time interval matches device's date, otherwise default profile will be used.
Example - we have 3 profiles in total:
- default
- Profile A
- Profile B
We create profile instances for Profiles A and B:
- Profile A: 08:00 - 11:00
- Profile B: 13:00 - 20:00
During 11:00 - 13:00 and 20:00 - 08:00 default profile will be used.