Difference between revisions of "OpenRemote"
(Created page with "=Introduction= In this article you will find instructions on how to setup OpenRemote Manager as a MQTT Broker and how to setup a RUT router as a MQTT Publisher and send data o...") |
|||
| Line 31: | Line 31: | ||
The service user will give programmatic access to the MQTT client. | The service user will give programmatic access to the MQTT client. | ||
| − | # Go to the users page and create a new service user (second panel on the page). | + | # Go to the users page and create a new service user (second panel on the page). |
| − | [[File:Networking_rutos_configuration_examples_openremote_002.png|border|class=tlt-border]] | + | #:[[File:Networking_rutos_configuration_examples_openremote_002.png|border|class=tlt-border]] |
| − | [[File:Networking_rutos_configuration_examples_openremote_003.png|border|class=tlt-border]] | + | #:[[File:Networking_rutos_configuration_examples_openremote_003.png|border|class=tlt-border]] |
# Name the service user 'mqtt_user' and give the user the read and write role for the sake of convenience. It is advised to configure a more restricted role for your service users. | # Name the service user 'mqtt_user' and give the user the read and write role for the sake of convenience. It is advised to configure a more restricted role for your service users. | ||
| − | [[File:Networking_rutos_configuration_examples_openremote_004.png|border|class=tlt-border]] | + | #:[[File:Networking_rutos_configuration_examples_openremote_004.png|border|class=tlt-border]] |
# Click 'Create', a secret will be generated automatically. | # Click 'Create', a secret will be generated automatically. | ||
# Open the 'mqtt_user' user to see and copy the secret. | # Open the 'mqtt_user' user to see and copy the secret. | ||
| − | [[File:Networking_rutos_configuration_examples_openremote_005.png|border|class=tlt-border]] | + | #:[[File:Networking_rutos_configuration_examples_openremote_005.png|border|class=tlt-border]] |
| − | ====== | + | ===Create an asset with attributes=== |
| + | |||
| + | We will create a Thing asset (MQTT subscriber), but feel free to use an AssetType that matches your physical device. | ||
| + | |||
| + | # On the assets page, click the + in the asset tree on the left. | ||
| + | #:[[File:Networking_rutos_configuration_examples_openremote_006.png|border|class=tlt-border]] | ||
| + | # Select the Thing asset type, give it a friendly name and click 'Add'. | ||
| + | #:[[File:Networking_rutos_configuration_examples_openremote_007.png|border|class=tlt-border]] | ||
| + | # Add new attribute in the Edit asset mode: | ||
| + | #:*type: Custom Attribute | ||
| + | #:*name: writeAttribute | ||
| + | #:*Valuetype: JSON | ||
| + | #:[[File:Networking_rutos_configuration_examples_openremote_008.png|border|class=tlt-border]] | ||
| + | #:[[File:Networking_rutos_configuration_examples_openremote_009.png|border|class=tlt-border]] | ||
Revision as of 15:35, 16 March 2023
Main Page > General Information > Configuration Examples > Third party services > OpenRemoteIntroduction
In this article you will find instructions on how to setup OpenRemote Manager as a MQTT Broker and how to setup a RUT router as a MQTT Publisher and send data over to this OpenRemote Broker.
With that, you will be able to configure any other device as a MQTT Subscriber, and listen to any published info by the router or other devices on this same broker.
Prerequisites
You will need:
- OpenRemote system
- A router from RUTx, TCRx or TRBx series
Hardware Description
Hardware descriptions can be found in different Quick Start Guides (QSG). There you will find an overview of the various components on the front and back of a device, hardware installation instructions, first login information, device specifications, and general safety information. Link: Quick Start Guides
Set up your Development Environment
Teltonika Networks devices comes with our created firmware, therefore no additional development or scripting is required for this unit to support OpenRemote.
Setting up OpenRemote
Quickstart
Refer to the online OpenRemote documentation at Quckstart. Follow the steps in the section Quickstart to create your own environment with full access.
NOTE: In examples, port 1883 was used for MQTT protocol. To use this port you need to add it to your docker-compose file.

Create a service user
The service user will give programmatic access to the MQTT client.
- Go to the users page and create a new service user (second panel on the page).
- Name the service user 'mqtt_user' and give the user the read and write role for the sake of convenience. It is advised to configure a more restricted role for your service users.
- Click 'Create', a secret will be generated automatically.
- Open the 'mqtt_user' user to see and copy the secret.


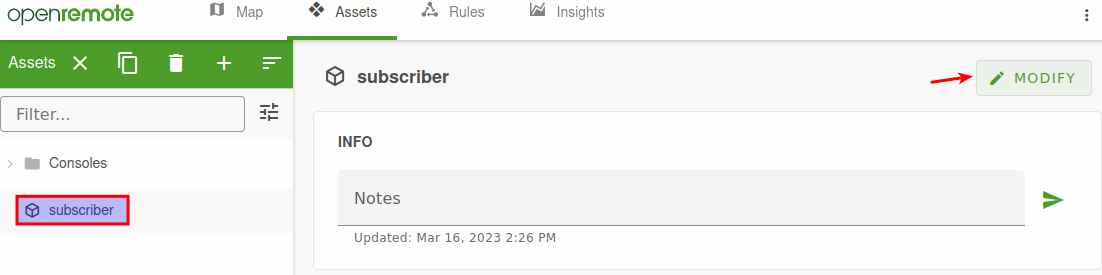
Create an asset with attributes
We will create a Thing asset (MQTT subscriber), but feel free to use an AssetType that matches your physical device.
- On the assets page, click the + in the asset tree on the left.
- Select the Thing asset type, give it a friendly name and click 'Add'.
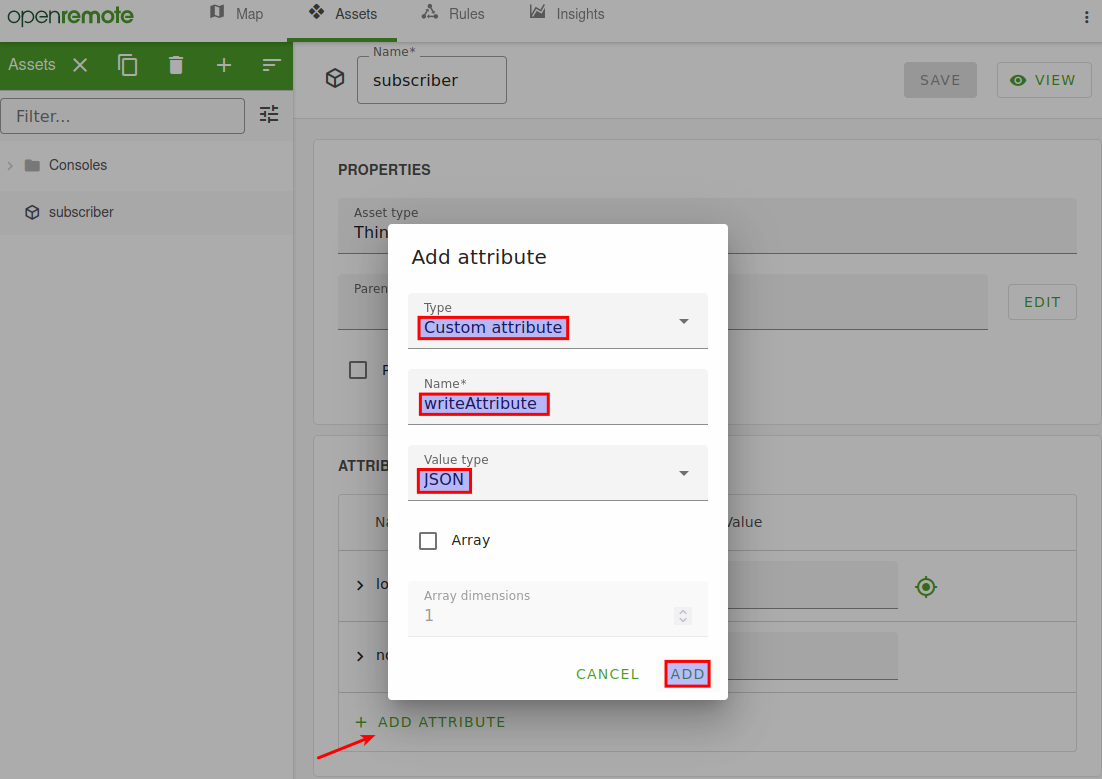
- Add new attribute in the Edit asset mode:
- type: Custom Attribute
- name: writeAttribute
- Valuetype: JSON