Difference between revisions of "OpenVPN server on Windows"
PauliusRug (talk | contribs) |
|||
| (37 intermediate revisions by 7 users not shown) | |||
| Line 1: | Line 1: | ||
==Introduction== | ==Introduction== | ||
| − | + | '''OpenVPN''' is an open-source software application that implements virtual private network (VPN) techniques for creating secure point-to-point or site-to-site connections in routed or bridged configurations and remote access facilities. | |
This article contains step-by-step instructions on how to create and run an OpenVPN server on a PC that runs on Windows OS. The information provided here is geared towards users of almost any knowledge level. The instructions apply to Windows 7 and newer systems. | This article contains step-by-step instructions on how to create and run an OpenVPN server on a PC that runs on Windows OS. The information provided here is geared towards users of almost any knowledge level. The instructions apply to Windows 7 and newer systems. | ||
| Line 10: | Line 10: | ||
'''Prerequisites''': | '''Prerequisites''': | ||
| − | + | * A PC or Laptop running on Windows 7 or a later version | |
| − | *A PC or Laptop running on Windows 7 or a later version | + | * The PC in question must have a '''[[Private_and_Public_IP_Addresses#Public_IP_address|Public IP address]]''' |
| − | *The | + | * An active Internet connection |
| − | * | ||
| − | |||
---- | ---- | ||
'''Objective''': | '''Objective''': | ||
| Line 20: | Line 18: | ||
The purpose of this article is to provide the know-how needed to configure a working OpenVPN server on a Windows PC. | The purpose of this article is to provide the know-how needed to configure a working OpenVPN server on a Windows PC. | ||
| − | + | ==Step 1: installing OpenVPN software== | |
| − | |||
| − | |||
| − | + | <ul> | |
| + | <li>The first thing that we'll need to do is install the necessary OpenVPN software. You can download the OpenVPN installer file from '''[https://openvpn.net/index.php/open-source/downloads.html here]'''. <br> | ||
| + | Simply run the downloaded file and follow the instructions of the installation guide. | ||
| + | </li> | ||
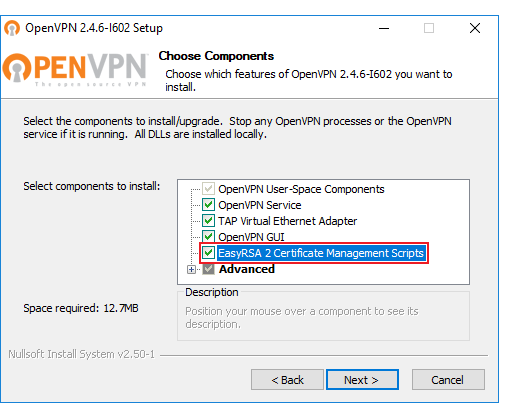
| + | <li>'''Important note''': at one point before the installation begins, you will be prompted to select which components should be included in the installation. Make sure to select '''EasyRSA''' as it will be needed later on to generate keys and certificates. You can leave the rest as defaults: | ||
| + | <ul>[[File:Openvpn windows server setup step 1 openvpn installation part 1 v2.png]]</ul> | ||
| + | </li> | ||
| + | </ul> | ||
| − | + | ==Step 2: preparing EasyRSA== | |
| − | |||
| − | |||
| − | |||
| − | |||
| − | |||
<ul> | <ul> | ||
| − | <li> | + | <li>Now we can start preparing to generate certificates and keys. For this we'll be using the '''EasyRSA''' application that was installed along with OpenVPN. <br> EasyRSA commands have to be executed via the Windows Command Prompt. It can be opened by typing '''cmd''' in the Windows search bar ('''Windows button + S'''). When you launch it, make sure you run it '''as administrator''': |
| + | <ul>[[File:How to generate tls certificates windows part 1 v3.png]]</ul> | ||
</li> | </li> | ||
| − | <li> | + | |
| + | <li>Change the current directory to the EasyRSA folder. To do so, execute this command: | ||
| + | <ul> | ||
| + | <pre>cd "C:\Program Files\OpenVPN\easy-rsa"</pre> | ||
| + | </ul> | ||
</li> | </li> | ||
| − | <li> | + | |
| + | <li>Initialize the OpenVPN configuration with the following command: | ||
<ul> | <ul> | ||
| − | <pre> | + | <pre> init-config</pre> |
| − | |||
| − | |||
| − | |||
</ul> | </ul> | ||
</li> | </li> | ||
| − | <li> | + | |
| + | <li>Open the '''''vars.bat''''' file with the Notepad text editor: | ||
<ul> | <ul> | ||
| − | <pre> | + | <pre>notepad vars.bat</pre> |
| − | |||
| − | |||
| − | |||
</ul> | </ul> | ||
| − | |||
</li> | </li> | ||
| − | <li> | + | |
| − | <ul> | + | <li>This is the template file for generating certificates, i.e., the information stored here will be offered as default values during certificate generation. Locate and edit the following lines in accordance with your needs: |
| + | <ul> | ||
| + | <pre>set KEY_COUNTRY=US | ||
| + | set KEY_PROVINCE=CA | ||
| + | set KEY_CITY=SanFrancisco | ||
| + | set KEY_ORG=OpenVPN | ||
| + | set KEY_EMAIL=mail@host.domain</pre> | ||
</ul> | </ul> | ||
| − | + | </li> | |
| + | |||
| + | <li>You can also set the key size for the Diffie Hellman parameters: | ||
<ul> | <ul> | ||
| − | < | + | <pre>set DH_KEY_SIZE=2048</pre> |
| − | + | </ul> | |
| − | + | </li> | |
| − | |||
| − | </ | ||
| − | |||
| − | </li | ||
| − | + | <li>Once you're done, save the file and close the editor</li> | |
| − | + | <li>Run the following commands: | |
| + | <ul> | ||
| + | <pre>vars</pre> | ||
| + | <pre>clean-all</pre> | ||
| + | </ul> | ||
| + | </li> | ||
| + | </ul> | ||
| + | ==Step 3: generating certificates and keys== | ||
| − | + | <ul> | |
| + | <li>Now we can start generating the certificates and keys. Begin with the '''certificate authority''' ('''CA''') - the root certificate file that will be used to sign other certificates and keys: | ||
| + | <ul> | ||
| + | <pre>build-ca</pre> | ||
| + | </ul> | ||
| + | '''NOTE''': you can press the "Enter" key when prompted to enter the values set in the ''vars.bat'' file earlier. Doing this will set the values to the default specified in ''vars.bat''. However, you should type in a meaningful '''Common Name'''. | ||
| + | </li> | ||
| − | + | <li>Next, build the '''server''' certificate and key: | |
| + | <ul> | ||
| + | <pre>build-key-server server</pre> | ||
| + | '''NOTE''': once again, don't forget to specify a different Common Name (use the name "server" for easier management purposes). When prompted the sign and commit the certificate, type '''y''' and press "Enter". | ||
| + | </ul> | ||
| + | </li> | ||
| − | + | <li>Next, build certificates and keys for the '''clients''': | |
| + | <ul> | ||
| + | <pre>build-key Client1</pre> | ||
| + | </ul> | ||
| + | '''TIP''': use the same Common Name as the certificate name (Client1 in this example). This will help you differentiate different clients easier. Pick meaningful names like "toms_PC", "company_maintenance", etc. Repeat this step as many times as you need, depending on the client quantity. | ||
| + | </li> | ||
| − | + | <li>Lastly, generate '''Diffie Hellman parameters''': | |
| − | |||
| − | |||
| − | <li> | ||
| − | |||
<ul> | <ul> | ||
| − | + | <pre>build-dh</pre> | |
</ul> | </ul> | ||
</li> | </li> | ||
</ul> | </ul> | ||
| − | == | + | ==Step 4: OpenVPN server configuration== |
| − | + | <ul> | |
| − | + | <li></li> | |
| − | + | </ul> | |
| − | |||
| − | |||
| − | |||
| − | |||
| − | |||
| − | |||
| − | |||
Revision as of 12:45, 17 September 2018
Main Page > General Information > Configuration Examples > PC > Windows > OpenVPN server on WindowsIntroduction
OpenVPN is an open-source software application that implements virtual private network (VPN) techniques for creating secure point-to-point or site-to-site connections in routed or bridged configurations and remote access facilities.
This article contains step-by-step instructions on how to create and run an OpenVPN server on a PC that runs on Windows OS. The information provided here is geared towards users of almost any knowledge level. The instructions apply to Windows 7 and newer systems.
Configuration overview and prerequisites
Before we begin, let's overview the configuration that we are attempting to achieve and the prerequisites that make it possible.
Prerequisites:
- A PC or Laptop running on Windows 7 or a later version
- The PC in question must have a Public IP address
- An active Internet connection
Objective:
The purpose of this article is to provide the know-how needed to configure a working OpenVPN server on a Windows PC.
Step 1: installing OpenVPN software
- The first thing that we'll need to do is install the necessary OpenVPN software. You can download the OpenVPN installer file from here.
Simply run the downloaded file and follow the instructions of the installation guide. - Important note: at one point before the installation begins, you will be prompted to select which components should be included in the installation. Make sure to select EasyRSA as it will be needed later on to generate keys and certificates. You can leave the rest as defaults:

Step 2: preparing EasyRSA
- Now we can start preparing to generate certificates and keys. For this we'll be using the EasyRSA application that was installed along with OpenVPN.
EasyRSA commands have to be executed via the Windows Command Prompt. It can be opened by typing cmd in the Windows search bar (Windows button + S). When you launch it, make sure you run it as administrator: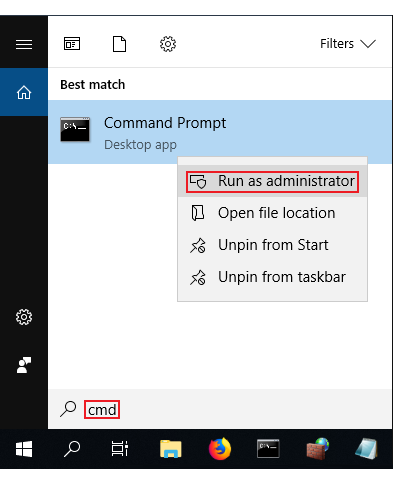
- Change the current directory to the EasyRSA folder. To do so, execute this command:
cd "C:\Program Files\OpenVPN\easy-rsa"

init-config
notepad vars.bat
set KEY_COUNTRY=US
set KEY_PROVINCE=CA
set KEY_CITY=SanFrancisco
set KEY_ORG=OpenVPN
set [email protected]
set DH_KEY_SIZE=2048
vars
clean-all
Step 3: generating certificates and keys
- Now we can start generating the certificates and keys. Begin with the certificate authority (CA) - the root certificate file that will be used to sign other certificates and keys:
build-ca
NOTE: you can press the "Enter" key when prompted to enter the values set in the vars.bat file earlier. Doing this will set the values to the default specified in vars.bat. However, you should type in a meaningful Common Name.
build-key-server server
NOTE: once again, don't forget to specify a different Common Name (use the name "server" for easier management purposes). When prompted the sign and commit the certificate, type y and press "Enter".
build-key Client1
TIP: use the same Common Name as the certificate name (Client1 in this example). This will help you differentiate different clients easier. Pick meaningful names like "toms_PC", "company_maintenance", etc. Repeat this step as many times as you need, depending on the client quantity.
build-dh

