RMS Companies: Difference between revisions
Created page with "=Companies= ==Summary== Companies can be found on left sidebar under Administration section. All settings related to company monitoring are here...." |
No edit summary |
||
| (24 intermediate revisions by 2 users not shown) | |||
| Line 1: | Line 1: | ||
=Companies= | =Companies= | ||
==Summary== | ==Summary== | ||
Companies can be found on left sidebar under [[ | Companies can be found on left sidebar under [[RMS_Administration|Administration]] section. All settings related to company monitoring are here. | ||
<br> | <br> | ||
==Overview== | ==Overview== | ||
| Line 7: | Line 7: | ||
[[File:Rmsusers8.png|border|class=tlt-border|1100x700px]] | [[File:Rmsusers8.png|border|class=tlt-border|1100x700px]] | ||
On this screen, you'll be able to: | On this screen, you'll be able to: | ||
#Add a new company | #Add a new company, add company data, move company resources, view the resource report and remove selected companies. | ||
# | #Filter out companies by chosen filters. | ||
#Search through existing companies by name, parent company. | #Search through existing companies by name, parent company. | ||
#Various actions on a selected company, such as: View company details, View all company devices, View all company users, Show all company files, Show all children companies, and rename it. | #Various actions on a selected company, such as: [[RMS_Company_details|View company details]], View all company devices, View all company users, Show all company files, Show all children companies, and rename it. | ||
#View companies tree | #View companies tree, change table settings, refresh data. | ||
#Allow to use parent company's credits. | #Allow to use parent company's credits. | ||
==Add new company== | ==Add new company== | ||
The '''Add new company''' function is used to create new companies for your RMS profile. You can create a subsidiary company that will belong to your current company. | The '''Add new company''' function is used to create new companies for your RMS profile. You can create a subsidiary company that will belong to your current company. | ||
| Line 21: | Line 21: | ||
<br> | <br> | ||
'''Instructions''' | '''Instructions''' | ||
# Click on | # Click on <span style="color:#0455a4">'''Actions'''</span> button below the title '''Companies'''. | ||
# You will get | # You will get dropdown menu of various functions. | ||
# Enter your company name | # Select <span style="color:#0455a4">'''+ Create Company'''</span> | ||
# Enter your company name, it will automatically belong to your current main company. | |||
# And finally click on the '''Create''' button. | # And finally click on the '''Create''' button. | ||
| Line 33: | Line 34: | ||
==Remove company== | ==Remove company== | ||
To remove company go to the RMS web page, Left sidebar panel, (<b> | To remove company go to the RMS web page, Left sidebar panel, ([[RMS_Administration|Administration]] → <b>Companies</b>). | ||
Select companies, you'd like to remove and a Remove company button will appear left of the search bar. | Select companies, you'd like to remove and a Remove company button will appear left of the search bar. | ||
| Line 44: | Line 45: | ||
# Select a company you would like to remove. | # Select a company you would like to remove. | ||
# Move your mouse pointer to the ''' | # Move your mouse pointer to the '''Actions''' button, click it, and select '''Remove company'''.[[File:Rmsusers9.gif|thumb|500px|right|Removing a company]] | ||
# You will get a confirmation pop-up window. Click the '''Confirm''' button to continue. | # You will get a confirmation pop-up window. Click the '''Confirm''' button to continue. | ||
[[File:Rms manual remove company complete v1.png|600px]] | [[File:Rms manual remove company complete v1.png|600px]] | ||
| Line 50: | Line 51: | ||
'''<span style="color:#0455a4"><big>Important!</big></span>''' | '''<span style="color:#0455a4"><big>Important!</big></span>''' | ||
* If there any assigned devices to the company you want to remove, | * If there any assigned devices to the company you want to remove, RMS won't let you remove the company. | ||
* You can remove multiple companies at the same time. | * You can remove multiple companies at the same time. | ||
==Resources== | |||
[[File:Rmsusers11.png|border|class=tlt-border]] | |||
By clicking on the '''<span style="color:#0455a4">Actions</span>''' button, you will get a drop-down menu. Here you'll get to do various actions such as converting credits to company data, moving resources between your companies, generating resource reports and removing companies. | |||
===Add data=== | |||
---- | |||
To add more data to your company, click on the '''<span style="color:#0455a4">Actions</span>''' button. You will get a drop-down menu. | |||
[[File:Rmsusers14.png|border|class=tlt-border]] | |||
1 '''RMS Credit''' provides '''2GB''' of data. | |||
# Move your mouse pointer to the drop-down menu and select '''Add data''' (Actions → Add company data). | |||
# In the new dialog window select the '''company''' to which the data will be added. | |||
# Enter the amount of '''credits''' you want to use and click the '''Add''' button. | |||
# You will get a confirmation dialog. Click the add button. | |||
[[File:Rms manual rms connect data confirm v1.png]] | |||
Data will be added and you will get confirmation message on the top of your screen: '''Data added successfully'''. | |||
===Move resources=== | |||
---- | |||
To move credit(s) or packs click on the '''<span style="color:#0455a4">Actions</span>''' button. You will get a drop-down menu, select '''Move resources''' Here you can move any number of available credits and packs from one company to another. | |||
# Select a resource type | |||
# Select move from company | |||
# And select move to company. | |||
# Enter the number of credits or packs to move and click on the '''Move''' button. | |||
[[File:Rmsusers13.png|border|class=tlt-border]] | |||
==Company details== | |||
[[File:Rmsusers17.png|border|class=tlt-border|1100x700px]] | |||
By clicking [[RMS_Company_details|View company details]] in the action column, you'll be redirected to a new page where you'll see all its information regarding details, monitoring, credits, etc. | |||
[[Category:RMS_Administration]] | |||
Latest revision as of 12:29, 26 February 2025
Main Page > IoT Platforms > RMS > RMS Manual > RMS Administration > RMS CompaniesCompanies
Summary
Companies can be found on left sidebar under Administration section. All settings related to company monitoring are here.
Overview
 On this screen, you'll be able to:
- Add a new company, add company data, move company resources, view the resource report and remove selected companies.
- Filter out companies by chosen filters.
- Search through existing companies by name, parent company.
- Various actions on a selected company, such as: View company details, View all company devices, View all company users, Show all company files, Show all children companies, and rename it.
- View companies tree, change table settings, refresh data.
- Allow to use parent company's credits.
Add new company
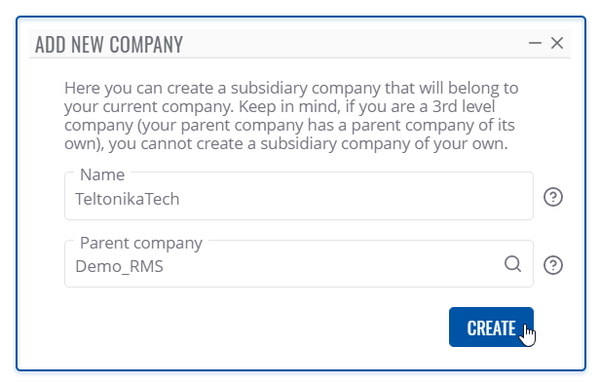
The Add new company function is used to create new companies for your RMS profile. You can create a subsidiary company that will belong to your current company.
Instructions
- Click on Actions button below the title Companies.
- You will get dropdown menu of various functions.
- Select + Create Company
- Enter your company name, it will automatically belong to your current main company.
- And finally click on the Create button.
At the top of your screen, you will get a notification: Company created.
Important!
- Keep in mind, if you are a 3rd level company (your parent company has a parent company of its own), you cannot create a subsidiary company of your own.
Remove company
To remove company go to the RMS web page, Left sidebar panel, (Administration → Companies).
Select companies, you'd like to remove and a Remove company button will appear left of the search bar.
Instructions
- Select a company you would like to remove.
- Move your mouse pointer to the Actions button, click it, and select Remove company.

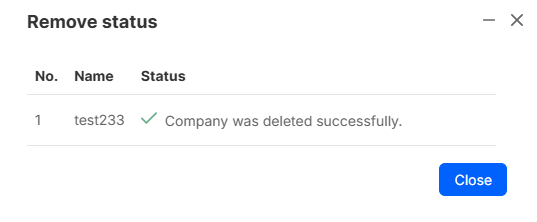
Removing a company - You will get a confirmation pop-up window. Click the Confirm button to continue.
Important!
- If there any assigned devices to the company you want to remove, RMS won't let you remove the company.
- You can remove multiple companies at the same time.
Resources
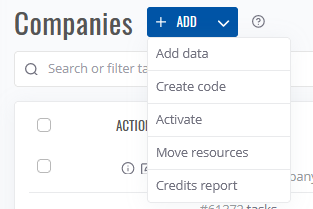
By clicking on the Actions button, you will get a drop-down menu. Here you'll get to do various actions such as converting credits to company data, moving resources between your companies, generating resource reports and removing companies.
Add data
To add more data to your company, click on the Actions button. You will get a drop-down menu.
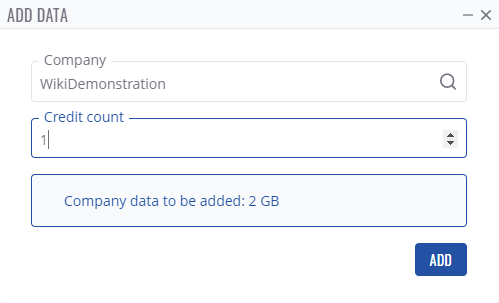
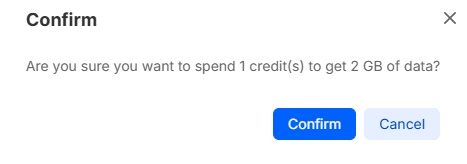
1 RMS Credit provides 2GB of data.
- Move your mouse pointer to the drop-down menu and select Add data (Actions → Add company data).
- In the new dialog window select the company to which the data will be added.
- Enter the amount of credits you want to use and click the Add button.
- You will get a confirmation dialog. Click the add button.
Data will be added and you will get confirmation message on the top of your screen: Data added successfully.
Move resources
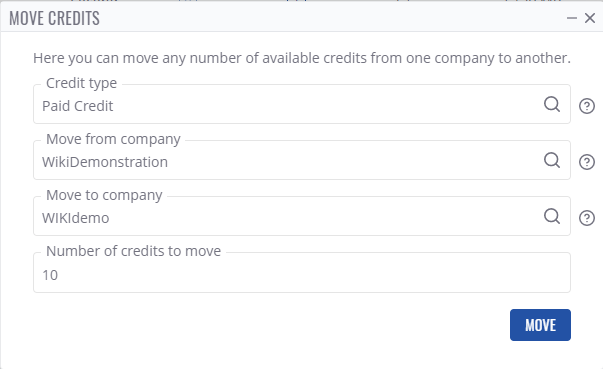
To move credit(s) or packs click on the Actions button. You will get a drop-down menu, select Move resources Here you can move any number of available credits and packs from one company to another.
- Select a resource type
- Select move from company
- And select move to company.
- Enter the number of credits or packs to move and click on the Move button.
Company details
By clicking View company details in the action column, you'll be redirected to a new page where you'll see all its information regarding details, monitoring, credits, etc.

