RUTX 1-to-1 NAT: Difference between revisions
m Added the "Advanced" mode image and FW version indication |
m Minor gramatical corrections |
||
| Line 65: | Line 65: | ||
iptables -t nat -I PREROUTING -d [ROUTER'S_WAN_IP] -j DNAT --to-destination [SERVER'S_LAN_IP] | iptables -t nat -I PREROUTING -d [ROUTER'S_WAN_IP] -j DNAT --to-destination [SERVER'S_LAN_IP] | ||
iptables -t nat -I POSTROUTING -s [SERVER'S_LAN_IP] -j SNAT --to-source [ROUTER'S_WAN_IP] | iptables -t nat -I POSTROUTING -s [SERVER'S_LAN_IP] -j SNAT --to-source [ROUTER'S_WAN_IP] | ||
After saving and applying the rules, the end-user should be able to reach the LAN device when trying to connect to the WAN interface, which in this case is 192.168.2.1, | After saving and applying the rules, the end-user should be able to reach the LAN device when trying to connect to the WAN interface, which in this case is 192.168.2.1, through every port available. | ||
Revision as of 12:21, 19 April 2022
Introduction
1-to-1 NAT is a mode of NAT which maps one external address to one internal address. This article contains step-by-step instructions on how to configure a 1-to-1 NAT between a LAN device and a WAN interface on RUTX devices. This setup can be useful for applications such as exposing email servers to the internet, while preserving private communication in the LAN network.
The information in this page is updated in accordance with the R_00.07.01.4 firmware version.
If you're having trouble finding this page or some of the parameters described here on your device's WebUI, you should turn on "Advanced WebUI" mode. You can do that by clicking the "Basic" button under "Mode", which is located at the top-right corner of the WebUI.
Prerequisites
- Any device which acts as a Server
- A RUTX device
- A computer to configure the Router
Configuration Scheme

Overview
This configuration makes use of a source and destination NAT to allow connectivity through the device’s WAN IP address, and it forwards all traffic from all ports to the LAN device. Please be aware that this approach exposes the server completely to the WAN, nullifying any firewall rules which are imposed over the WAN interface, so be cautious.
Configuring Static IP addresses for the devices
In this scenario, we will need static IP addresses both for LAN and WAN, as we will create static rules between the two.
First, we will configure a static IP address for the LAN and a static IP address for the WAN interface, as well as for the computer involved in the setup.
For this scenario, on the LAN side the IP addresses are the following:
- Router's gateway: 192.168.1.1/24
- Server: 192.168.1.2/24
From the WAN side, the IP addresses are the following:
- Router's WAN IP address: 192.168.2.1/24
- Computer's IP address: 192.168.2.2/24
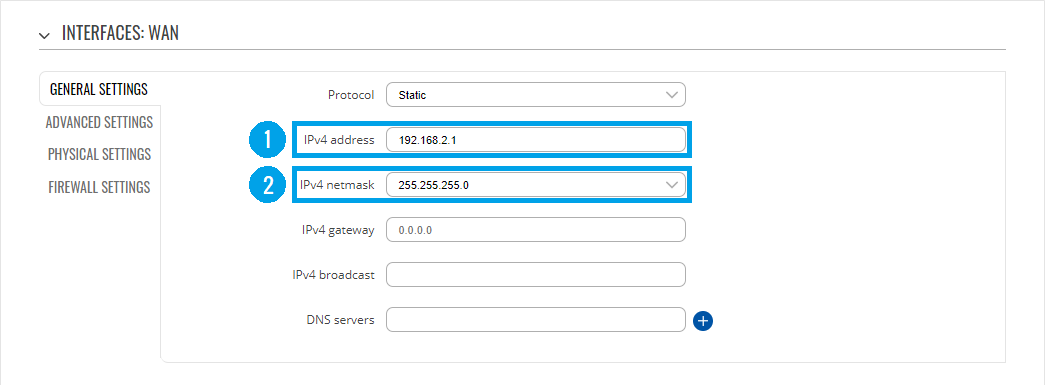
In order to edit the WAN IP address of the device, you will need to go to Network → Interfaces and then click on the Edit ![]() button for the WAN connection.
button for the WAN connection.
After clicking on Edit, a new window will open. Here, you will need to click on DHCP as shown in point 1, and then click on Static, as shown in point 2.
Next, you will need to fill out the IP address fields, first, with the IP address 192.168.2.1 and the netmask 255.255.255.0.
Then finally, click on the ![]() button to save the changes.
button to save the changes.
Once you have set up the IP addresses for the devices, you can continue over to the next step.
Configuring Custom Rules for the NAT
Custom rules are needed to make a two-way NAT forwarding. This means that all traffic coming to the WAN IP will be forwarded to the LAN device, and the LAN device will respond to this by forwarding its traffic as if it was coming from the WAN IP.
In turn, this makes the LAN server reachable through the WAN interface, through every port possible, and to be also reachable through other LAN devices. Be aware that this also exposes the LAN device completely to the WAN, so be aware of which ports are open on the device, as this forwarding nullifies the Firewall rules which apply to the WAN interface.
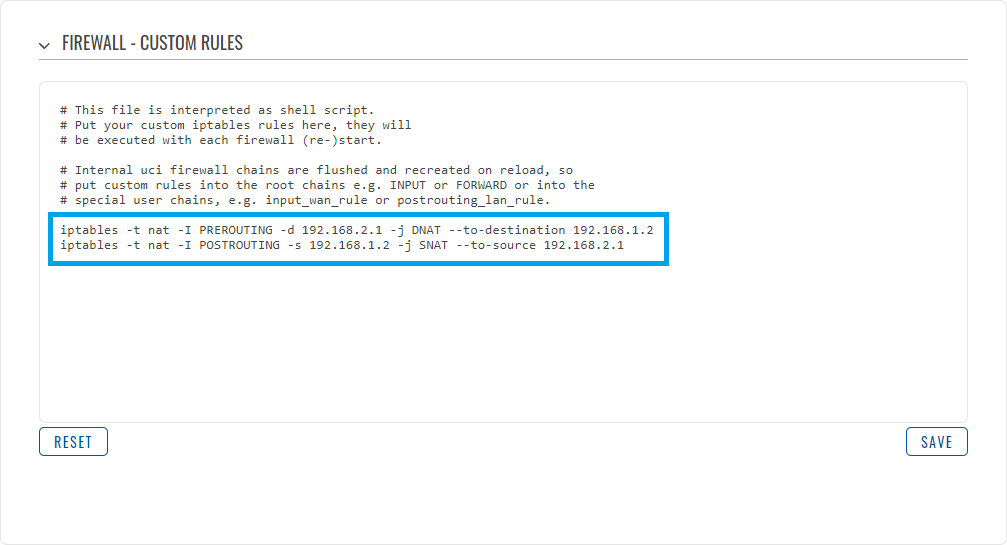
After setting the static IP addresses, you must head to Network→Firewall→Custom Routes to add the following custom rules.
A more comprehensive analysis of this custom rule would be:
iptables -t nat -I PREROUTING -d [ROUTER'S_WAN_IP] -j DNAT --to-destination [SERVER'S_LAN_IP]
iptables -t nat -I POSTROUTING -s [SERVER'S_LAN_IP] -j SNAT --to-source [ROUTER'S_WAN_IP]
After saving and applying the rules, the end-user should be able to reach the LAN device when trying to connect to the WAN interface, which in this case is 192.168.2.1, through every port available.


