Connecting two same subnet office networks using OpenVPN bridge (TAP)
The information in this page is updated in accordance with 00.07.10 firmware version.
 |
|
|---|---|
|
|
Configuration overview and prerequisites
Prerequisites:
- Two Teltonika Networks routers (One with public IP that will be VPN server)
- An end device to configure the router (PC, Laptop, Tablet, Smartphone)
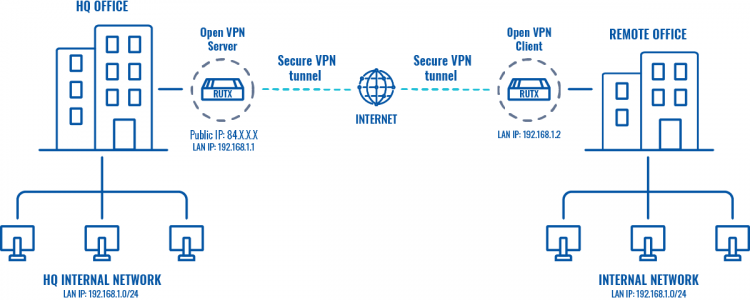
The topology above depicts the OpenVPN scheme. The router with the Public IP address (RUTX) acts as the OpenVPN server and other RUTX acts as client. OpenVPN connects the networks of HQ Office and Remote Office.
When the scheme is realized, remote office workers will be able to reach HQ’s internal network with all internal systems, allowing working from remote office to be possible. All remote office's WAN and LAN traffic is going to travel through VPN tunnel.
Configuring HQ office router
OpenVPN
Generating TLS certificates/keys
A connection that uses TLS requires multiple certificates and keys for authentication:
- OpenVPN server
- The root certificate file (Certificate Authority)
- Server certificate
- Server key
- Diffie Hellman Parameters
- OpenVPN client
- The root certificate file (Certificate Authority)
- Client certificate
- Client key
Before you continue you'll have to obtain the necessary certificates and keys. When you use a third-party OpenVPN service, they should provide you with their certificates and even configuration files.
If you're creating your server, you'll have to generate these files yourself. The most simple way to generate certificates is by navigating System → Administration → Certificates on WebUI and pressing the Generate button.
After devices has finished generating all the files, you can download them by navigating to System → Administration → Certificates → Certificates Manager and pressing the Export button next to the required files.
To get detailed instructions on how to generate TLS certificates and keys on other platforms check out our article on the topic of Windows TLS certificate generation.
Configuration
TAP is used for creating a network bridge between Ethernet segments in different locations. For this example we will be creating a TAP (bridged) type connection that uses the UDP protocol for data transfer and TLS for Authentication. We will be using two RUT routers: RUT1 (Server; LAN IP: 192.168.1.1; WAN (Public static) IP: 213.***.***.***) and RUT2 (Client; LAN IP: 192.168.1.2); the two routers will be connected via OpenVPN.
Server configuration
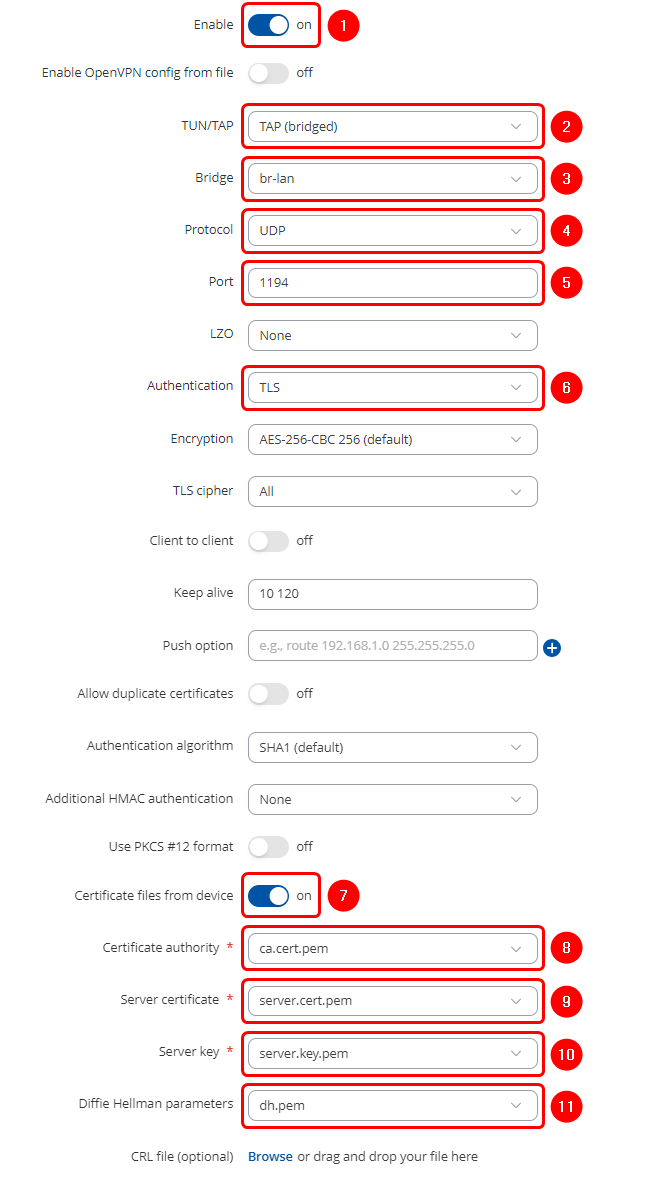
Start by configuring OpenVPN TAP Server on RUT1 device. Login to the WebUI, navigate to Services → VPN → OpenVPN, enter any name and select role as Server. After pressing the Add button, make the following changes:
Note: Not specified fields can be left as is or changed according to your needs.
Client configuration
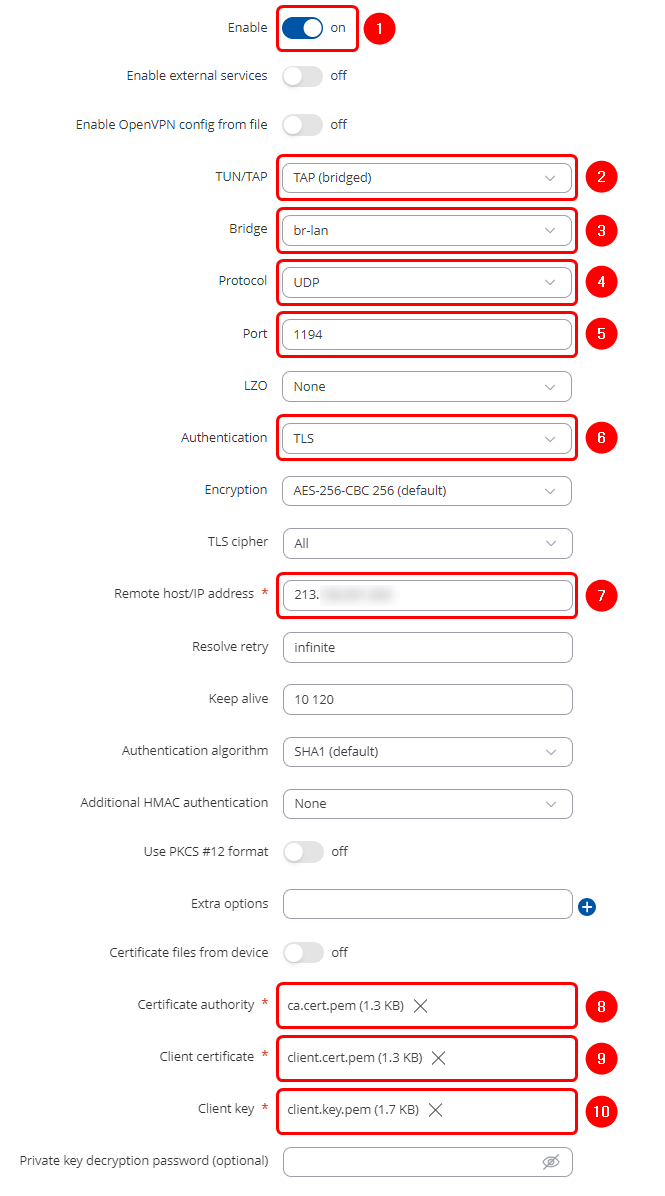
Next, configure OpenVPN TAP Client on RUT2 device. Login to the WebUI, navigate to Services → VPN → OpenVPN, enter any name and select role as Client. After pressing the Add button, make the following changes:
Note: Not specified fields can be left as is or changed according to your needs.
 |
|
|---|---|
To sum up, just make sure the Server and the Clients use the same parameters (same authentication, same port, same protocol, etc.). Since the OpenVPN interface that comes up is bridged with the LAN interface, make sure the routers are in the same subnet (192.168.1.0 in this case). While making sure of that, don't forget that the routers can't have the same IP address, just the same subnet (for example, if both routers have the LAN IP 192.168.1.1, the connection won't work; if one has, for example, 192.168.1.1 and the other 192.168.1.100, then the connection will work).
For this example, we used TLS Authentication. If you want to use a different Authentication method, refer to the relevant section of this article. The authentication configuration will not be different because of the chosen OpenVPN type (TUN or TAP).
From the Client side, make sure to enter the correct Remote host/IP address (213.***.***.*** in this case). This is the Server's Public IP address, not the LAN IP address.
Testing an OpenVPN connection
The most important thing after configuration is making sure that the newly established connection works. You can check the status of an OpenVPN connection on the Services → VPN → OpenVPN page:
Server side
Client side
If you check the server - the status should be Active. If you check the client - the status should be Connected. The server should have active client and if you check logs, you should find line "Initialization Sequence Completed"
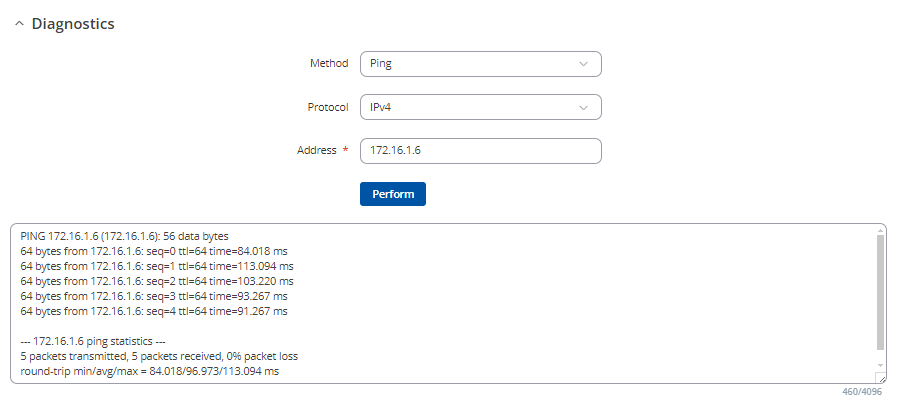
Another method of testing pinging the other instance's virtual or private IP address. You can send ping packets via CLI, SSH, or from the System → Maintenance → Troubleshoot → Diagnostics section of the router's WebUI:
Ping the Client's virtual IP address from the Server or vice versa. If the ping packets are transmitted successfully, congratulations, your OpenVPN connection is working.


