Difference between revisions of "Domnev1"
| (35 intermediate revisions by the same user not shown) | |||
| Line 1: | Line 1: | ||
| + | <p style="color:red">The information in this page is updated in accordance with [https://wiki.teltonika-networks.com/view/FW_%26_SDK_Downloads'''00.07.03'''] firmware version.</p> | ||
| + | |||
==Introduction== | ==Introduction== | ||
| − | This article contains instructions on how to | + | This article contains instructions on how to do UCI-based configuration for setting up RelayD with IPv4+IPv6 support. |
| + | ==Tunnelbroker configuration== | ||
| + | Tunnelbroker is a website operated by Hurricane Electric, a leading provider of internet services and networking solutions. The website provides a service called Hurricane Electric IPv6 Tunnel Broker, which allows users to create an IPv6 tunnel between their network and Hurricane Electric's network. This allows users to connect their devices to the internet using the IPv6 protocol, even if their internet service provider (ISP) does not support IPv6. | ||
| + | ====Login==== | ||
| + | ---- | ||
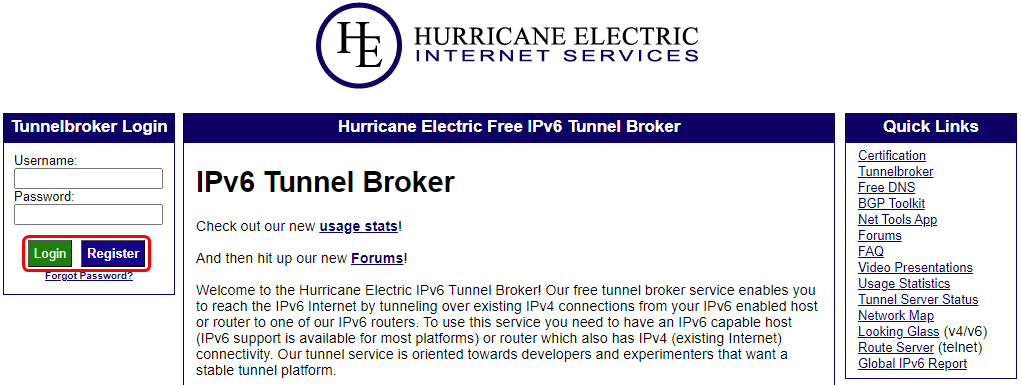
| + | Go to [http://tunnelbroker.net tunnelbroker.net] and log into your account. If you don't have a registered account then you will need to create one - click '''register'''. | ||
| + | [[File:Tunnelbroker login v2.png|border|center|class=tlt-border|1022 × 385px]] | ||
| − | ===Relayd installation=== | + | ====IPv6 to IPv4 tunnel creation==== |
| + | ---- | ||
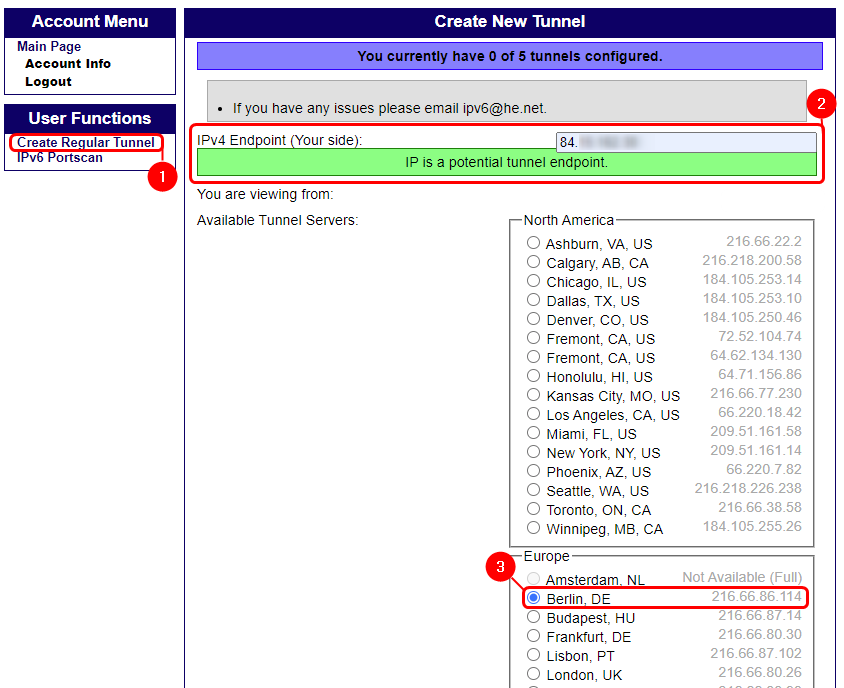
| + | Setup IPv6 over IPv4, also known as 6in4 IPv6 transition mechanism. To create a new tunnel: | ||
| + | # Click on '''create regular tunnel''', | ||
| + | # '''Enter''' your '''public IP''' (it will light up green, if the tunnel can be created with this IP), | ||
| + | # '''Select''' the desired '''tunnel server''', | ||
| + | |||
| + | To establish the tunnel, at the bottom of the page, you should see '''Create tunnel'''. | ||
| + | |||
| + | [[File:Create IPv6 Tunnel v2.png|border|center|class=tlt-border|844 × 688px]] | ||
| + | |||
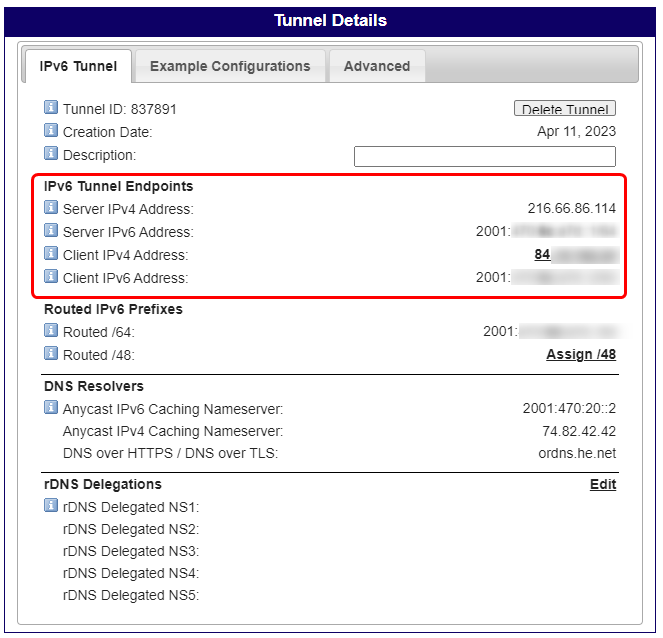
| + | After successful tunnel creation, you will be prompt to tunnel details window. | ||
| + | |||
| + | [[File:IPv6 Tunnel created v2.png|border|center|class=tlt-border|663 × 638px]] | ||
| + | |||
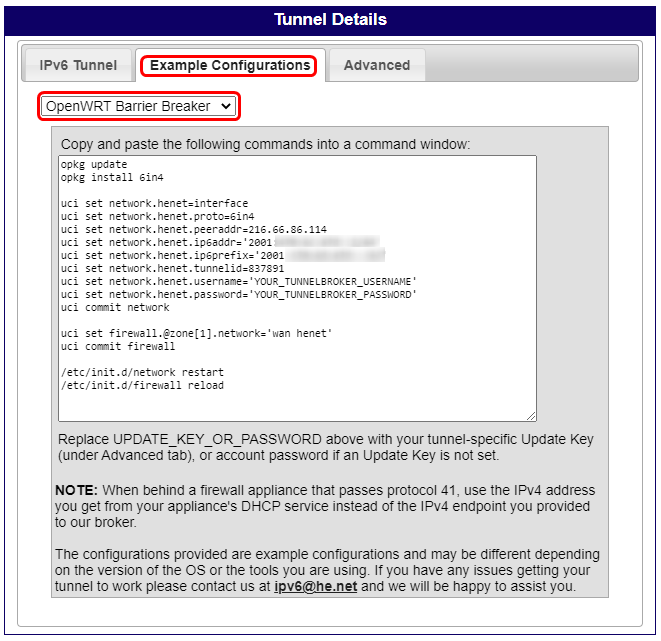
| + | To create a a tunnel instance on your RUT router, navigate to '''example configurations''', there, select '''OpenWRT Barrier Breaker'''. | ||
| + | and paste the following '''commands''' '''into''' your '''router CLI'''. | ||
| + | |||
| + | [[File:Tunnel interface v2.png|border|center|class=tlt-border|661 × 641px]] | ||
| + | |||
| + | '''Note''': Do not forget to '''replace''' '''YOUR_TUNNELBORKER_USERNAME''' and '''YOUR_TUNNELBROKER_PASSWORD''' with your '''TunnelBroker account username''' and '''password'''. | ||
| + | |||
| + | |||
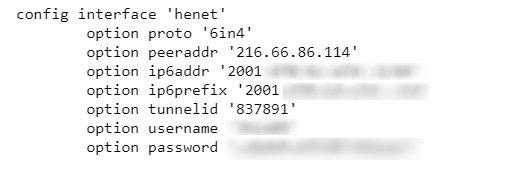
| + | Use the <code><span class="highlight" >'''cat /etc/config/network'''</span></code> command in routers CLI to see if the new interface was successfully created. | ||
| + | |||
| + | [[File:Tunnel RUT interface created v2.png|border|center|class=tlt-border|507 × 169px]] | ||
| + | ==Router configuration== | ||
| + | ===Relayd and interface configuration using UCI=== | ||
| + | ---- | ||
| + | Relay is a daemon (computer program that runs as a background process) used to relay and dynamically redirect incoming connections to a target host. Its main purpose in RUTxxx routers is to extend the wireless network. For example, when RUTxxx is in STA Wireless Station mode, it can be used to bridge WAN and LAN interfaces to create a larger Wireless network. | ||
| + | |||
| + | [[UCI_command_usage|Unified Configuration Interface (UCI)]] is a small utility written in C (a shell script-wrapper is available as well) and is intended to centralize the whole configuration of a device running on OpenWrt. | ||
| + | ====Relayd installation==== | ||
---- | ---- | ||
Install relayd package if needed, skip this step on RUTX series devices or if you already installed it on your router | Install relayd package if needed, skip this step on RUTX series devices or if you already installed it on your router | ||
| Line 8: | Line 48: | ||
opkg install relayd</pre> | opkg install relayd</pre> | ||
| − | ===WiFi client configuration=== | + | ====WiFi client configuration==== |
---- | ---- | ||
Add WiFi interface to make your router act as a WiFi client (connect to another AP) | Add WiFi interface to make your router act as a WiFi client (connect to another AP) | ||
| Line 23: | Line 63: | ||
Change SSID here to an SSID that the router will be connecting to | Change SSID here to an SSID that the router will be connecting to | ||
| − | <pre>uci set wireless.@wifi-iface[-1].ssid=' | + | <pre>uci set wireless.@wifi-iface[-1].ssid='RUT1_SSID'</pre> |
Change BSSID here to BSSID that the router will be connecting to (L2 address) | Change BSSID here to BSSID that the router will be connecting to (L2 address) | ||
| − | <pre>uci set wireless.@wifi-iface[-1].bssid=' | + | <pre>uci set wireless.@wifi-iface[-1].bssid='RUT1_BSSID'</pre> |
| − | Use appropriate | + | Use appropriate encryption method, PSK2 = WPA2-PSK here |
<pre>uci set wireless.@wifi-iface[-1].encryption='psk2'</pre> | <pre>uci set wireless.@wifi-iface[-1].encryption='psk2'</pre> | ||
| Line 35: | Line 75: | ||
Change secret to appropriate one | Change secret to appropriate one | ||
| − | <pre>uci set wireless.@wifi-iface[-1].key=' | + | <pre>uci set wireless.@wifi-iface[-1].key='SSID_PASSWORD' |
uci set wireless.@wifi-iface[-1].disabled='0' | uci set wireless.@wifi-iface[-1].disabled='0' | ||
uci set wireless.@wifi-iface[-1].skip_inactivity_poll='0' | uci set wireless.@wifi-iface[-1].skip_inactivity_poll='0' | ||
uci set wireless.@wifi-iface[-1].wifi_id='wifi1'</pre> | uci set wireless.@wifi-iface[-1].wifi_id='wifi1'</pre> | ||
| − | + | ====IPv4 interface creation==== | |
| − | + | ---- | |
| + | Create a new interface IPv4 for WiFi WAN. | ||
<pre>uci set network.wifi_wan=interface | <pre>uci set network.wifi_wan=interface | ||
uci set network.wifi_wan.proto='dhcp' | uci set network.wifi_wan.proto='dhcp' | ||
| Line 49: | Line 90: | ||
uci set network.wifi_wan.broadcast='0'</pre> | uci set network.wifi_wan.broadcast='0'</pre> | ||
| − | + | Set mwan3 settings for new interface | |
| − | |||
| − | |||
| − | |||
| − | |||
| − | |||
| − | |||
| − | |||
| − | |||
| − | |||
| − | |||
| − | |||
| − | |||
| − | |||
| − | |||
| − | |||
| − | |||
| − | |||
| − | |||
| − | |||
| − | |||
| − | |||
| − | |||
| − | |||
| − | |||
| − | |||
| − | |||
| − | |||
| − | |||
| − | |||
| − | |||
| − | |||
| − | |||
| − | |||
| − | |||
| − | |||
| − | Set mwan3 settings for new interface | ||
<pre>uci set mwan3.wifi_wan=interface | <pre>uci set mwan3.wifi_wan=interface | ||
| Line 109: | Line 114: | ||
uci add_list mwan3.mwan_default.use_member='wifi_wan_member_mwan' | uci add_list mwan3.mwan_default.use_member='wifi_wan_member_mwan' | ||
uci add_list mwan3.balance_default.use_member='wifi_wan_member_balance'</pre> | uci add_list mwan3.balance_default.use_member='wifi_wan_member_balance'</pre> | ||
| + | |||
| + | ====IPv6 interface creation==== | ||
| + | ---- | ||
| + | Create a new IPv6 interface for WiFi WAN | ||
| + | <pre>uci set network.wifi_wan6=interface | ||
| + | uci set network.wifi_wan6.proto='dhcpv6' | ||
| + | uci set network.wifi_wan6.metric='6' | ||
| + | uci set network.wifi_wan6.disabled='0' | ||
| + | uci set network.wifi_wan6.force_link='0' | ||
| + | uci set network.wifi_wan6.reqaddress='try' | ||
| + | uci set network.wifi_wan6.reqprefix='auto' | ||
| + | uci set network.wifi_wan6.device='@wifi_wan'</pre> | ||
Set proper ipv6 settings for wifi_wan6 iface | Set proper ipv6 settings for wifi_wan6 iface | ||
| Line 139: | Line 156: | ||
uci set mwan3.default_rule_ipv6.family='ipv6'</pre> | uci set mwan3.default_rule_ipv6.family='ipv6'</pre> | ||
| + | ====LAN interface configuration==== | ||
| + | ---- | ||
| + | Configure a LAN interface accordingly. | ||
| + | <pre>uci set network.lan_repeater=interface | ||
| + | uci set network.lan_repeater.proto='relay' | ||
| + | uci set network.lan_repeater.lan_mark='lan' | ||
| + | uci set network.lan_repeater.enabled='1' | ||
| + | uci set network.lan_repeater.network='lan wifi_wan'</pre> | ||
| + | |||
| + | Set DHCP settings for LAN interface (disable dhcp on LAN) and enable IPv6 relay on wifi_wan interface and | ||
| + | |||
| + | <pre>uci set dhcp.lan.ignore='1' | ||
| + | uci set dhcp.lan.ra='relay' | ||
| + | uci set dhcp.lan.dhcpv6='relay' | ||
| + | uci set dhcp.lan.ndp='relay'</pre> | ||
| + | |||
| + | <pre>uci set dhcp.wifi_wan=dhcp | ||
| + | uci set dhcp.wifi_wan.ra='relay' | ||
| + | uci set dhcp.wifi_wan.dhcpv6='relay' | ||
| + | uci set dhcp.wifi_wan.master='1' | ||
| + | uci set dhcp.wifi_wan.ndp='relay'</pre> | ||
| + | |||
| + | ====Firewall configuration==== | ||
| + | ---- | ||
| + | Set firewall zone, using WAN firewall zone for newly created WiFi WAN network interface. | ||
| + | <pre>uci set firewall.@zone[1].network='wan wan6 mob1s1a1 mob1s2a1 wifi_wan'</pre> | ||
| + | |||
| + | ====Commit changes==== | ||
| + | ---- | ||
Save all the changes and restart the configuration | Save all the changes and restart the configuration | ||
| − | |||
<pre>uci commit | <pre>uci commit | ||
reload_config</pre> | reload_config</pre> | ||
| + | |||
| + | ==Testing the setup== | ||
| + | If you've taken all of the steps described above, the configuration is done. But as with any other configuration, it is always wise to test the set up in order to make sure that it works properly. | ||
| + | |||
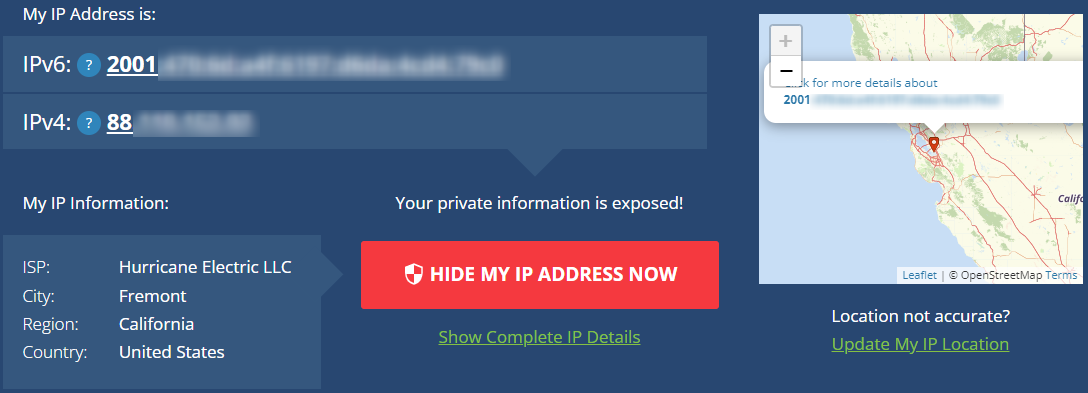
| + | * Check what IP address are you getting on [https://whatismyipaddress.com What is my IP address] website. | ||
| + | |||
| + | [[File:WhatismyIP.png|border|center|class=tlt-border|1088 × 393px]] | ||
| + | |||
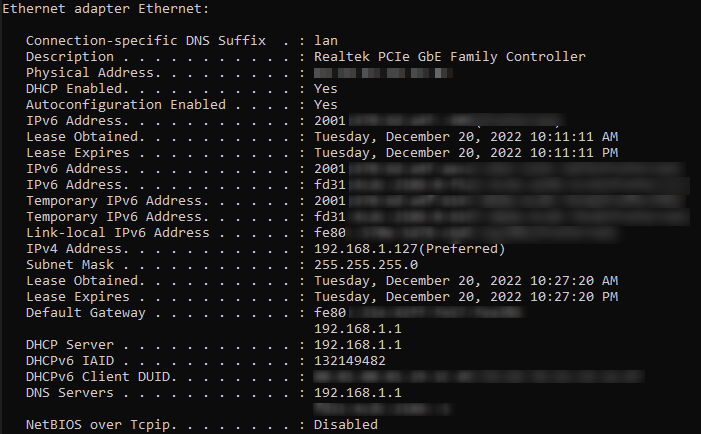
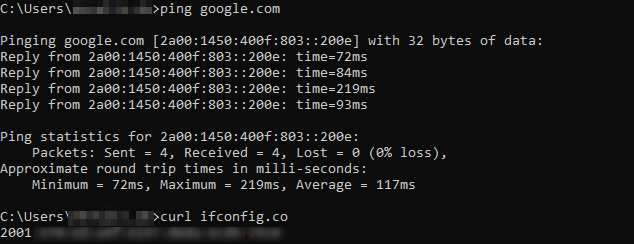
| + | * You can also check what IP address you are getting via command line interface. | ||
| + | |||
| + | [[File:IPV6 on PC.png|border|center|class=tlt-border|701 × 434px]] | ||
| + | |||
| + | [[File:Cmdoutput IPv6.png|border|center|class=tlt-border|634 × 244px]] | ||
| + | |||
| + | ==See also== | ||
| + | More information about [[RUTOS_relay_/_Wi-Fi_extender_/_repeater_/_bridge_configuration|RelayD]] | ||
| + | ==External links== | ||
| + | More about [http://tunnelbroker.net TunnelBroker.net] | ||
Latest revision as of 11:31, 12 April 2023
The information in this page is updated in accordance with 00.07.03 firmware version.
Introduction
This article contains instructions on how to do UCI-based configuration for setting up RelayD with IPv4+IPv6 support.
Tunnelbroker configuration
Tunnelbroker is a website operated by Hurricane Electric, a leading provider of internet services and networking solutions. The website provides a service called Hurricane Electric IPv6 Tunnel Broker, which allows users to create an IPv6 tunnel between their network and Hurricane Electric's network. This allows users to connect their devices to the internet using the IPv6 protocol, even if their internet service provider (ISP) does not support IPv6.
Login
Go to tunnelbroker.net and log into your account. If you don't have a registered account then you will need to create one - click register.
IPv6 to IPv4 tunnel creation
Setup IPv6 over IPv4, also known as 6in4 IPv6 transition mechanism. To create a new tunnel:
- Click on create regular tunnel,
- Enter your public IP (it will light up green, if the tunnel can be created with this IP),
- Select the desired tunnel server,
To establish the tunnel, at the bottom of the page, you should see Create tunnel.
After successful tunnel creation, you will be prompt to tunnel details window.
To create a a tunnel instance on your RUT router, navigate to example configurations, there, select OpenWRT Barrier Breaker. and paste the following commands into your router CLI.
Note: Do not forget to replace YOUR_TUNNELBORKER_USERNAME and YOUR_TUNNELBROKER_PASSWORD with your TunnelBroker account username and password.
Use the cat /etc/config/network command in routers CLI to see if the new interface was successfully created.
Router configuration
Relayd and interface configuration using UCI
Relay is a daemon (computer program that runs as a background process) used to relay and dynamically redirect incoming connections to a target host. Its main purpose in RUTxxx routers is to extend the wireless network. For example, when RUTxxx is in STA Wireless Station mode, it can be used to bridge WAN and LAN interfaces to create a larger Wireless network.
Unified Configuration Interface (UCI) is a small utility written in C (a shell script-wrapper is available as well) and is intended to centralize the whole configuration of a device running on OpenWrt.
Relayd installation
Install relayd package if needed, skip this step on RUTX series devices or if you already installed it on your router
opkg update
opkg install relayd
WiFi client configuration
Add WiFi interface to make your router act as a WiFi client (connect to another AP)
uci add wireless wifi-iface
uci set wireless.@wifi-iface[-1]=wifi-iface
Add new WiFi interface to 2.4ghz device, can specify 'radio1' for 5ghz
uci set wireless.@wifi-iface[-1].device='radio0'
uci set wireless.@wifi-iface[-1].mode='sta'
uci set wireless.@wifi-iface[-1].network='wifi_wan'
Change SSID here to an SSID that the router will be connecting to
uci set wireless.@wifi-iface[-1].ssid='RUT1_SSID'
Change BSSID here to BSSID that the router will be connecting to (L2 address)
uci set wireless.@wifi-iface[-1].bssid='RUT1_BSSID'
Use appropriate encryption method, PSK2 = WPA2-PSK here
uci set wireless.@wifi-iface[-1].encryption='psk2'
Change secret to appropriate one
uci set wireless.@wifi-iface[-1].key='SSID_PASSWORD'
uci set wireless.@wifi-iface[-1].disabled='0'
uci set wireless.@wifi-iface[-1].skip_inactivity_poll='0'
uci set wireless.@wifi-iface[-1].wifi_id='wifi1'
IPv4 interface creation
Create a new interface IPv4 for WiFi WAN.
uci set network.wifi_wan=interface
uci set network.wifi_wan.proto='dhcp'
uci set network.wifi_wan.metric='6'
uci set network.wifi_wan.disabled='0'
uci set network.wifi_wan.force_link='0'
uci set network.wifi_wan.broadcast='0'
Set mwan3 settings for new interface
uci set mwan3.wifi_wan=interface
uci set mwan3.wifi_wan.enabled='0'
uci set mwan3.wifi_wan.interval='3'
uci set mwan3.wifi_wan.family='ipv4'
uci add mwan3 condition
uci set mwan3.@condition[-1].interface='wifi_wan'
uci set mwan3.@condition[-1].track_method='ping'
uci add_list mwan3.@condition[-1].track_ip='1.1.1.1'
uci add_list mwan3.@condition[-1].track_ip='8.8.8.8'
uci set mwan3.@condition[-1].reliability='1'
uci set mwan3.@condition[-1].count='1'
uci set mwan3.@condition[-1].timeout='2'
uci set mwan3.@condition[-1].down='3'
uci set mwan3.@condition[-1].up='3'
uci set mwan3.wifi_wan_member_mwan=member
uci set mwan3.wifi_wan_member_mwan.interface='wifi_wan'
uci set mwan3.wifi_wan_member_mwan.metric='1'
uci set mwan3.wifi_wan_member_balance=member
uci set mwan3.wifi_wan_member_balance.interface='wifi_wan'
uci set mwan3.wifi_wan_member_balance.weight='1'
uci add_list mwan3.mwan_default.use_member='wifi_wan_member_mwan'
uci add_list mwan3.balance_default.use_member='wifi_wan_member_balance'
IPv6 interface creation
Create a new IPv6 interface for WiFi WAN
uci set network.wifi_wan6=interface
uci set network.wifi_wan6.proto='dhcpv6'
uci set network.wifi_wan6.metric='6'
uci set network.wifi_wan6.disabled='0'
uci set network.wifi_wan6.force_link='0'
uci set network.wifi_wan6.reqaddress='try'
uci set network.wifi_wan6.reqprefix='auto'
uci set network.wifi_wan6.device='@wifi_wan'
Set proper ipv6 settings for wifi_wan6 iface
uci set mwan3.wifi_wan6=interface
uci set mwan3.wifi_wan6.enabled='0'
uci set mwan3.wifi_wan6.interval='3'
uci set mwan3.wifi_wan6.family='ipv6'
uci add mwan3 condition
uci set mwan3.@condition[-1].interface='wifi_wan6'
uci set mwan3.@condition[-1].track_method='ping'
uci add_list mwan3.@condition[-1].track_ip='2606:4700:4700::1111'
uci add_list mwan3.@condition[-1].track_ip='2001:4860:4860::8888'
uci set mwan3.@condition[-1].reliability='1'
uci set mwan3.@condition[-1].count='1'
uci set mwan3.@condition[-1].timeout='2'
uci set mwan3.@condition[-1].down='3'
uci set mwan3.@condition[-1].up='3'
uci set mwan3.wifi_wan6_member_mwan=member
uci set mwan3.wifi_wan6_member_mwan.interface='wifi_wan6'
uci set mwan3.wifi_wan6_member_mwan.metric='1'
uci set mwan3.wifi_wan6_member_balance=member
uci set mwan3.wifi_wan6_member_balance.interface='wifi_wan6'
uci set mwan3.wifi_wan6_member_balance.weight='1'
uci add_list mwan3.mwan_default.use_member='wifi_wan6_member_mwan'
uci add_list mwan3.balance_default.use_member='wifi_wan6_member_balance'
uci set mwan3.default_rule_ipv6=rule
uci set mwan3.default_rule_ipv6.dest_ip='::/0'
uci set mwan3.default_rule_ipv6.use_policy='mwan_default'
uci set mwan3.default_rule_ipv6.family='ipv6'
LAN interface configuration
Configure a LAN interface accordingly.
uci set network.lan_repeater=interface
uci set network.lan_repeater.proto='relay'
uci set network.lan_repeater.lan_mark='lan'
uci set network.lan_repeater.enabled='1'
uci set network.lan_repeater.network='lan wifi_wan'
Set DHCP settings for LAN interface (disable dhcp on LAN) and enable IPv6 relay on wifi_wan interface and
uci set dhcp.lan.ignore='1'
uci set dhcp.lan.ra='relay'
uci set dhcp.lan.dhcpv6='relay'
uci set dhcp.lan.ndp='relay'
uci set dhcp.wifi_wan=dhcp
uci set dhcp.wifi_wan.ra='relay'
uci set dhcp.wifi_wan.dhcpv6='relay'
uci set dhcp.wifi_wan.master='1'
uci set dhcp.wifi_wan.ndp='relay'
Firewall configuration
Set firewall zone, using WAN firewall zone for newly created WiFi WAN network interface.
uci set firewall.@zone[1].network='wan wan6 mob1s1a1 mob1s2a1 wifi_wan'
Commit changes
Save all the changes and restart the configuration
uci commit
reload_config
Testing the setup
If you've taken all of the steps described above, the configuration is done. But as with any other configuration, it is always wise to test the set up in order to make sure that it works properly.
- Check what IP address are you getting on What is my IP address website.
- You can also check what IP address you are getting via command line interface.
See also
More information about RelayD
External links
More about TunnelBroker.net
