Difference between revisions of "OpenVPN server on Windows"
PauliusRug (talk | contribs) |
|||
| (39 intermediate revisions by 7 users not shown) | |||
| Line 1: | Line 1: | ||
==Introduction== | ==Introduction== | ||
| − | + | {{Template:openvpn introduction}} | |
This article contains step-by-step instructions on how to create and run an OpenVPN server on a PC that runs on Windows OS. The information provided here is geared towards users of almost any knowledge level. The instructions apply to Windows 7 and newer systems. | This article contains step-by-step instructions on how to create and run an OpenVPN server on a PC that runs on Windows OS. The information provided here is geared towards users of almost any knowledge level. The instructions apply to Windows 7 and newer systems. | ||
| Line 10: | Line 10: | ||
'''Prerequisites''': | '''Prerequisites''': | ||
| − | * A PC or Laptop running on Windows 7 or a later version | + | |
| − | * The | + | *A PC or Laptop running on Windows 7 or a later version |
| − | * | + | *The computer in question must have a '''[[Private_and_Public_IP_Addresses#Public_IP_address|Public IP address]]''' |
| + | *And an active Internet connection | ||
| + | |||
---- | ---- | ||
'''Objective''': | '''Objective''': | ||
| Line 18: | Line 20: | ||
The purpose of this article is to provide the know-how needed to configure a working OpenVPN server on a Windows PC. | The purpose of this article is to provide the know-how needed to configure a working OpenVPN server on a Windows PC. | ||
| − | + | {{Template:installing openvpn software}} | |
| + | {{Template:preparing easyrsa}} | ||
| + | {{Template:generating certificates and keys}} | ||
| − | + | ==Step 4: OpenVPN server configuration== | |
| − | + | ||
| − | + | In this section we'll be discussing how to configure an OpenVPN Tunnel (TUN) server that uses: | |
| − | |||
| − | |||
| − | |||
| − | |||
| − | |||
| − | |||
| − | |||
| − | + | *The UDP protocol | |
| + | *TLS authentication | ||
| + | As a template, we'll be using the sample configuration file that comes along with the OpenVPN installation, but we'll be adding with some minor changes to it. You can find it in the ''OpenVPN'' installation directory, ''sample-config'' folder (default: ''C:\Program Files\OpenVPN\sample-config'') under the name '''''server.ovpn'''''. | ||
| + | ---- | ||
<ul> | <ul> | ||
| − | <li> | + | <li>When you locate the file, make a copy, rename it and place it in the '''''config''''' directory of the OpenVPN folder (default path: ''C:\Program Files\OpenVPN\config''). You should also copy the certificates and keys to this directory (required files: ''ca.crt'', ''server.crt'', ''server.key'', ''dh2048.pem''). |
| − | + | </li> | |
| − | + | <li>Open the config file with a text editor. You can use the Notepad, but for editing configuration files we recommend using '''Notepad++''' for a better experience (you can download it from '''[https://notepad-plus-plus.org/download/v7.5.8.html here]'''). | |
</li> | </li> | ||
| − | + | <li>Locate the following lines: | |
| − | <li> | ||
<ul> | <ul> | ||
| − | <pre> | + | <pre>ca ca.crt |
| + | cert server.crt | ||
| + | key server.key | ||
| + | dh dh1024.pem</pre> | ||
</ul> | </ul> | ||
</li> | </li> | ||
| − | + | <li>Edit the lines in a way that corresponds with the actual file paths. The defaults used in this example are: | |
| − | <li> | ||
<ul> | <ul> | ||
| − | <pre> | + | <pre>ca "C:\\Program Files\\OpenVPN\\config\\ca.crt" |
| + | cert "C:\\Program Files\\OpenVPN\\config\\server.crt" | ||
| + | key "C:\\Program Files\\OpenVPN\\config\\server.key" | ||
| + | dh "C:\\Program Files\\OpenVPN\\config\\dh2048.pem"</pre> | ||
</ul> | </ul> | ||
| + | '''NOTE''': Diffie Hellman parameters file name will depend on the key size that you specified in the ''vars.bat'' file. Don't forget to change it accordingly. | ||
</li> | </li> | ||
| − | + | <li>Next comes the preferential configurations, i.e., whether you want UDP or TCP, Tunnel or Bridge, server's network, keep alive, cipher values, etc. You should configure these options in accordance with your needs. Bellow is an image of what the final configuration from this example looks like (with the comments present in the sample deleted file for more clarity): | |
| − | <li> | + | <ul>[[File:Openvpn windows server setup step 4 server config.png]] |
| − | <ul> | ||
| − | |||
</ul> | </ul> | ||
| − | + | The following changes were made to the sample file: | |
| − | |||
| − | |||
<ul> | <ul> | ||
| − | < | + | <li>Changed ''udp'' to ''udp4'' to indicate that the connection should use only IPv4</li> |
| − | + | <li>Added ''client-config-dir'' option for possible TLS client configuration</li> | |
| − | + | <li>Changed the ''ifconfig-pool-persist'' file path</li> | |
| − | + | <li>Changes to the certificate and key file paths</li><li>Note: cipher AES-256-CBC is deprecated in v.2.5. Change CBC to GCM | |
| − | + | </li><li>You can harden (add security) to the VPN by creating a ta.key (''openvpn--genkey --secret keys/ta.key'') file on the server, placing it in the config folder and copying it to the config folder of all client machines. | |
| − | + | </li><li>Edit the server.ovpn file found in the OpenVPN/sample-config folder. Lines that begin with # or ; will be ignored.) Feel free to change it however you want.</li></ul> | |
| − | </li> | + | </li></ul> |
| − | + | ==Step 5: configuring clients== | |
| − | |||
| − | |||
| − | |||
| − | |||
| − | + | Install OpenVPN on all client machines, but omit Steps 2, 3 and 4 above. Just copy the ca.crt , client.crt and client.key files already created on the server machine in Step 4 above to the config folder of the relevant client machine. | |
| − | + | The next step is to create a configuration file for the clients. Edit the client.ovpn file found in the sample-config folder and save it. Now open the separate article: '''[[OpenVPN client on Windows]],''' but note that only the latter part is relevant to this page. Begin at the line "• Save the file with an '''.ovpn''' extension." | |
| − | |||
| − | |||
| − | |||
| − | |||
| − | |||
| − | + | Note: The edited client.ovpn file can be copied to all the client machines unless specific changes need to be made. | |
| − | |||
| − | |||
| − | |||
| − | |||
| − | |||
| − | + | ==Step 6: launching the server== | |
| − | |||
| − | |||
| − | |||
| − | |||
| − | |||
| − | + | If you've followed all the steps until now, your OpenVPN server configuration is complete! The next thing to do is to simply launch the server. | |
| − | |||
| − | |||
| − | |||
| − | |||
| − | |||
| − | <li> | + | <ul> |
| + | <li>Run the '''OpenVPN GUI''' application '''as administrator''' in order for the application to be able to fill log files.</li> | ||
| + | <li>Locate OpenVPN GUI in the Windows system tray. Right click it and click '''Connect''': | ||
<ul> | <ul> | ||
| − | + | [[File:Openvpn windows server setup step 6 launching the server.png]] | |
</ul> | </ul> | ||
</li> | </li> | ||
</ul> | </ul> | ||
| − | == | + | ==See also== |
| + | |||
| + | *[[OpenVPN client on Windows]] | ||
| + | *[[OpenVPN configuration examples]] | ||
| + | *[[OpenVPN traffic split]] | ||
| + | |||
| + | ==External links== | ||
| − | * | + | *OpenVPN downloads: https://openvpn.net/index.php/open-source/downloads.html |
| + | *OpenVPN manual: https://openvpn.net/index.php/open-source/documentation/manuals.html | ||
| + | *Notepad++ downloads: https://notepad-plus-plus.org/download/v7.5.8.html | ||
| + | [[Category:Windows]] | ||
Latest revision as of 15:03, 2 August 2023
Main Page > General Information > Configuration Examples > PC > Windows > OpenVPN server on WindowsIntroduction
OpenVPN is an open-source software application that implements virtual private network (VPN) techniques for creating secure point-to-point or site-to-site connections in routed or bridged configurations and remote access facilities.
This article contains step-by-step instructions on how to create and run an OpenVPN server on a PC that runs on Windows OS. The information provided here is geared towards users of almost any knowledge level. The instructions apply to Windows 7 and newer systems.
Configuration overview and prerequisites
Before we begin, let's overview the configuration that we are attempting to achieve and the prerequisites that make it possible.
Prerequisites:
- A PC or Laptop running on Windows 7 or a later version
- The computer in question must have a Public IP address
- And an active Internet connection
Objective:
The purpose of this article is to provide the know-how needed to configure a working OpenVPN server on a Windows PC.
Step 1: installing OpenVPN software
- Download an OpenVPN installer file from here.
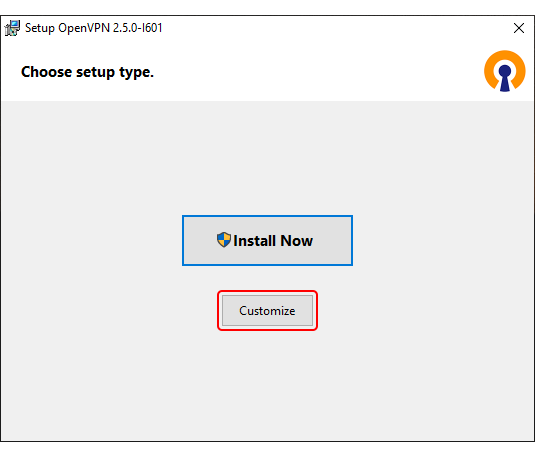
Run the downloaded file. - Before starting the installation process, click 'Customize':
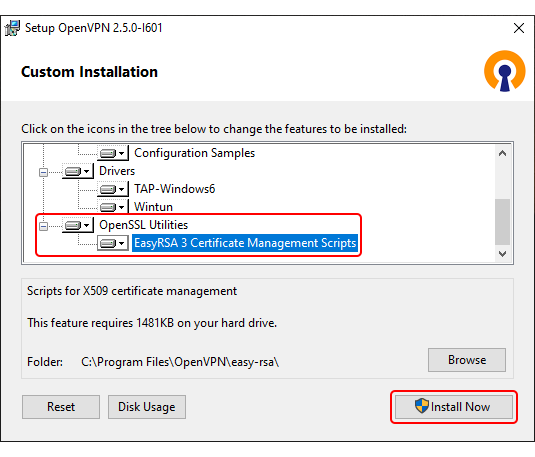
- While in the 'Custom Installation' window, scroll down to find OpenSSL Utilities → EasyRSA 3 Certificate Management Scripts; make sure it is installed along with OpenVPN and click 'Install Now':


Step 2: preparing EasyRSA
- Now we can start preparing to generate certificates and keys. For this we'll be using the EasyRSA 3 application that was installed along with OpenVPN.
EasyRSA commands have to be executed via the Windows Command Prompt. It can be opened by typing cmd in the Windows search bar (Windows button + S). When you launch it, make sure you run it as administrator: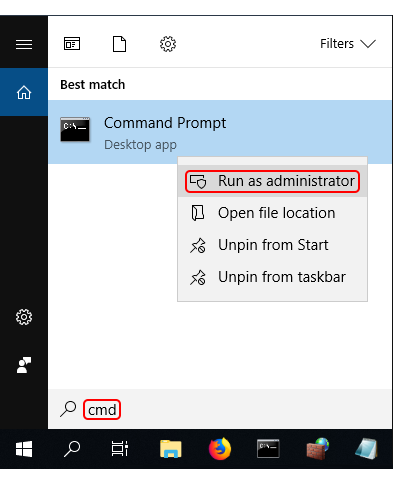
- Change the current directory to the EasyRSA folder. To do so, execute this command:
cd "C:\Program Files\OpenVPN\easy-rsa"
- Launch EasyRSA:
EasyRSA-Start.bat
- Before you can generate files with EasyRSA, you must first initialize a directory for the Public Key Infrastructure (PKI). This can be done with the following command:
./easyrsa init-pki
- Open the vars.bat file with the Notepad text editor:
notepad vars.bat
- This is the template file for generating certificates, i.e., the information stored here will be offered as default values during certificate generation. Locate and edit the following lines in accordance with your needs:
set KEY_COUNTRY=US
set KEY_PROVINCE=CA
set KEY_CITY=SanFrancisco
set KEY_ORG=OpenVPN
set [email protected]
- You can also set the key size for the Diffie Hellman parameters:
set DH_KEY_SIZE=2048
- Once you're done, save the file and close the editor; then run the following commands:
vars.bat
./easyrsa clean-all

Step 3: generating certificates and keys
- Now we can start generating the certificates and keys. Begin with the certificate authority (CA) - the root certificate file that will be used to sign other certificates and keys:
./easyrsa build-ca nopass
- Next, build the server certificate and key:
./easyrsa build-server-full server nopass
- Next, build certificates and keys for the clients:
./easyrsa build-client-full Client1 nopass
Note: replace Client1 with this client's Common Name (CN). Omit "nopass" and you will be prompted to choose the client's password. - Lastly, generate Diffie Hellman parameters:
./easyrsa gen-dh
The generated and signed files should appear in the following directories (by default):
| File(s) | Location | |
|---|---|---|
| CA certificate | → | C:\Program Files\OpenVPN\easy-rsa\pki |
| Diffie-Hellman parameters | → | C:\Program Files\OpenVPN\easy-rsa\pki |
| Client and Server keys | → | C:\Program Files\OpenVPN\easy-rsa\pki\private |
| Client and Server certificates | → | C:\Program Files\OpenVPN\easy-rsa\pki\issued |
Step 4: OpenVPN server configuration
In this section we'll be discussing how to configure an OpenVPN Tunnel (TUN) server that uses:
- The UDP protocol
- TLS authentication
As a template, we'll be using the sample configuration file that comes along with the OpenVPN installation, but we'll be adding with some minor changes to it. You can find it in the OpenVPN installation directory, sample-config folder (default: C:\Program Files\OpenVPN\sample-config) under the name server.ovpn.
- When you locate the file, make a copy, rename it and place it in the config directory of the OpenVPN folder (default path: C:\Program Files\OpenVPN\config). You should also copy the certificates and keys to this directory (required files: ca.crt, server.crt, server.key, dh2048.pem).
- Open the config file with a text editor. You can use the Notepad, but for editing configuration files we recommend using Notepad++ for a better experience (you can download it from here).
- Locate the following lines:
ca ca.crt
cert server.crt
key server.key
dh dh1024.pem
ca "C:\\Program Files\\OpenVPN\\config\\ca.crt"
cert "C:\\Program Files\\OpenVPN\\config\\server.crt"
key "C:\\Program Files\\OpenVPN\\config\\server.key"
dh "C:\\Program Files\\OpenVPN\\config\\dh2048.pem"
NOTE: Diffie Hellman parameters file name will depend on the key size that you specified in the vars.bat file. Don't forget to change it accordingly.

The following changes were made to the sample file:
- Changed udp to udp4 to indicate that the connection should use only IPv4
- Added client-config-dir option for possible TLS client configuration
- Changed the ifconfig-pool-persist file path
- Changes to the certificate and key file paths
- Note: cipher AES-256-CBC is deprecated in v.2.5. Change CBC to GCM
- You can harden (add security) to the VPN by creating a ta.key (openvpn--genkey --secret keys/ta.key) file on the server, placing it in the config folder and copying it to the config folder of all client machines.
- Edit the server.ovpn file found in the OpenVPN/sample-config folder. Lines that begin with # or ; will be ignored.) Feel free to change it however you want.
Step 5: configuring clients
Install OpenVPN on all client machines, but omit Steps 2, 3 and 4 above. Just copy the ca.crt , client.crt and client.key files already created on the server machine in Step 4 above to the config folder of the relevant client machine.
The next step is to create a configuration file for the clients. Edit the client.ovpn file found in the sample-config folder and save it. Now open the separate article: OpenVPN client on Windows, but note that only the latter part is relevant to this page. Begin at the line "• Save the file with an .ovpn extension."
Note: The edited client.ovpn file can be copied to all the client machines unless specific changes need to be made.
Step 6: launching the server
If you've followed all the steps until now, your OpenVPN server configuration is complete! The next thing to do is to simply launch the server.
- Run the OpenVPN GUI application as administrator in order for the application to be able to fill log files.
- Locate OpenVPN GUI in the Windows system tray. Right click it and click Connect:


See also
External links
- OpenVPN downloads: https://openvpn.net/index.php/open-source/downloads.html
- OpenVPN manual: https://openvpn.net/index.php/open-source/documentation/manuals.html
- Notepad++ downloads: https://notepad-plus-plus.org/download/v7.5.8.html

