PPTP configuration examples RutOS
The information in this page is updated in accordance with firmware version RUTX_R_00.07.02.7.
Introduction
Point-to-Point Tunneling Protocol (PPTP) is a Virtual Private Network (VPN) protocol that uses a TCP control channel and a Generic Routing Encapsulation (GRE) tunnel to encapsulate PPP packets.
This article provides an extensive configuration example with details on how to create a connection between a PPTP Server and Client, both of which are configured on RUTxxx routers.
Configuring both server and client PPTP tunnel on our devices
Configuration overview and prerequisites
Before we begin, let's overview the configuration that we are attempting to achieve and the prerequisites that make it possible.
Prerequisites:
- Two RUTxxx routers of any type (excluding RUT850)
- A SIM card with a Public Static or Public Dynamic IP address for the PPTP Server
- An end device (PC, Laptop, Tablet, Smartphone) to configure the routers
Configuration scheme:
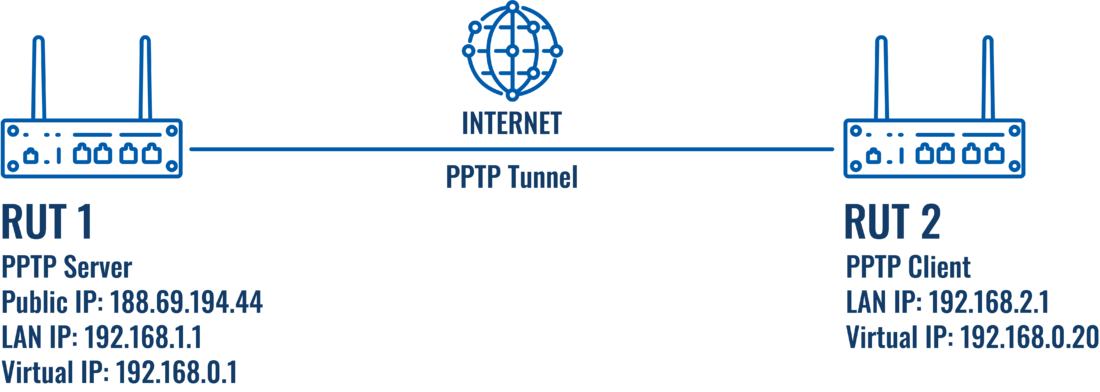
As indicated by the figure above, the configuration we are trying to achieve here is very basic: it concerns two RUTxxx routers - RUT1 and RUT2. One functions as a PPTP Server, and the other - is a PPTP Client. They are connected to a virtual network via a PPTP Tunnel.
Router configuration
If you have familiarized yourself with the configuration scheme and have all of the devices in order, we can start configuring the routers using the instructions provided in this section.
PPTP Server (RUT1)
As mentioned in the prerequisites section, the router that acts as the server must have a Public Static or Public Dynamic IP address (more information on the subject can be found here). If that is in order, we should start configuring the server.
- Login to the router's WebUI and go to Services → VPN → PPTP. Select Role: Server, enter a name for the new instance and click the "Add" button:
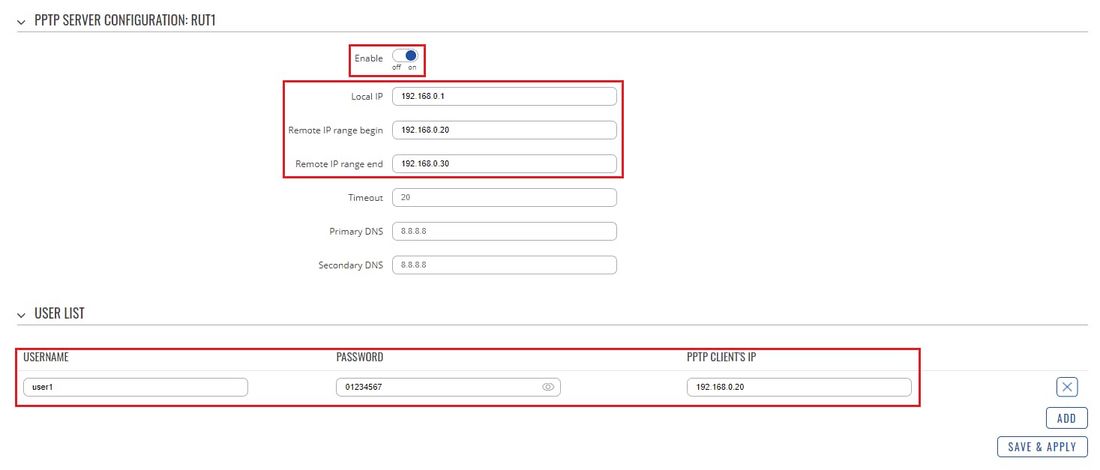
- Click the "Edit" button located to the right of the newly created PPTP Server to enter the instance's settings window. The configuration is fairly simple, just remember to Enable the instance:
- The rest of the parameters are user preferential so you should set them as you see fit. A short explanation on these parameters is provided below:
- Local IP defines the server's virtual IP address
- Remote IP range parameters define the range of virtual IP addresses that will be assigned to connecting clients
- User name and Password parameters define a client's authentication info
- PPTP Client's IP is used to assign a specific virtual IP to a specific client. It is not mandatory and, if left empty, the client will be assigned an IP address from the Remote IP range specified above
Once you're done setting these parameters don't forget to click the Save button.
PPTP Client (RUT2)
- Now let's configure the PPTP Client. Login to the router's WebUI and go to Services → VPN → PPTP. Select Role: Client, enter a name for the new instance and click the "Add" button:
- Click the "Edit" button located to the right of the newly created PPTP Client to enter the instance's settings window. In the settings window, Enable the PPTP instance, specify the server's Public (WAN) IP address and the client's authentication info as specified in the server's configuration:
Once this is done, don't forget to save the changes.
- Optional: if you plan on using the server as a default gateway, you should also enable the Default route option in the client's configuration:
Testing the setup
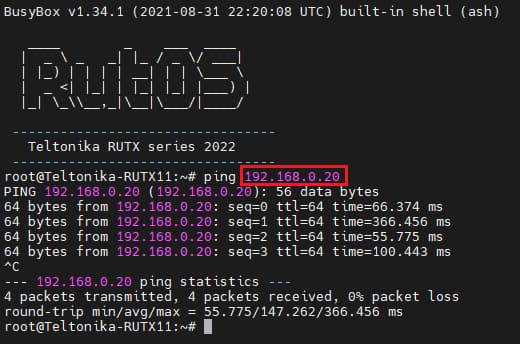
If you've followed the steps presented above, your configuration should be finished. But as with any other configuration, it is always wise to test the setup in order to make sure that it works properly. In order to test a PPTP connection, log in to one of the routers' WebUIs and go to Services → CLI. Log in with the user name: root and the router's admin password. You should then be able to ping the opposite instance, i.e., if you logged in to the server's CLI, you should be able to ping the client's virtual IP address, and vice versa. To use a ping command, type ping <ip_address> and press the "Enter" key on your keyboard:
If the ping requests are successful, congratulations, your setup works! If not, we suggest that you review all the steps once more.
If you're using the server as a default gateway, end devices connected to the PPTP client router should have the Public IP address of the PPTP server. You can visit this website to check the Public IP address: http://www.whatsmyip.org/
Configuring client PPTP tunnel using Third-party PPTP service provider
Configuration overview and prerequisites
We are going to use VPNBOOK's PPTP service to configure our device as a client.
Only one device with RutOS is required.
Topology
Acquiring PPTP server's information
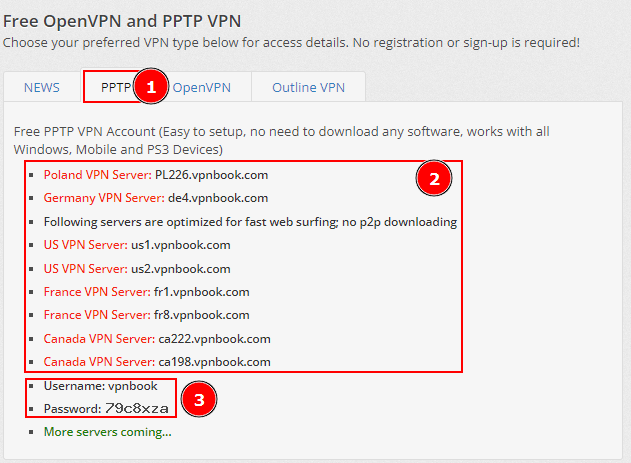
Open your internet browser and type www.vpnbook.com in the browser's URL bar.
- Press PPTP
- Copy desired server's address.
- Write down the username and password as it will be needed to connect using this provider.
Router configuration
- Navigate to Services -> VPN -> PPTP.
- Type name.
- Choose client type.
- Add this new instance.
- Enable new instance
- Paste server's address you've copied earlier
- Type username and password provided by the service provider.
- Enable default route option to route all internet traffic through this PPTP tunnel.
- Save
Testing
Using CLI, type "ifconfig", where you should see a new interface has been created:

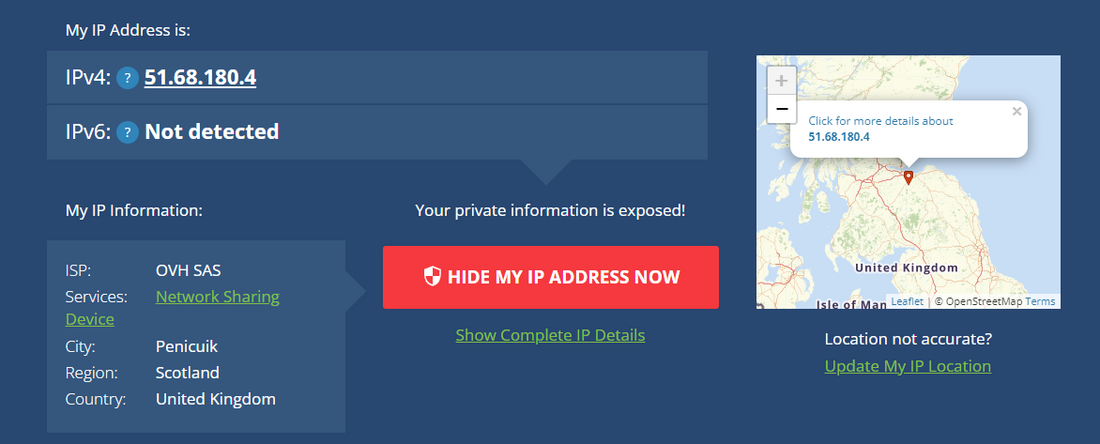
You can check your IP location on WhatIsMyIPAddress.
See also
- Other types of VPNs suported by RUTxxx devices:
