Difference between revisions of "RMS Device menu"
(Created page with "The '''Device''' top control menu is located in the '''Management''' menu section. ==Summary== Can use '''Device''' menu to add or remove devices, change...") |
|||
| Line 2: | Line 2: | ||
==Summary== | ==Summary== | ||
| + | [[File:Rmsdevices3.png|border|class=tlt-border]] | ||
| − | + | '''Device''' menu can be used to manage services, set packs or remove devices. | |
| + | ==Manage services== | ||
| + | [[File:Rmsdevices4.png|border|class=tlt-border]] | ||
| − | + | Here you can enable/disable features: | |
| − | |||
| − | + | '''Service''' - This switch controls your credit activation and is used to manually use a credit and enable the service to a device if it wasn't automatically enabled after 30 days (due to Auto Extend being disabled). Cannot be disabled if a device has used a credit the past 30 days. This feature is used when you want to only manually use credits for each device. | |
| − | |||
| − | + | '''Monitoring''' - This switch controls monitoring of each device. When monitoring is disabled, a device will appear offline and will not be monitored. After re-enabling monitoring, it may take a few minutes for a device to become online again. This feature is used for saving data, as a device with disabled monitoring will not send data until monitoring is re-enabled. | |
| − | + | '''Auto Extend''' - This switch controls if a credit will be automatically used by a device after each 30 day period. When disabled, after a credit becomes invalid, the device in question will become offline until a credit is manually assigned using the 'Service' switch. Keep in mind, even if 'Monitoring' is disabled, a credit will still be used if 'Auto Extend' is enabled. | |
| − | + | '''Remaining data''' - shows the remaining data left on the selected device. | |
| − | + | ==Set pack== | |
| − | |||
| − | |||
| − | |||
| − | |||
| − | |||
| − | |||
| − | |||
| − | |||
| − | |||
| − | |||
| − | |||
| − | |||
| − | |||
| − | |||
| − | |||
| − | |||
| − | |||
| − | |||
| − | |||
| − | |||
| − | |||
| − | |||
| − | |||
| − | |||
| − | |||
| − | |||
| − | |||
| − | |||
| − | |||
| − | |||
| − | |||
| − | |||
| − | |||
| − | |||
| − | |||
| − | |||
| − | |||
| − | |||
| − | |||
| − | |||
| − | |||
| − | |||
| − | |||
| − | |||
| − | |||
| − | |||
| − | |||
| − | |||
| − | |||
| − | |||
| − | |||
| − | |||
| − | |||
| − | === | ||
| − | |||
| − | |||
| − | |||
| − | |||
| − | |||
| − | |||
==Unregister device(s)== | ==Unregister device(s)== | ||
Revision as of 15:07, 30 November 2022
Main Page > IoT Platforms > RMS > RMS Manual > RMS Management > RMS Devices > RMS Device menuThe Device top control menu is located in the Management menu section.
Summary
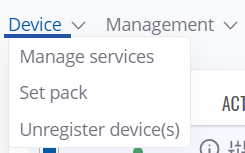
Device menu can be used to manage services, set packs or remove devices.
Manage services
Here you can enable/disable features:
Service - This switch controls your credit activation and is used to manually use a credit and enable the service to a device if it wasn't automatically enabled after 30 days (due to Auto Extend being disabled). Cannot be disabled if a device has used a credit the past 30 days. This feature is used when you want to only manually use credits for each device.
Monitoring - This switch controls monitoring of each device. When monitoring is disabled, a device will appear offline and will not be monitored. After re-enabling monitoring, it may take a few minutes for a device to become online again. This feature is used for saving data, as a device with disabled monitoring will not send data until monitoring is re-enabled.
Auto Extend - This switch controls if a credit will be automatically used by a device after each 30 day period. When disabled, after a credit becomes invalid, the device in question will become offline until a credit is manually assigned using the 'Service' switch. Keep in mind, even if 'Monitoring' is disabled, a credit will still be used if 'Auto Extend' is enabled.
Remaining data - shows the remaining data left on the selected device.
Set pack
Unregister device(s)
The Unregister device(s) function is used to remove the specific device(s) from the RMS system.
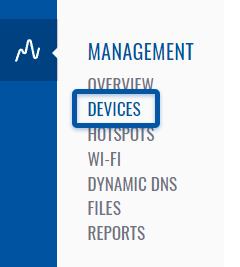
To unregister device(s) from RMS, go to Left sidebar panel (Management → Devices) and click on Devices submenu.
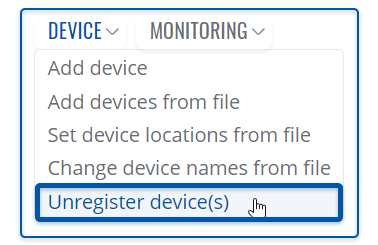
Move your mouse pointer to the Top control Device menu and select Unregister device(s) (Device → Unregister device(s)).
Read these step by step instructions to learn how to unregister device(s).
- To delete device(s) from the system, first select the devices that you wish to remove (you can delete any number of devices at once).
- Move your mouse pointer to the top control Device menu and select Unregister device(s).
- A pop window listing selected device(s) will appear.
- When ready, click the Confirm button.
When the device is removed you will get ✔ Done in the Status column.


