RUT900 Mobile (legacy WebUI)
The information in this page is updated in accordance with firmware version RUT9XX_R_00.06.09.5.
Note: this user manual page is for RUT900's old WebUI style available in earlier FW versions. Click here for information based on the latest FW version.
Summary
The Mobile page is used for setting parameters related to the mobile data connection. This page provides an overview of the Mobile page for RUT900 routers.
General
The General section is used to configure SIM card parameters that define how the device will establish a mobile connection.
Mobile Configuration
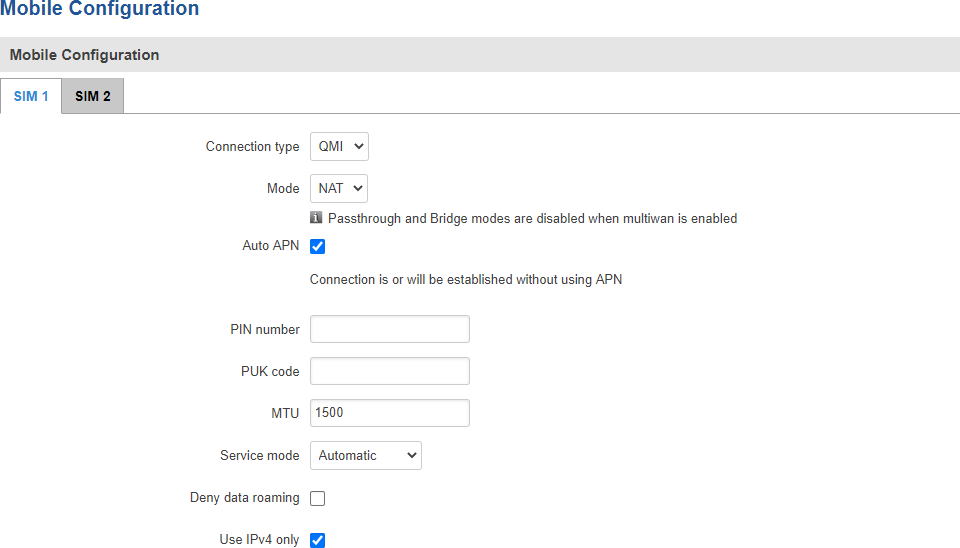
The Mobile Configuration section is used to configure main SIM card parameters. Refer to the figure and table below for information on the fields contained in that section.
| Field | Value | Description |
|---|---|---|
| Connection type | QMI | PPP; default: QMI | Defines how the modem will establish a connection to the ISP.
|
| Mode | NAT | Bridge * | Passthrough**; default: NAT | Mobile connection operation mode.
|
| Auto APN | yes | no; default: yes | Auto APN scans an internal Android APN database and selects an APN based on the SIM card's operator and country. If the first automatically selected APN doesn't work, it attempts to use the next existing APN from the database until it can establish a connection. If none of the APNs work, the router will try an empty APN value. |
| Custom APN | string; default: none | An Access Point Name (APN) is a gateway between a GSM, GPRS, 3G or 4G mobile network and another computer network. Depending on the contract, some operators may require you to use an APN just to complete the registration on a network. In other cases, APN is used to get special parameters from the operator (e.g., a public IP address) depending on the contract. An APN Network Identifier cannot start with any of the following strings:
|
| Authentication method | CHAP | PAP | None; default: None | Authentication method that your GSM carrier uses to authenticate new connections on its network. If you select PAP or CHAP, you will also be required to enter a username and password. |
| PIN number | string; default: none | A 4-digit long numeric password used to authenticate the modem to the SIM card. Reminder: Firstboot will not reset the PIN number, it must be changed manually |
| PUK number | string; default: none | A 12-digit long numeric password used to reset a personal identification number (PIN) that has been lost or forgotten. |
| Dialing number | string; default: *99# | A dial code used to establish a mobile PPP connection. |
| MTU | integer [0..1500]; default: 1500 | Sets the maximum transmission unit (MTU) size. It is the largest size of a protocol data unit (PDU) that can be transmitted in a single network layer transaction. |
| Service mode | 2G only | 3G only 2G + 3G | Automatic; default: Automatic | Your service mode preference. If your local mobile network supports 2G, 3G and 4G (LTE), you can specify to which type of network you wish to connect to. For example, if you choose 2G only, the router will connect to a 2G network, so long as it is available, otherwise it will connect to a network that provides better connectivity. If you select Automatic, then the router will connect to the network that provides the best connectivity. |
| Deny data roaming | yes | no; default: no | When enabled, this option prevents the device from establishing a mobile data connection while not in your home network (roaming conditions). |
| Use IPv4 only | yes | no; default: yes | When enabled, this makes the device only use IPv4 settings for the mobile connection. |
* more on Passthrough mode in section 2.3 of this page.
** more on Bridge mode in section 2.4 of this page.
Mobile data on demand
The mobile data on demand function keeps the mobile data connection on only when it is in use. When the router detects that there is no traffic, it shuts down the mobile data connection and turns it back on only when there is a "Demand" (a user trying to reach a website, for example). Refer to the figure and table below for more information.
| Field | Value | Description |
|---|---|---|
| Enable | yes | no; default: no | Turns mobile data on demand on or off Important: this function is only available with PPP Connection type. |
| No data timeout (sec) | integer [10..3600]; default: 10 | Mobile data connection will be terminated if no data is transferred during the timeout period specified in this field. |
Network frequency bands
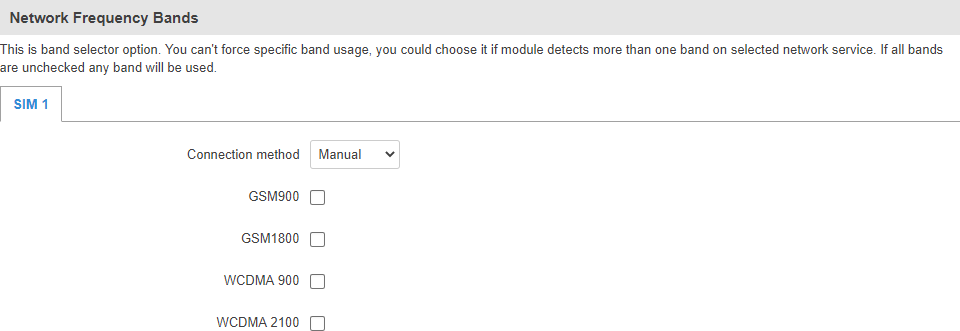
The network frequency bands section provides the possibility to manually choose which frequency band the router's module should use for the cellular connection.
Simply select Manual connection method and check the bands that you want the module to use. If all bands are unchecked, the band that provides the best connectivity will be used.
Available network frequency bands may differ based on the router's product code (different codes may indicate that the devices are using different modem variants). Click here for more information on frequency bands supported by RUT900.
You can find your router's modem variant in Status → Device Information page and checking FW Version field. Usually, the first 5-7 characters indicate the modem variant, while modem's FW version number begins with "GAR". For example:
Passthrough mode
In Passthrough mode the router assigns its mobile WAN IP address to another device. It is similar to Bridge mode, except in Passthrough mode other devices can still connect to the router and get LAN IP addresses and both other clients and the router retain Internet access, while Bridge mode also disables the router's DHCP Server.
To begin configuring Passthrough mode, make sure that WAN failover is turned off and mobile is set as main WAN in the Network → WAN page. Then in the Network → Mobile page select Mode: Passthrough in the mobile configuration section. You will then see additional configuration fields appear at the bottom of the section.
Important: using Passthrough mode will disable most of the router’s other capabilities.
| Field | Value | Description |
|---|---|---|
| DHCP mode | Static | Dynamic | No DHCP; default: Static | Specifies DHCP mode used with Passthrough.
|
| MAC address | mac; default: none | MAC address of a LAN device (e.g., computer). |
Bridge mode
In Bridge mode the router assigns its WAN IP address to another device. It is used instead of Network Address Translation (NAT) in order to make the router "transparent" in the communication process. The main difference between Passthrough and Bridge is that in Passthrough, the router's DHCP Server still works and the regular LAN interface is still up, allowing clients to connect to the router's local network as usual, while Bridge mode disables all of these features and simply gives the a single specified device its WAN IP address. Since Bridge uses less of the router's features, it is a bit faster than Passthrough.
To begin configuring Bridge mode, make sure that WAN failover is turned off and mobile is set as main WAN in the Network → WAN page. Then in the Network → Mobile page select Mode: Bridge in the mobile configuration section. You will then see an additional configuration field for entering a MAC address appear Mode field.
Important: using Bridge mode will disable most of the router’s other capabilities.
| Field | Value | Description |
|---|---|---|
| Bind to MAC | mac; default: none | Specifies the MAC address of the device that will work with the router in Bridge mode, i.e., the device whose MAC is specified in this field will be assigned the router's Mobile WAN IP address. |
If you have configured Bridge mode and can no longer reach your router, you'll need to set up a Static IP address on your PC in order to do so. If you don't know how to set up a Static IP, you can use one of our "how to" guide on this subject:
SIM Management
The SIM Management section provides you with the possibility to specify which SIM card slot is the primary one and setup SIM switching rules. SIM switching is used as a failover mechanism when the user has two working SIM cards. For example, if the user has two SIM cards with limited data, you can setup a rule that switches the SIM card in use to the secondary SIM card when the data limit is reached. You can setup similar rules for SMS limit, signal strength and more.
Primary card
The Primary card section is used to select which SIM slot will host the router's primary SIM card. The primary SIM card is the one which is active by default, while the secondary card stays inactive until switched to or set as primary.
Note: both SIM cards cannot be active at the same time.
SIM Switching
The SIM switching section is used to enable automatic SIM switching and to set the SIM switching check interval. Refer to the figure and table below for more information.
| Field | Value | Description |
|---|---|---|
| Enable automatic switching* | yes | no; default: no | Turns automatic SIM Switching on or off. |
| Check interval | integer; default: 30 | The frequency at which the router will check for condition changes corresponding to SIM switch rules. If such a condition exists, the router will perform a SIM switch, if not - it will check for the same conditions again after the amount of time specified in this field. |
SIM switching rules
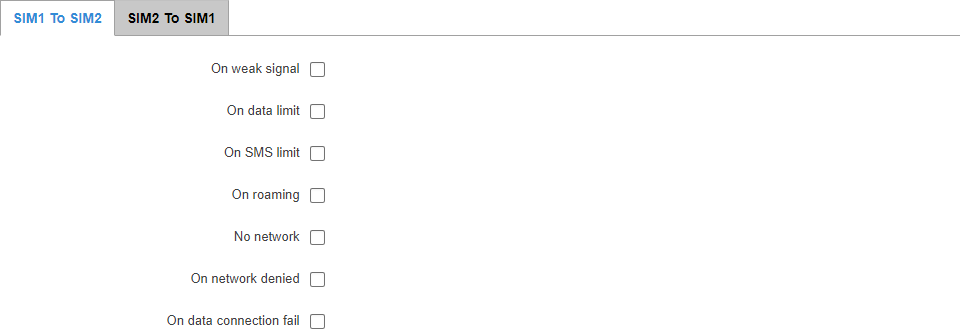
Below the SIM switching section you can configure SIM switching rules, i.e., set up circumstances under which the router will perform a switch from using one SIM card to the other. Refer to the figure and table below for information.
| Field | Value | Description |
|---|---|---|
| On weak signal | yes | no; default: no | Performs a SIM switch when signal strength value (RSSI in dBm) falls below a specified threshold. When this field is checked you will see an additional field for entering the minimum signal strength value appear. |
| On data limit | yes | no; default: no | Performs a SIM switch when the SIM card reaches the specified data limit for the designated period. Mobile data limit can be configured in the Services → Mobile → Mobile Data Limit page. |
| On SMS limit | yes | no; default: no | Performs a SIM switch when the SIM card reaches the specified sent SMS limit for the designated period. SMS limit can be configured in the Services → Mobile → SMS Limit page. |
| On roaming | yes | no; default: no | Performs a SIM switch when roaming conditions are detected (i.e., when the SIM card connects to a foreign operator). |
| No network | yes | no; default: no | Performs a SIM switch when the SIM card cannot find an operator to connect to. |
| On network denied | yes | no; default: no | Performs a SIM switch when access to a network is denied (usually by an operator). |
| On data connection fail | yes | no; default: no | Performs a SIM switch when the router does receive an LCP or ICMP echo from a specified host address. |
Note: remember to check the Enable automatic switching field above in order to make you SIM switching rules work.
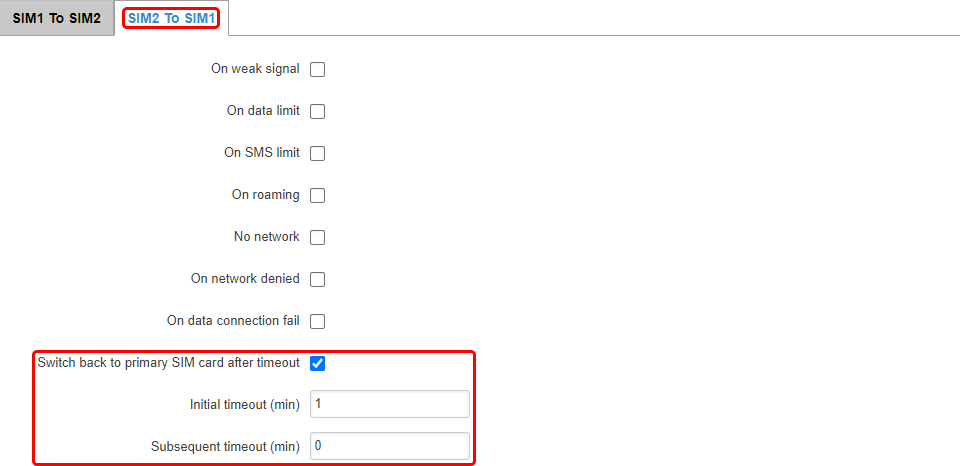
When configuring SIM switching from the Secondary card, an additional field called "Switch back to primary SIM card after timeout" becomes available:
| Field | Value | Description |
|---|---|---|
| Switch back to primary SIM card after timeout | yes | no; default: no | Attempts to switch back to the primary SIM card after a SIM switch occurs. |
| Initial timeout (min) | integer; default: 1 | Indicates a time value (in minutes) after which the device will attempt to switch back to the primary SIM card. |
| Subsequent timeout (min) | integer; default: 0 | Indicates a time value (in minutes) that is added to the timeout value each time an unsuccessful switch back to the Primary SIM card occurs (meaning that the conditions that caused the initial SIM switch from primary to secondary still exist). The first timeout value is defined in the Initial timeout field. After each unsuccessful switch, this value is increased by the Subsequent timeout specification:New_timeout = Old_timeout + Subsequent_timeout |
Network Operators
The Network operators section provides you with the possibility to scan for and manage mobile network operators to which the device's SIM card can connect to. Operator selection is only available for the primary SIM card. In order to specify an operator for the other SIM card it must first be selected as the Primary SIM in the SIM Management section.
Scan For Network Operators
Scan For Network Operators is a function that initiates a scan for mobile network operators available in your area. To initiate a scan, press the 'Scan for operators' button.
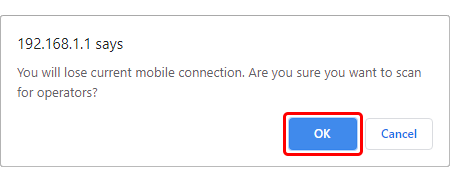
After this you will be prompted by a pop-up asking if you wish to proceed. This is because while the scan is in progress you will lose your data connection for approximately 2 minutes so, please take that into account.
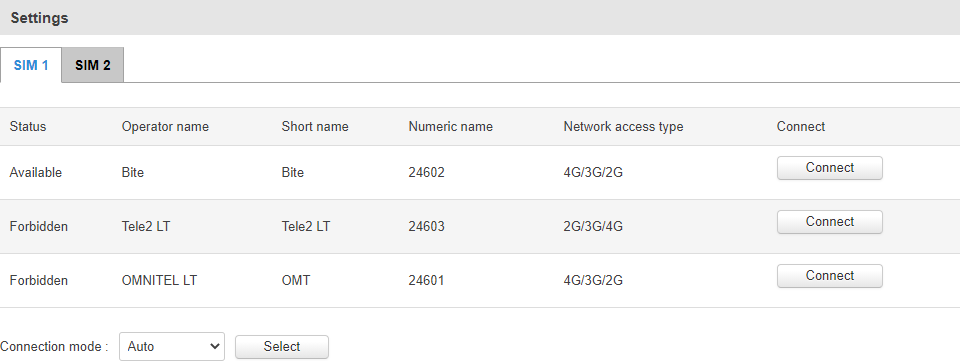
After the scan is complete you will be presented with a list of operators available in your area. The list provides such information as operator's name, code and network access type. You can also choose to which operator you would like to connect provided that the operator's status is not Forbidden.
The 'Connection mode' box specifies the logic of how the router will connect to operators:
- Auto - the router automatically connects to the network operator that provides the best connectivity.
- Manual - prompts you to enter an operator's code*. The router will then only attempt to connect to the operator whose code was specified (even if previous attempts have been unsuccessful).
- Manual-Auto - prompts you to enter an operator's code* but if the router can't complete the connection, it will automatically connect to the next available operator.
* Most network operators' codes can be found online or you can initiate a scan for operators - if the operator you're looking for can be reached from your current area, the list of available network operators will contain the desired operator's code.
Operators List
The Operators List section is used to create a blacklist or whitelist for undesired or desired operators. Please note that when using either Whitelist mode or Blacklist mode, you will initially lose your mobile connection for several minutes. Also if you have your SIM card set to switch "On network denied", your SIM card may switch when using Blacklist mode.
| Field | Value | Description |
|---|---|---|
| Enable | yes | no; default: no | Turns operator list on or off. |
| Mode | Blacklist | Whitelist; default: Whitelist | Defines how operators will be filtered.
|
The list itself is empty by default. Click the 'Add' button to create a new entry in the list.
The newly added entry should look similar to this:
| Field | Value | Description |
|---|---|---|
| Name | string; default: none | Operator's name. Used only for easier management purposes and not in the actual filtering process. |
| Operator code | integer; default: none | Operator's code used to identify a network operator. You can find network operator codes online or use the router's scan for operators function described here. |
Important: be mindful when using the Operators List function as it very easy to block yourself from the right operators and lose your data connection.
Mobile Data Limit
The Mobile Data Limit page provides you with the possibility to set data usage limits for your SIM cards and data usage warnings via SMS message in order to protect yourself from unwanted data charges.
Video tutorial - How to Set Mobile Data Limit on Teltonika RUT9XX
Data Connection Limit Configuration
The Data Connection Limit Configuration section is used to configure custom mobile data limits for your SIM card(s). When the mobile data limit set for the SIM card(s) is reached, the router will no longer use the mobile connection to establish a data connection until the limit period is over or the limit is reset by the user.
| Field | Value | Description |
|---|---|---|
| Enable data connection limit | yes | no; default: no | Turns mobile data limitations on or off. |
| Data limit* (MB) | integer; default: none | The amount of data that is allowed to be downloaded over the specified period of time. When the limit is reached, the router will no longer be able to establish a data connection until the period is over or the data limit is reset. Note: after the router has reached the data limit it will not switch to using the secondary SIM card. If you wish to configure a SIM switch system based on received data limit, instructions can be found in the SIM Switching rules section of this page. |
| Period | Month | Week | Day; default: Month | Data limit period after which the data counter is reset on the specified Start day. |
| Start day | Start hour | day [1..31] | day [Monday..Sunday] | hour [1..24]; default: day 1 | Specifies when the period of counting data usage should begin. After the period is over, the limit is reset and the count begins over again. |
*Your carrier's data usage accounting may differ. Teltonika is not liable should any accounting discrepancies occur.
SMS Warning Configuration
The SMS Warning Configuration section provides you with the possibility to configure a rule that sends you an SMS message after the router's SIM card(s) uses a specified amount of mobile data.
| Field | Value | Description |
|---|---|---|
| Enable SMS warning | yes | no; default: no | Turns SMS warning on or off. |
| Data limit* (MB) | integer; default: none | The received data limit that will trigger the sending of an SMS warning. |
| Period | Month | Week | Day; default: Month | Period to which the SMS warning data limit applies to. |
| Start day | Start hour | day of the month [1..31] | day of the week [Monday..Sunday] | hour of the day [1..24]; default: 1 | Specifies when the period of counting data usage should begin. After the period is over, the limit is reset and the count begins over again. |
| Recipients | single number | User group; default: Single number | Number of recipients. Groups can be configured in the Services → SMS Utilities → User Groups page. |
| Phone number/Group | phone number | group; default: none | Recipient's phone number or a group of recipients. |
Clear Data Limit
The Clear Data Limit section contains only one button - 'Clear data limit'. When clicked, the button resets the data limit counter for the related SIM card. Thus, the count is started over again regardless of the specified period.
Important: remember that the 'Clear data limit' button doesn't clear the actual data usage statistics for the SIM card, only the data counters as calculated by the router.
SMS Limit
The SMS Limit page provides you with the possibility to set up a limit of SMS messages that the router's SIM card(s) can send in a period of one day, week or a month.
SMS Limit Configuration
The SMS Limit Configuration section is used to configure custom SMS limits for your SIM card(s). In order to limit sent SMS messages, select the SIM card (SIM1 or SIM2), enable SMS limit and configure the limit conditions. For related information, refer to the figure and table below.
| Field | Value | Description |
|---|---|---|
| Enable SMS limit | yes | no; default: no | Turns SMS limitations on or off. |
| Period | Month | Week | Day; default: Month | SMS limit period after which the sent SMS counter is reset on the specified Start day. |
| Start day | Start hour | day of the month [1..31] | day of the week [Monday..Sunday] | hour of the day [1..24]; default: 1 | Specifies when the period of counting SMS messages should begin. After the period is over, the limit is reset and the count begins over again. |
| SMS limit* | integer; default: none | Number of SMS messages that the SIM card is allowed to send over the specified period of time. When the limit is reached, the router will no longer be able to send SMS messages until the period is over or the SMS limit is reset. Note: after the router has reached the SMS limit it will not switch to using the secondary SIM card. If you wish to configure a SIM switch system based on sent SMS limit, instructions can be found in the SIM Switching rules section of this page. |
* Your carrier's SMS usage accounting may differ. Teltonika is not liable should any accounting discrepancies occur.
Clear SMS Limit
The Clear SMS Limit section displays the amount of sent SMS messages and provides the possibility to reset that counter. When the 'Clear SMS button' is clicked, it clears the SMS limit counter for the related SIM card. Thus, the count is started over again regardless of the specified period.
Important: remember that the 'Clear SMS limit' button doesn't clear the actual sent SMS statistics for the SIM card, only the SMS counters as calculated by the router.
SIM Idle Protection
Some operators block user SIM cards after a period of inactivity. The SIM Idle Protection tab provides you with the possibility to configure the router to periodically switch to the secondary SIM card and establish a data connection with a mobile network operator in order to break the idleness and prevent the SIM card from being blocked.
Settings
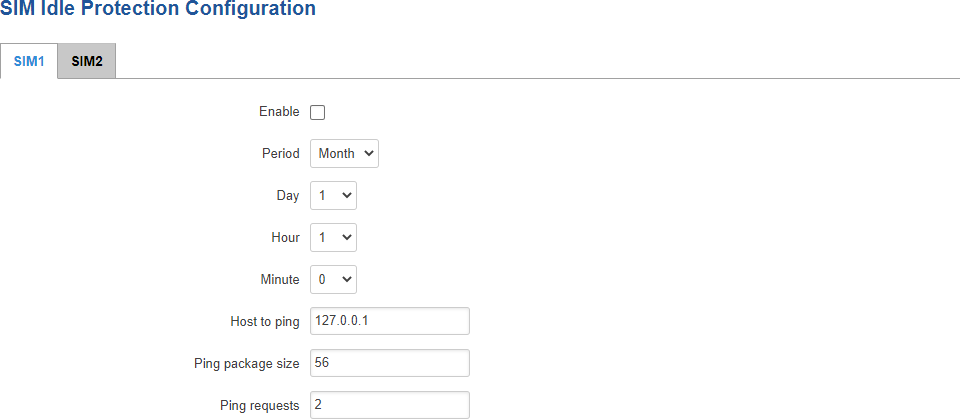
The Settings tab is used to configure the parameters used by the SIM Idle Protection function. Refer to the figure and table below for more information.
| Field | Value | Description |
|---|---|---|
| Enable | yes | no; default: no | Turns SIM Idle Protection on or off. |
| Period | Month | Week; default: Month | How often SIM Idle Protection will be performed. Use the three following fields ('Day', 'Hour' and 'Minute') to set the exact time of the action. |
| Host to ping | ip; default: 127.0.0.1 | IP address of a host that will be pinged during the SIM Idle Protection action. |
| Ping package size | integer [1..1000]; default: 56 | ICMP packet size in bytes. |
| Ping requests | integer [1..30]; default: 2 | How many ping requests will be sent. |
Test
Once you have configured the SIM Idle Protection settings, you can use the Test section to test these settings to make sure everything works correctly. Once you click the 'Test' button, the SIM Idle Protection test will initiate. The test is designed to simulate SIM Idle Protection according to your current SIM Idle Protection settings.
The test takes about 2 minutes, so make sure the router isn't doing anything important before you start the test because during it you will lose connectivity. It is very important to wait for the test to finish before commiting any actions. Commiting actions on the router during test phase you may cause the router to crash.

