Starlink Failover Configuration
The information in this page is updated in accordance with firmware version 07.15.2.
Introduction
This article provides a guide on how to use starlink connection and setup failover configuration using RUTX11. These configurations can be implemented on RUT, RUTX and TRB series devices.
Starlink is a satellite internet service provided by SpaceX. It aims to provide high-speed, low-latency internet access to users around the world, including in remote and underserved areas.
The Failover function allows you to backup your primary WAN connection in case it goes down. Cellular failover for satellite connections, is simply a process of adding a backup internet source, when the satellite connection fails. When a failure is detected, the cellular gateway or router automatically establishes a network connection and begins routing traffic through it. This ensures that there is no interruption in the Internet connection, and users can continue to access the Internet and transfer data without disruption.
This article provides a comprehensive configuration example, detailing how to establish a Starlink connection with a Teltonika router, as well as how to set up Starlink failover.
It also includes a step-by-step guide on how to connect the Starlink satellite dish directly to a Teltonika router without using the Starlink modem, using a third-party PoE injector to power the dish.
Configuration Overview and Prerequisites(With Starlink Ethernet Adapter)
Before we begin, let's overview the configuration that we are attempting to achieve and the prerequisites that will make it possible. Prerequisites:
- One RUTxxx router of any type with sim
- Atleast one end device to configure the router
- Putty in your end device Putty Download
- Starlink dish, Starlink Ethernet adapter
- Starlink mobile phone application Starlink app
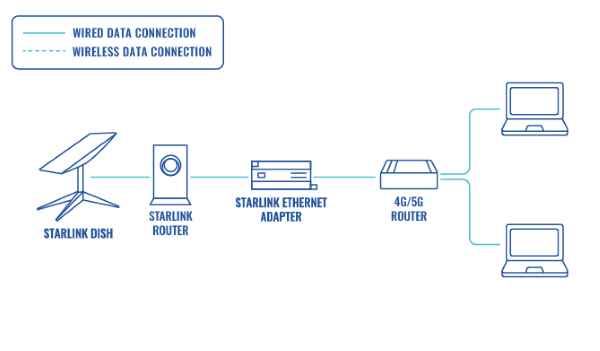
Here is the topology of the Starlink connection with the Teltonika router :In this configuration, your initial step should involve connecting the Starlink dish to the Starlink router, followed by linking it to an Ethernet adapter, and ultimately connecting it to the WAN port of RUTX11.Once that's done, use an Ethernet cable to establish a connection between the RUTX11 router and your PC via its LAN port. Alternatively, you can opt for a wireless connection if preferred.Before moving forward, double-check that both devices are securely connected and powered on.
Note: Additionally, before setting up the topology, make sure to adjust the LAN IP to a separate subnet to prevent any IP conflicts. Change LAN IP
Starlink Configuration
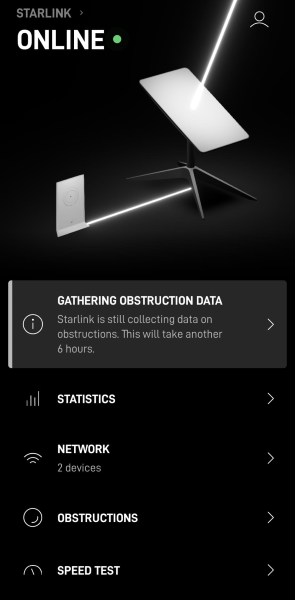
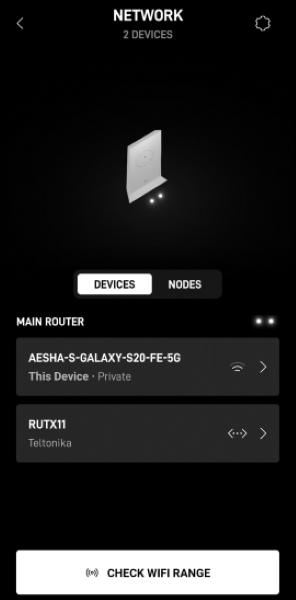
The Starlink antenna was positioned on the rooftop to ensure an unobstructed line of sight, and it was allowed to automatically orient itself. The Starlink app on the Android phone was utilized to configure the Starlink settings following the instructions provided in its initial setup guide. The WAN port of the RUTX11 router was connected to the Starlink modem using the Starlink Ethernet adapter. Additionally, both the laptops were directly connected to the router's LAN ports.
- Starlink application using the setup guide:
Router Configuration
- WebUI Login:
Access RUTOS through your laptop or computer that is connected to the router. Launch a web browser on your connected device, and in the address bar, type in the router's default IP address, which is typically 192.168.1.1. Upon doing so, you will receive a prompt to provide a username and password. Unless you've previously modified them, the default credentials are:
Username: admin
Password: (located on the device)
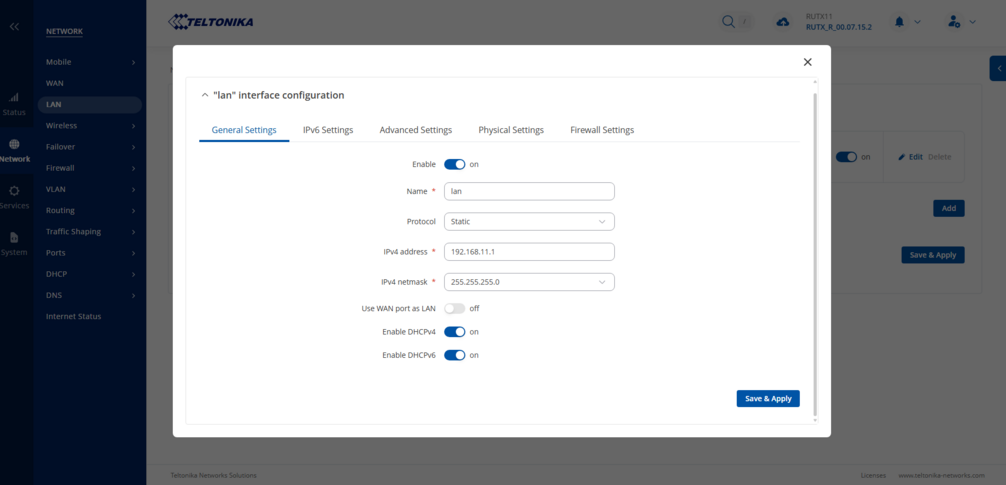
After logging in, proceed to update the LAN IP by navigating to Network → interfaces. Click on the edit icon for the LAN interface. Modify the IP address and lease time as needed. After making these changes, save and apply. The WebUI will refresh with the new IP address, allowing you to process with the configuration steps.
- Failover setup:
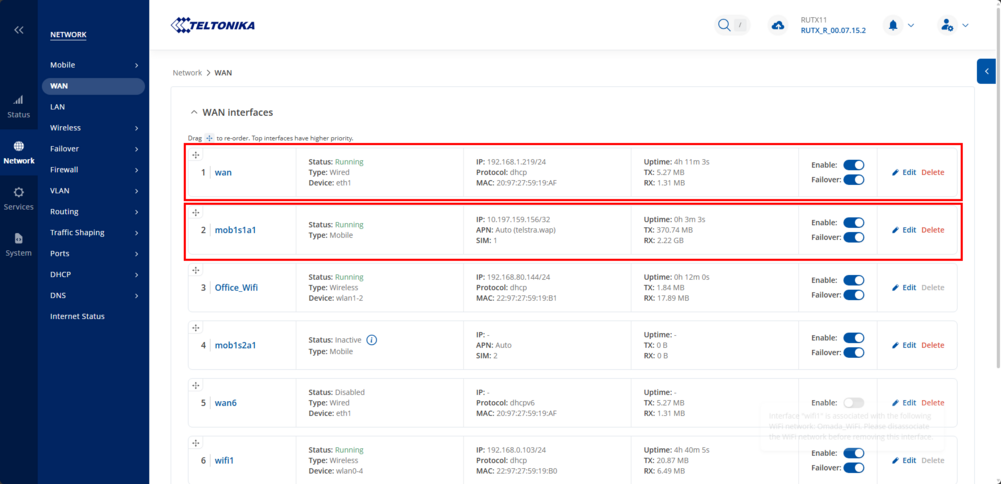
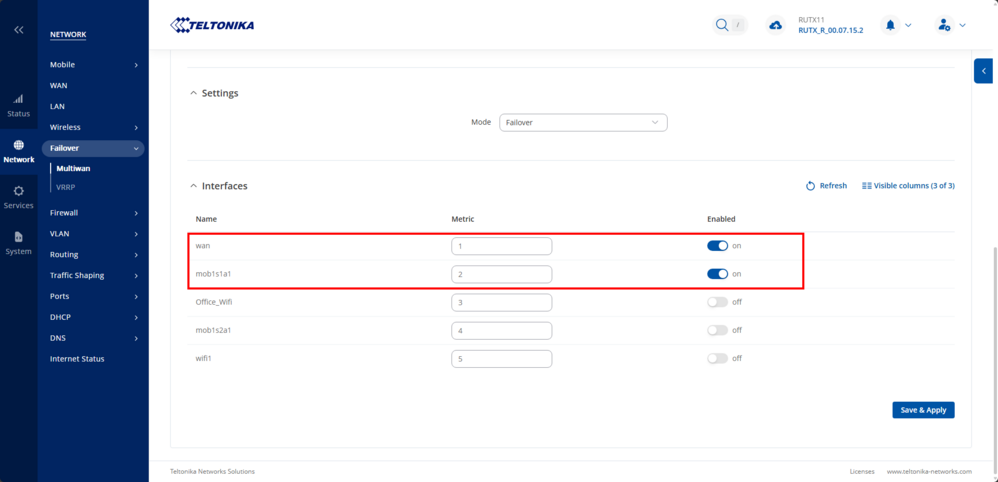
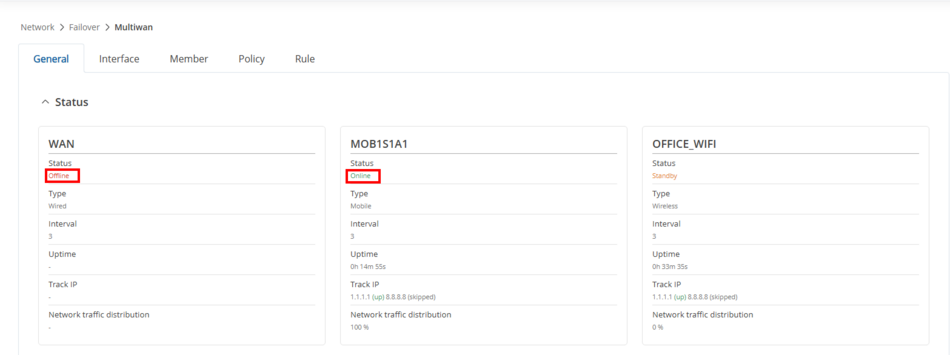
Firstly, In the WebUI, navigate to Network → Failover →Multiwan. In this section, you should observe two entries: " WAN," which represents your starlink connection, and "mob1s1a1", which corresponds to your Teltonika Networks router. Both of these entries should be indicated as online. Next arrange the connection order by simply changing the Metric value of "WAN" to "1" and "mob1s1a1" to "2". This sequence determines the order of priority for the connections.
- Failover rules:
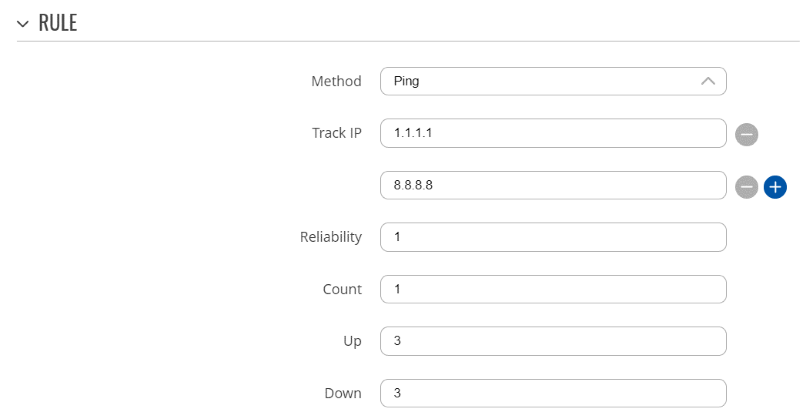
In the Network → Failover → Multiwan → Interface section, configure the failover rules for both connections as follows:
To begin, click on the pencil icon associated with your WAN connection and establish the rule that will activate the failover mechanism. You have the flexibility to define this rule according to your preferences. If you're uncertain about how to proceed, you can opt to set up the default rule displayed in the provided screenshot.
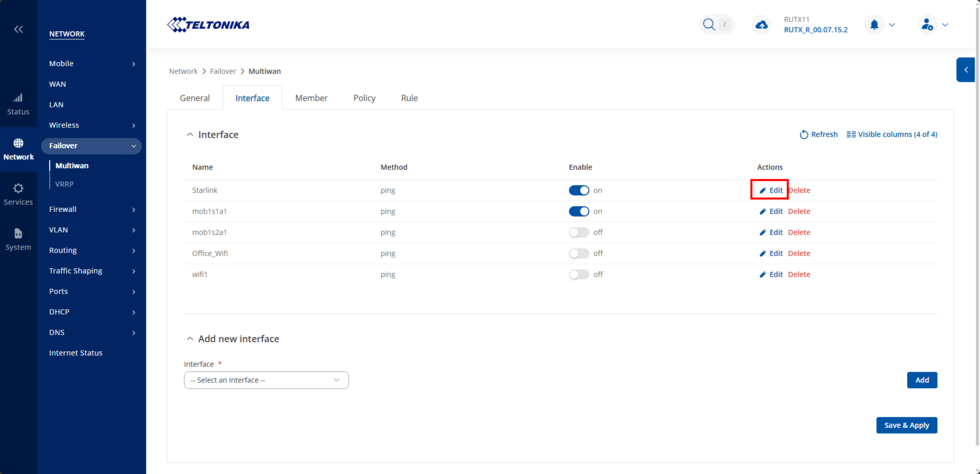
Note: Depending on the reliability of your Starlink connection, you have the flexibility to adjust your interval setting for your WAN connection to a value between 3 and 10. We recommend conducting tests to determine the optimal interval that offers the highest stability for your specific location.
Finally, replicate the same process for your mob1s1a1 connection.
Testing Results
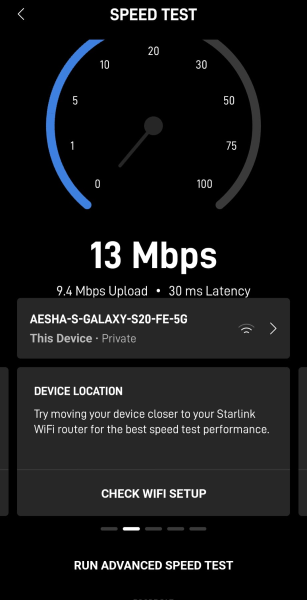
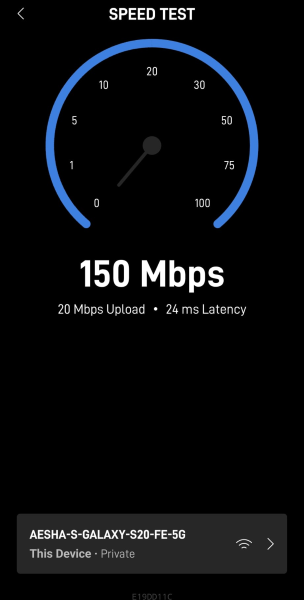
The below screenshots provide speed test when the device was connected to starlink.
- Starlink Speed test:
- Testing on CLI:
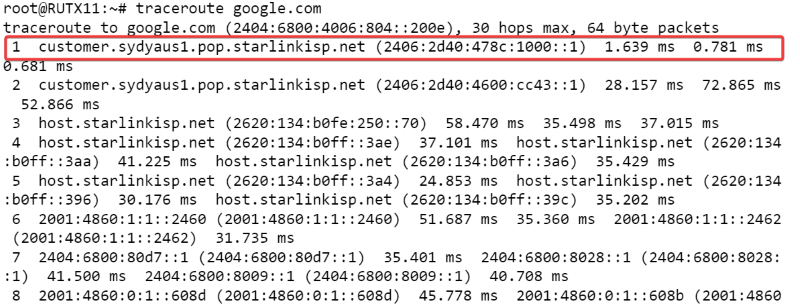
The below screenshots shows that Starlink route is the most preferred while the 4g is the backup route to internet. Try some of the below commands on CLI and verify.
Command: ip route
Command: traceroute google.com
- Failover logs:
The below screenshots are the testing results when the primary WAN stopped and failover to 4G took place, and then failback to the primary WAN after the interface was enabled.
WAN interface stopped:
Ping loss:
Failover to 4G:
Failback when the WAN interface was enabled:
Configuration Overview and Prerequisites(With Starlink Ethernet Adapter)
Before proceeding with the configuration, let’s review the setup goals and outline the necessary prerequisites to ensure a successful deployment. And in this setup we will using the mobile connectivity as the main WAN, and the Starlink as a backup WAN.
- One RUTxxx router of any type with sim
- Atleast one end device to configure the router
- Putty in your end device Putty Download
- Starlink dish, Starlink Ethernet adapter
- Starlink mobile phone application Starlink app
- 3rd party PoE injector(minimum voltage: 57V , 1.7A)
The Starlink antenna was mounted on the rooftop to ensure a clear, unobstructed line of sight to the sky, which is essential for optimal signal reception. The initial configuration was carried out using the Starlink mobile application on an Android device, following the setup instructions provided within the app.
The WAN port of the Teltonika RUTX11 router was connected to the Starlink satellite dish using a 3rd party(Yaosheng) Ethernet adapter. Additionally, the Android phone was connected to the RUTX11’s Wi-Fi hotspot, enabling access to the Teltonika router’s web interface, and the Starkink app for further configuration.
Note: Additionally, before setting up the topology, make sure to adjust the LAN IP to a separate subnet to prevent any IP conflicts. Change LAN IP
Router Configuration
- WebUI Login:
Access RUTOS through your laptop or computer that is connected to the router. Launch a web browser on your connected device, and in the address bar, type in the router's default IP address, which is typically 192.168.1.1. Upon doing so, you will receive a prompt to provide a username and password. Unless you've previously modified them, the default credentials are:
Username: admin
Password: (located on the device)
After logging in, proceed to update the LAN IP by navigating to Network → interfaces. Click on the edit icon for the LAN interface. Modify the IP address and lease time as needed. After making these changes, save and apply. The WebUI will refresh with the new IP address, allowing you to process with the configuration steps.
After successfully logging into the RUTOS WebUI:
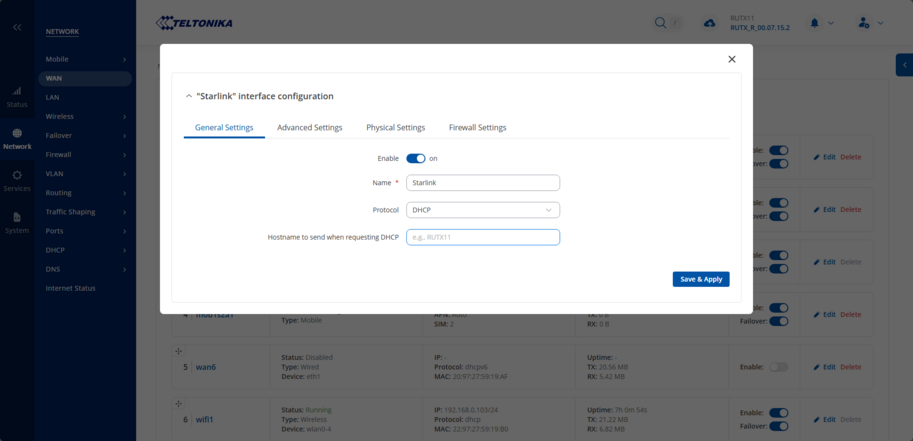
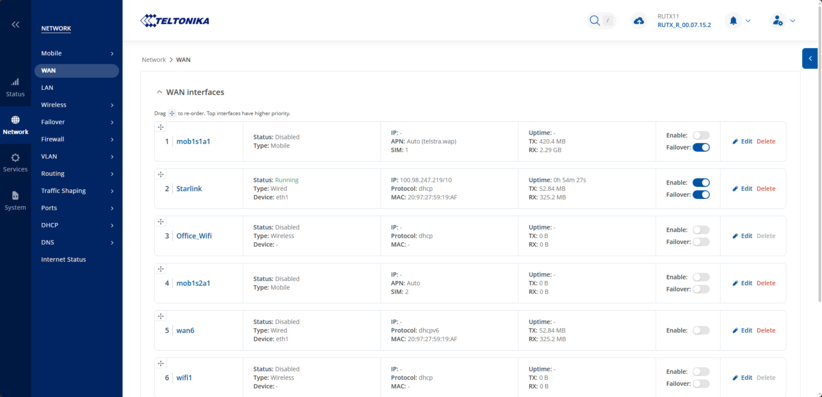
- Navigate to Network → WAN in the left-hand menu.
- Locate the WAN interface and click the Edit (pencil) icon.
- In the configuration window:
- Optionally update the interface name for easier identification.
- Set the Protocol to DHCP to allow the router to automatically obtain an IP address from the Starlink connection.
- Click Save & Apply to commit the changes.
The WebUI will refresh, and the WAN IP address will be updated accordingly. Once the new IP is visible, you can proceed with the remaining configuration steps.
- Failover setup:
On the WAN interface list, enable the Failover toggle on the right side as showing from the screenshot below
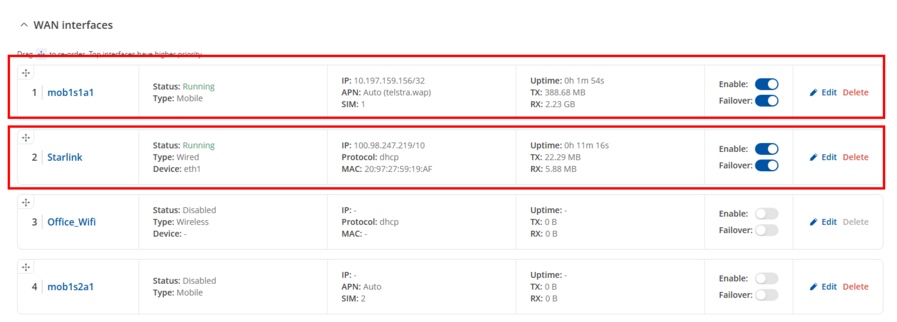
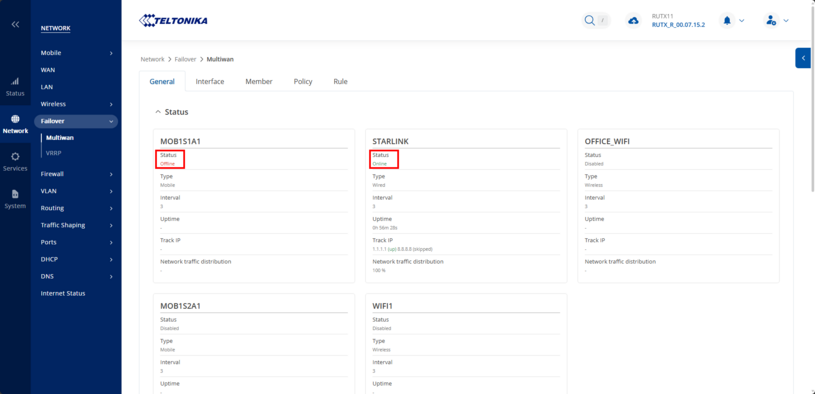
Additionally, please confirm in the Network → Failover → Multi-WAN section that the failover status for both WAN interfaces — mob1s1a1 and Starlink — is set to enabled.
This ensures that the device can properly switch between connections in case of a failover scenario.

- Failover rules:
In the Network → Failover → Multiwan → General section, set the Mobile interface mob1s1a1 as the main WAN by setting it's metric value to 1, and the Starlink Metric value to 2 as a backup.

In the Network → Failover → Multiwan → Interface section, configure the failover rules for both connections as follows:
To begin, click on the pencil icon associated with your WAN connection and establish the rule that will activate the failover mechanism. You have the flexibility to define this rule according to your preferences. If you're uncertain about how to proceed, you can opt to set up the default rule displayed in the provided screenshot.

Note: Depending on the reliability of your Starlink connection, you have the flexibility to adjust your interval setting for your WAN connection to a value between 3 and 10. We recommend conducting tests to determine the optimal interval that offers the highest stability for your specific location.
Finally, replicate the same process for your mob1s1a1 connection.
Testing Results
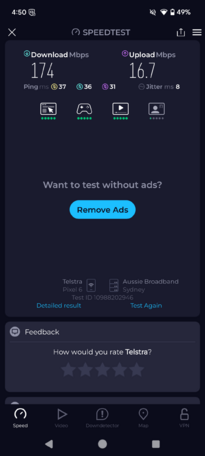
The below screenshots provide speed test when the device was connected to starlink.
- Starlink Speed test:
- Testing on CLI:
The below screenshots shows that 4g route is the most preferred while the Starlink is the backup route to internet. Try some of the below commands on CLI and verify.
Command: ip route
- Failover logs:
The below screenshots are the testing results when the primary WAN stopped and failover to Starlink took place, and then failback to the primary WAN after the interface was enabled.
Mobile interface stopped:
Ping loss:

Failover to Starlink:

Failback when the Mobile interface was enabled:

Troubleshooting
Slow speed
Navigate to Network → Firewall → General settings and enable/disable Software flow offloading option, depending on its default setting;
MTU settings
Navigate to Network → Interfaces → General. Edit WAN interface settings, switch to Advanced settings tab. In the Override MTU field try the following values: 1420 1460 1472
opkg instaqll iperf3 for a proper speed/bandwidth test
iperf3 command: iperf < -s|-c host> <options> It is a tool to measure the bandwidth and the quality of a network link. It is additional package. First it should be installed on device: opkg install iperf3 Syntax examples for server: iperf3 -s -p 5000; for client: iperf3 -c IPADDRESS -p 5000 -t 10
For failover stability
Change (increase / decrease) ping check packets, failover check intervals
Compatability checks
Ensure that the correct branded "SpaceX" ethernet adapter is used to connect between the router's ethernet port and the starlink modem
Subnet issues
As starlink modem is on the same management ip 192.168.1.0/24:
Under "Protocol" you need select "DHCP" and leave all other config settings for WAN at the defaults. The IP address is assigned by Starlink and will appear on the main "Interfaces" page when you connect.
Please check the IP address assigned to your WAN interface after connecting it to Starlink. Then, ensure that your LAN is on a different network than your WAN interface. For example, if your WAN is on the 192.168.1.0/24 network, and your LAN is also on the 192.168.1.0/24 network, then change the LAN network to something else, like 192.168.10.0/24. To do so, edit your LAN interface and change the IPv4 address to 192.168.10.1 (scroll down and change the DHCP IP start and end settings to 192.168.10.100 and 192.168.10.249 too).
If you want Starlink to be your primary connection, make sure the WAN interface is at the top of the list in Network → Interfaces → General.
If you are using failover, move your WAN interface to the top in Network → Failover as well. In your case, the order from top to bottom should be WAN → mob1s1a1 → mob1s2a1.
Capture output of the below commands from the Teltonika router
- Traceroute 8.8.8.8,
- mwan3 status,
- ifconfig,
- ip route,
- arp,
- logread | grep mwan3
In case you still cannot access the internet via Starlink, please replicate the issue and generate a troubleshoot file. To do this, connect to Starlink, wait a few minutes, and try accessing the internet. Next, download a troubleshoot file from System → Administration → Troubleshoot and raise VIP query.
Low signal
The signal strength can be gauged from the starlink app itself at that particular location,
Starlink IPv6 Prefix-delegation
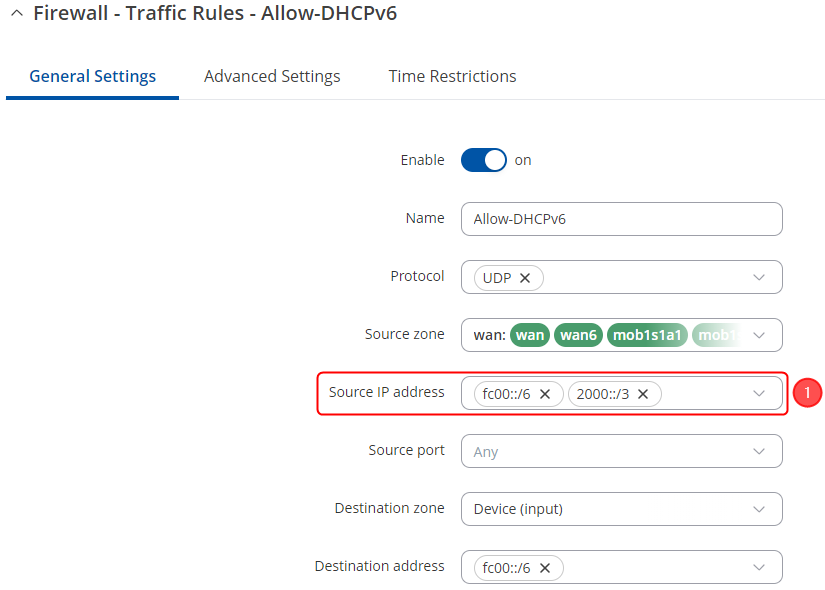
In case you get IPv6 address, but you are not able to get a bigger prefix then /64, you need to change your Traffic rule in the firewall.
Go to your devices WebUI → Firewall → Traffic Rules → Edit Allow-DHCPv6 rule

Do the following changes:
- Source IP address - Add a new one 2000::/3
- click on the Save & Apply button.
