TAP200 Device Recovery Options
Summary
This chapter is an overview on various recovery options for a TAP200 device.
Default login information
Using recovery methods resets the device's configuration to its default state. Therefore, you will need to use the default authentication info in order to login to the device. The default login information for TAP200 is provided below:
- Default Address (LAN IP): 192.168.1.3
- Default Username: admin
- Default Password: admin01 or random generated password (see password on bottom of the device)*
Devices with random password
* Certain devices or batches of a device may have a generated password out of the box, instead of admin01. For TAP200 devices, batch from when unique passwords are used is 1
You can find the batch of your device on the Product Labels sticker or engraving.
Factory reset
A factory reset returns the device back to its default factory settings, i.e., it deletes all custom configurations. Below you will find various methods of performing a factory reset on TAP200.
Reset Button
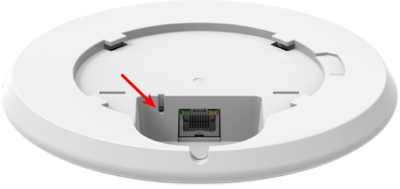
The reset button is located on the bottom of the device:
The reset button has two functions:
- Reboot the device. If the reset button is pressed for up to 4 seconds, the device will reboot. Start of the reboot will be indicated by the flashing power led.
- Factory reset. If the reset button is pressed for at least 12 seconds (by default), the device will perform a factory reset and reboot.
NOTE: the default button hold time value (min time 12 seconds, max time 20 seconds) can be changed in the device WebUI, from the System → Administration → General page.
WebUI
You can also perform a factory reset from the AP's WebUI. To do so, login to the AP and go to the Backup section found under the System tab (System → Maintenance → Reset settings). In the very bottom of the page there's a Reset button that performs a chosen type of reset.
Notice: A Factory defaults reset will remove all logs, SIM PIN's and RMS data that the device might have had.
Command line
You can perform a factory reset via command line by executing the firstboot command. After this you will be asked to confirm the reset. If you're sure, type the letter y and press "Enter" or type the letter n if you wish to cancel the reset.
If you agreed to perform a factory reset, next type in reboot and press "Enter". The AP will be reset to it's factory settings and rebooted. The entire sequence of events should look like this:
root@Teltonika-TAP200:~# firstboot
This will erase all settings and remove any installed packages. Are you sure? [N/y]
y
/dev/mtdblock5 is mounted as /overlay, only erasing files
root@Teltonika-TAP200:~# reboot
You can find more information on the command line interface (CLI) here.
The bootloader menu is a special AP state used as a recovery tool in case the AP becomes inaccessible even after a factory reset. It can be used to upgrade the AP's firmware or bootloader version.
In order to place the AP into the bootloader menu state, follow these steps:
- Plug Ethernet cable from your computer to TAP200 Ethernet port.
- Press and hold the reset button.
- While holding the reset button, plug the power cable into the AP. Continue holding the button for another 5 seconds.
- Release the reset button.
- The LEDs will begin to blink rapidly, indicating that the device has entered bootloader mode.
If you followed all the steps correctly, all panel LEDs should light up. This means that the device is in the bootloader menu state. If that is not the case, repeat the steps again.
Regardless of what the AP's IP address was before, the IP address of the AP when it's in the bootloader menu state is always 192.168.1.1. So in order to reach the AP, you'll have to set up a static IP address that's in the 192.168.1.0/24 network (for instance, 192.168.1.3) on your computer. Instructions are provided in the links below:
When set your computer's IP, you should be able to reach the AP's HTTP server. The address for the upgrade is:
- Firmware upgrade URL: 192.168.1.1
Type in the relevant address into the URL field of your web browser, upload the image file and click the Update button. Firmware image files can be downloaded from here.
If everything was done correctly, the update should begin. At this point you can close the browser window. The update will take about 120 seconds.
Additional note: don't forget to restore your computer's IP address settings.
RMA
If conventional recovery methods do not help, you may need to send the device to warranty for repair. The warranty process is described here.


