OpenVPN Access Control: Difference between revisions
(Topology changes) |
(Topology changes) |
(No difference)
| |
Latest revision as of 13:55, 9 April 2024
The information on this page is updated in accordance with the 00.07.06.6 firmware version .
Introduction
Normally, OpenVPN Client access is controlled by enabling or disabling the Client to Client button in OpenVPN Servers configuration, however, at times, more granular control is required. In this example, we will configure an OpenVPN server with 3 Clients:
- Client 1 will be able to communicate with Client 2 and OpenVPN server
- Client 2 will be able to communicate with Client 1 and OpenVPN server
- Client 3 will only be able to communicate with OpenVPN server, but not with any of other clients
If You have trouble seeing any of the settings, be sure to enable "Advanced mode"

Topology
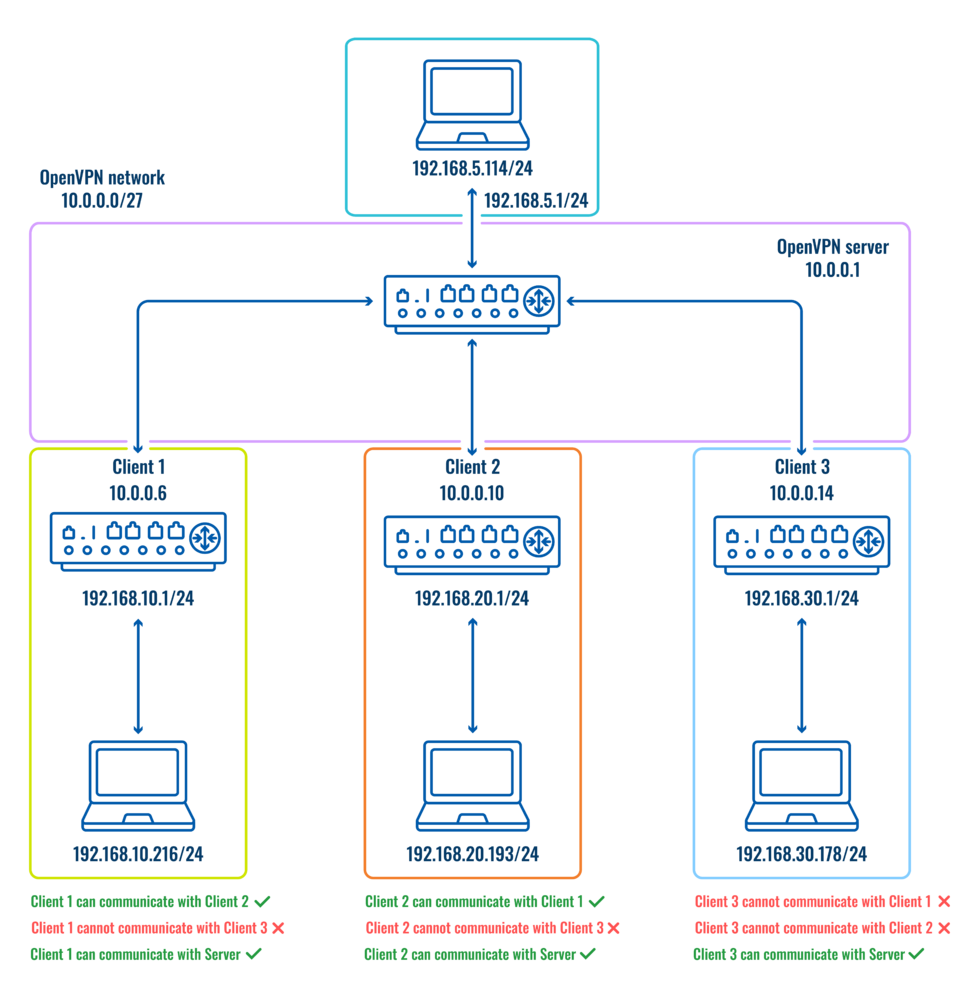
- OpenVPN server tunnel address - 10.0.0.1, OpenVPN subnet - 10.0.0.0/27, LAN device address - 192.168.5.114
- Client 1 VPN tunnel address - 10.0.0.6, LAN device address - 192.168.10.216
- Client 2 VPN tunnel address - 10.0.0.10, LAN device address - 192.168.20.193
- Client 3 VPN tunnel address - 10.0.0.14, LAN device address - 192.168.30.178
Generating certificates for an OpenVPN server
Navigate to System → Administration → Certificates → Generate Certificate
Generate 2 certificates. Recommended key size is at least 2048 bits for security reasons:
1. CA
2. Server
In Certificate Manager download Server certificate.

For any OpenVPN clients, You will need to generate “Client” certificates, download the certificate and key, and send them to the client
There are multiple methods of how certificates could be generated, you could follow this tutorial instead: How to generate TLS certificates (Windows)?
Creating an OpenVPN server
Navigate to Services -> VPN -> OpenVPN. Add a new OpenVPN instance with a Server role with these settings:
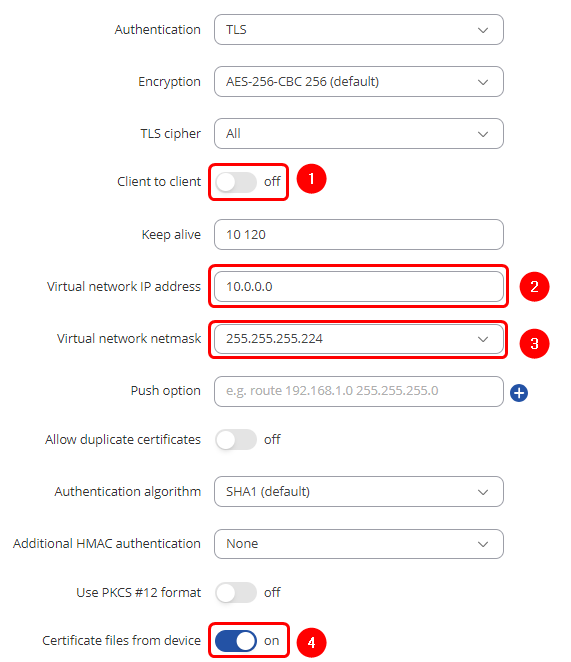
1 - Client to client – disabled
2 - Virtual network IP address – 10.0.0.0
3 - Virtual network netmask – 255.255.255.224
4 - Certificate files from device - on
Press "Save & Apply", enable OpenVPN server and check if the server is online.

Connecting clients to the OpenVPN server
Navigate to Services -> VPN -> OpenVPN. Add a new OpenVPN instance with a Client role with these settings:
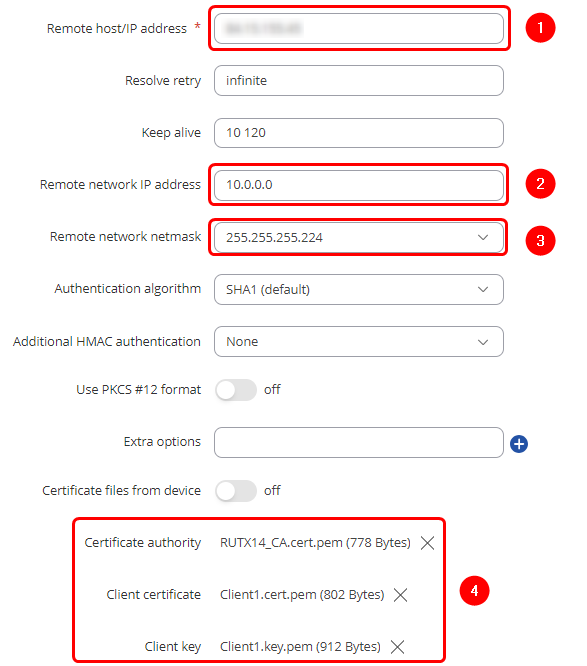
1 - Remote host/IP address - Public IP of the OpenVPN server's router
2 - Remote network IP address - 10.0.0.0
3 - Remote network netmask - 255.255.255.224
4 - Add the certificates from the OpenVPN server - Certificate Authority, Client certificate, and Client key which we downloaded in the Certificate Generation step.
Press "Save & Apply", enable OpenVPN client, and check if the connection is made

Repeat this step for as many clients as You need. For this example, we will have 3 clients.
Client to Client LAN network communication
TLS Clients
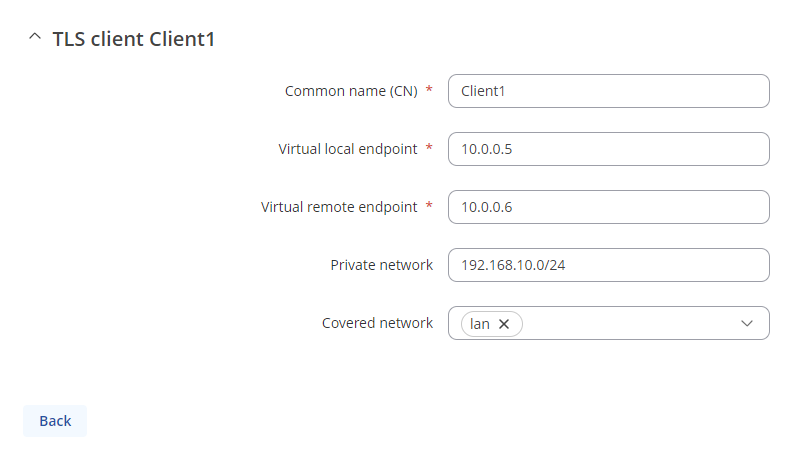
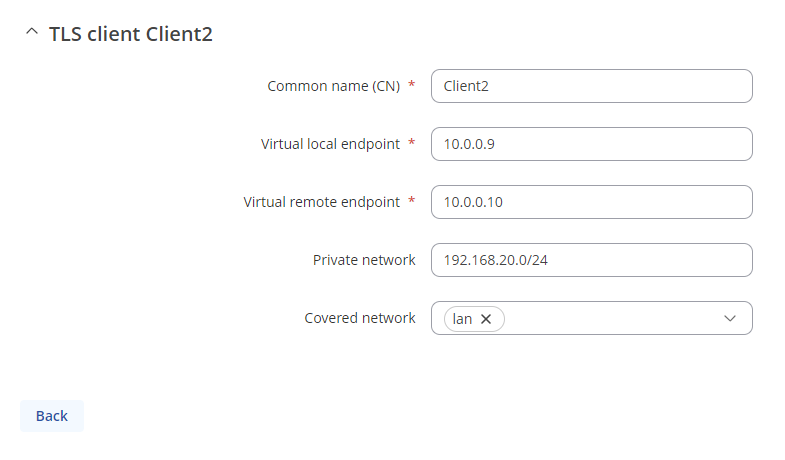
On the OpenVPN server router, navigate to Services -> VPN -> OpenVPN, Press "Edit" on the server, scroll down and add TLS clients which LAN address You want to have access to, in our case, we add all 3 clients:
TLS Client 1
TLS Client 2
TLS Client 3
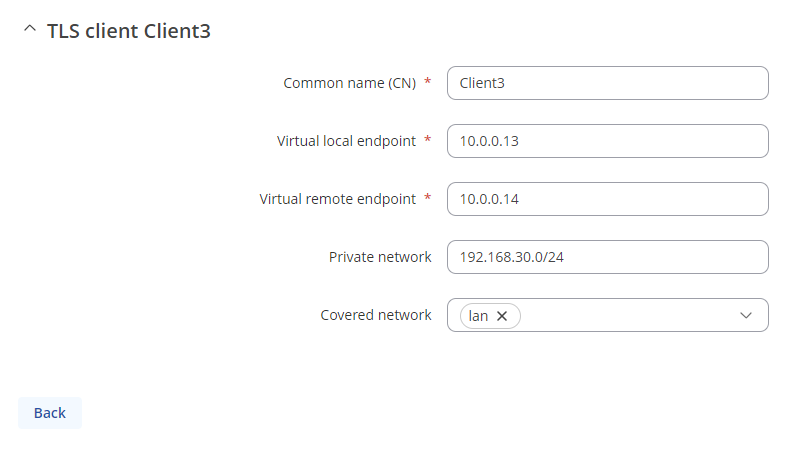
- Common name - common name of the certificate which was generated previously
- Virtual local endpoint - client’s local address in the virtual network
- Virtual remote endpoint - client’s remote address in the virtual network
- Private network - client's LAN subnet
- Covered network - Which LAN subnet should clients be able to communicate with in the OpenVPN server
Firewall Zones
This step should be done on OpenVPN server and all clients that want their LAN subnets be accessible and to access other client's LAN subnets.
Navigate to Network -> Firewall -> General settings -> Zones and set OpenVPN zone to forward traffic to LAN.

Routes to LAN subnets
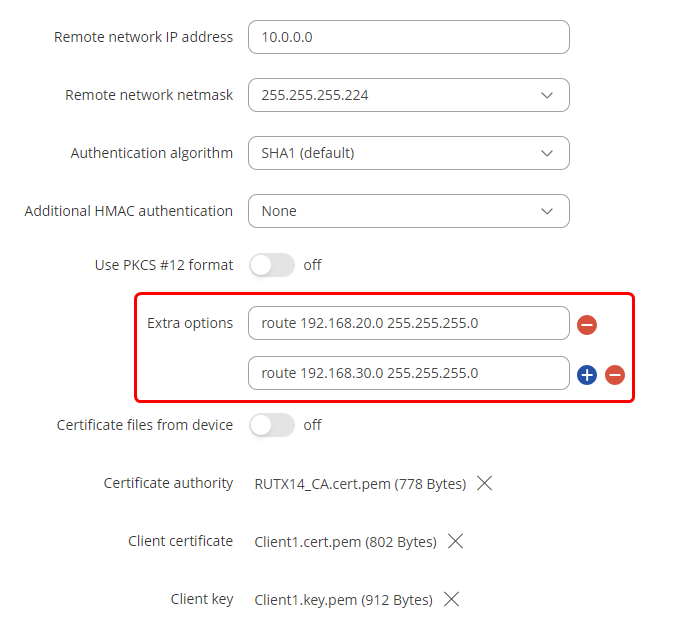
Create a route to other client LAN networks using WebUI. This step should be done on all clients that want their LAN subnets be accessible and to access other client's LAN subnets.
Navigate to Services -> VPN -> OpenVPN press "Edit" on the OpenVPN client and add routes to other client LAN subnets. In this image, we are editing Client 1's configuration's extra options, to add routes to Client 2's (192.168.20.0/24) and Client 3's (192.168.30.0/24) LAN subnets.
(In some cases, pushing routes to LAN addresses from the OpenVPN server to clients, breaks routing on the clients, so doing it from the client side is safer, but more time consuming)
Controlling access with firewall
Navigate to Network -> Firewall -> Access Control and create a new deny rule. In this example, we are denying Client 3 from accessing any other clients and their LAN networks.
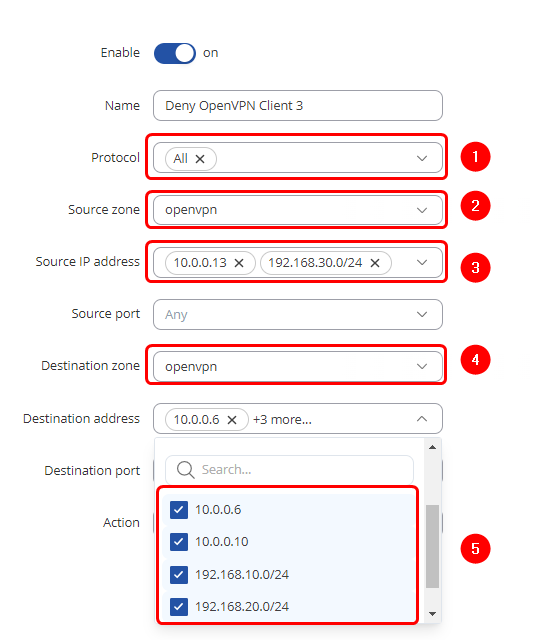
1 - Protocol - All protocols
2 - Source zone - OpenVPN
3 - Source IP - OpenVPN remote IP and LAN subnet of client 3
4 - Destination zone - OpenVPN
5 - Destination address - other client OpenVPN remote endpoints and LAN subnets
6 - Action - Deny
This rule will deny all traffic from Client 3 to other clients, but will not interact with traffic, if it's destination is OpenVPN server or it's LAN subnet.
Testing the setup
If You have followed the steps correctly, configuration should be finished. These should be the results that You will be getting:
Client 1 to Client 2
Pinging 192.168.20.193 from 192.168.10.216 with 32 bytes of data:
Reply from 192.168.20.194: bytes=32 time=172ms TTL=125
Reply from 192.168.20.194: bytes=32 time=114ms TTL=125
Reply from 192.168.20.194: bytes=32 time=113ms TTL=125
Reply from 192.168.20.194: bytes=32 time=294ms TTL=125
Client 1 to Client 3
Pinging 192.168.30.178 from 192.168.10.216 with 32 bytes of data:
Request timed out.
Request timed out.
Request timed out.
Request timed out.
Client 2 to Client 1
Pinging 192.168.10.216 from 192.168.20.193 with 32 bytes of data:
Reply from 192.168.10.216: bytes=32 time=185ms TTL=125
Reply from 192.168.10.216: bytes=32 time=123ms TTL=125
Reply from 192.168.10.216: bytes=32 time=227ms TTL=125
Reply from 192.168.10.216: bytes=32 time=189ms TTL=125
Client 2 to Client 3
Pinging 192.168.30.178 from 192.168.20.193 with 32 bytes of data:
Request timed out.
Request timed out.
Request timed out.
Request timed out.
Client 3 to Client 1
Pinging 192.168.10.216 from 192.168.30.178 with 32 bytes of data:
Request timed out.
Request timed out.
Request timed out.
Request timed out.
Client 3 to Client 2
Pinging 192.168.20.193 from 192.168.30.178 with 32 bytes of data:
Request timed out.
Request timed out.
Request timed out.
Request timed out.
And server can reach all of the clients and their LAN subnets
Pinging 192.168.10.216 from 192.168.5.114 with 32 bytes of data:
Reply from 192.168.5.114: bytes=32 time=264ms TTL=62
Reply from 192.168.5.114: bytes=32 time=138ms TTL=62
Reply from 192.168.5.114: bytes=32 time=81ms TTL=62
Reply from 192.168.5.114: bytes=32 time=107ms TTL=62

Pinging 192.168.20.193 from 192.168.5.114 with 32 bytes of data:
Reply from 192.168.5.114: bytes=32 time=61ms TTL=62
Reply from 192.168.5.114: bytes=32 time=376ms TTL=62
Reply from 192.168.5.114: bytes=32 time=132ms TTL=62
Reply from 192.168.5.114: bytes=32 time=232ms TTL=62

Pinging 192.168.30.178 from 192.168.5.114 with 32 bytes of data:
Reply from 192.168.5.114: bytes=32 time=226ms TTL=62
Reply from 192.168.5.114: bytes=32 time=327ms TTL=62
Reply from 192.168.5.114: bytes=32 time=111ms TTL=62
Reply from 192.168.5.114: bytes=32 time=80ms TTL=62
See also
- OpenVPN_configuration_examples_RUT_R_00.07
- How to generate TLS certificates (Windows)?
- OpenVPN client on Windows
- OpenVPN client on Linux
- OpenVPN server on Windows
- OpenVPN traffic split
- Configuration file .ovpn upload tutorial
- Firewall traffic rules
External links
https://openvpn.net/index.php/open-source/documentation/howto.html - some additional information on OpenVPN
