RUT850 Setup Wizard: Difference between revisions
No edit summary |
No edit summary |
||
| (One intermediate revision by the same user not shown) | |||
| Line 1: | Line 1: | ||
{{Template: Networking_rut850_manual_setup_wizard | |||
<!-----------------------------DEVICE DETAILS---------------------------> | |||
| name = RUT850 | |||
| series = RUT8xx | |||
| fw_version = RUT850_R_00.01.04 | |||
---- | <!------------------------------SETUP WIZARD----------------------------> | ||
| file_password = Networking_rutxxx_manual_setup_wizard_password_v1.png | |||
| file_general = Networking_rut850_manual_setup_wizard_general_v1.png | |||
| file_mobile = Networking_rut850_manual_setup_wizard_mobile_v1.png | |||
| file_wifi = Networking_rut850_manual_setup_wizard_wifi_v1.png | |||
| file_rms = Networking_rutxxx_manual_setup_wizard_rms_v1.png | |||
}} | |||
---- | |||
---- | |||
Latest revision as of 08:25, 17 September 2020
Main Page > EOL Products > RUT850 > RUT850 Manual > RUT850 WebUI > RUT850 System section > RUT850 Setup WizardSummary
The Setup Wizard is a tool that offers a simplified version of other WebUI pages used to set some of the router's most relevant parameters:
You will be greeted with the Setup Wizard the first time you login, after you have changed the router's default password. On other logins you will be redirected to the Overview page, but you can reach the Setup Wizard any time via the System → Setup Wizard page.
This page is an overview of the Setup Wizard tool for RUT850 routers.
The information in this page is updated in accordance with the RUT850_R_00.01.04 firmware version.
Set new password
On your very first login you will be required to change the router's default password. This is done for safety reasons. In many cases routers are used to provide access to remote networks and systems. Since many manufacturers use similar default passwords (like admin, admin01, admin123, etc.) it is easy for attackers to gain access to routers that use such passwords and compromise the systems behind them. Therefore, to avoid such malicious attacks, this step is mandatory and you will not able to access the rest of the WebUI before you change the password.
The new password must contain:
- 8-32 characters;
- at least one upper case letter;
- at least one lower case letter;
- at least one digit.
After you have entered the new password, click 'Save'. Afterwards you will be redirected to the first page of the Setup Wizard.
General
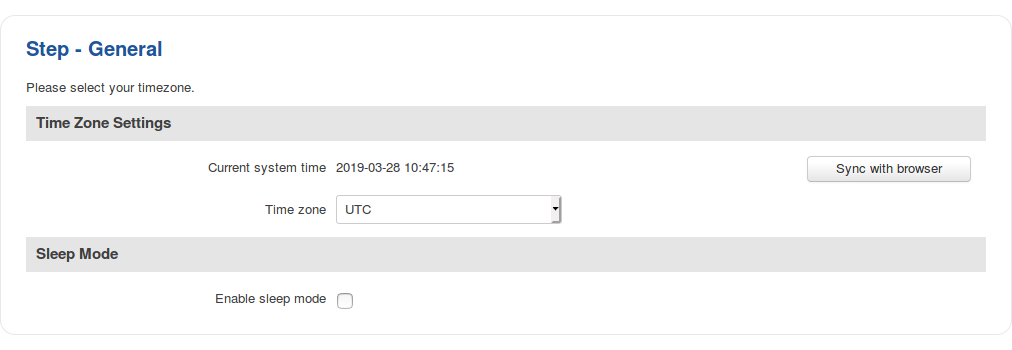
The General section is used to configure the router's time settings and sleep mode.
The section below is used to enable sleep mode. Sleep mode is a function that automatically puts the rotuer into standby mode after a user specified delay.
If you wish to set these setting later, you can find them via the following paths:
Mobile
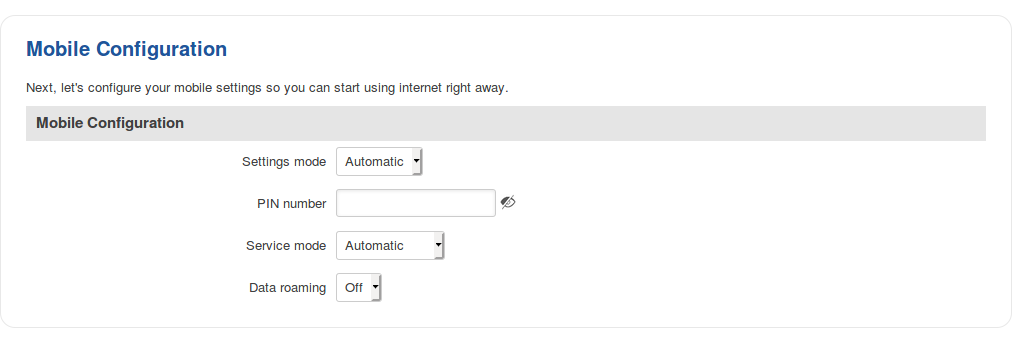
The Mobile section is used to configure the router's SIM card parameters.
| Field | Value | Description |
|---|---|---|
| Settings mode | Automatic | Advanced; default: Automatic | This configuration page's template.
|
| PIN number | string; default: none | A 4-digit long numeric password used to authenticate the modem to the SIM card. |
| Service mode | 2G only | 3G only | 4G (LTE) only | Automatic; default: Automatic | Preffered service type. |
| Data roaming | On | Off; default: Off | Turns mobile data roaming on or off. |
If you wish to set the router's Mobile settings later instead, you can do so via the Network → Mobile page.
RMS
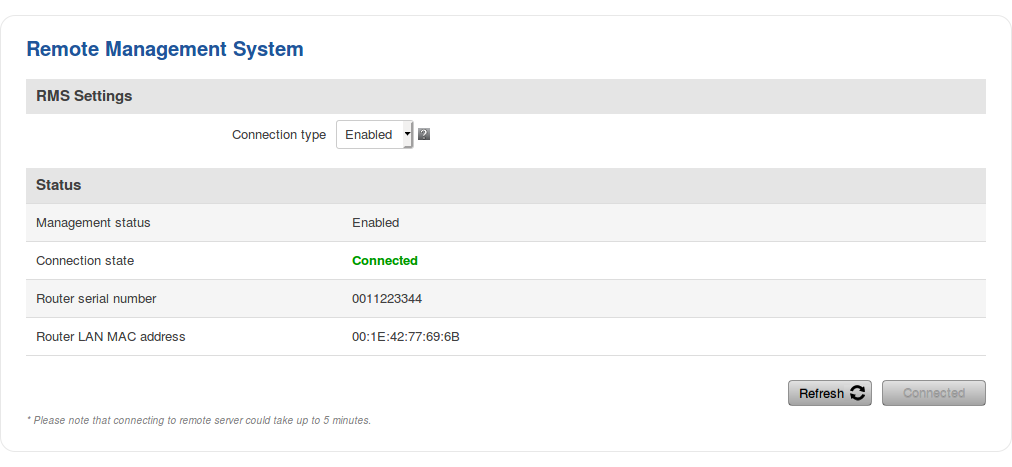
This section is used to configure the settings required to connect the router to the RMS (Remote Management System) - a cloud system designed by Teltonika and intended for remote monitoring and management of Teltonika-Networks products.
In order to add a device(s) to RMS, get yourself acquainted by watching this instructional video and register an account by clicking here. Each unique device receives a free month-long RMS license when added to RMS for the first time.
| Field | Value | Description |
|---|---|---|
| Connection type | Enabled | Standby | Disabled; default: Enabled | Defines how the device will connect to RMS:
|
When connection type is set to 'Enabled', the router attempts to connect to RMS every 2-5 minutes. To skip this wait, click the 'Connect' button to initiate a connection instantly.
If you wish to set the router's RMS settings later instead, you can do so via the System → Administration → RMS page.
WiFi
The WiFi section is used to configure the router's WiFi access point (AP). A WiFi access point is a type of wireless interface that provides WiFi access to connecting clients.
| Field | Value | Description |
|---|---|---|
| Wireless name | string; default: RUT850_<last 4 symbols of WiFi MAC> | Sets the access point's SSID. The Service Set Identifier (SSID) is an identification string (name) for the access point. It is how the access point will be seen by connecting devices. |
| Require password | yes | no; default: yes | When selected, protects the access point with a password. New devices have a unique WiFi password which can be located on a sticker on the bottom of the device. |
If you wish to set the router's WiFi settings later instead, you can do so via the Network → Wireless page.


