VPN
Summary
Virtual Private Network (VPN) is a method for secure data transfer through unsafe public networks. This page is an overview of different types of VPNs that can be used with RUT routers.
OpenVPN
OpenVPN is an open-source software application that implements virtual private network (VPN) techniques for creating secure point-to-point or site-to-site connections in routed or bridged configurations and remote access facilities. This section is an overview of the OpenVPN section of RUTxxx routers. For a more in depth guide refer to our OpenVPN configuration examples page.
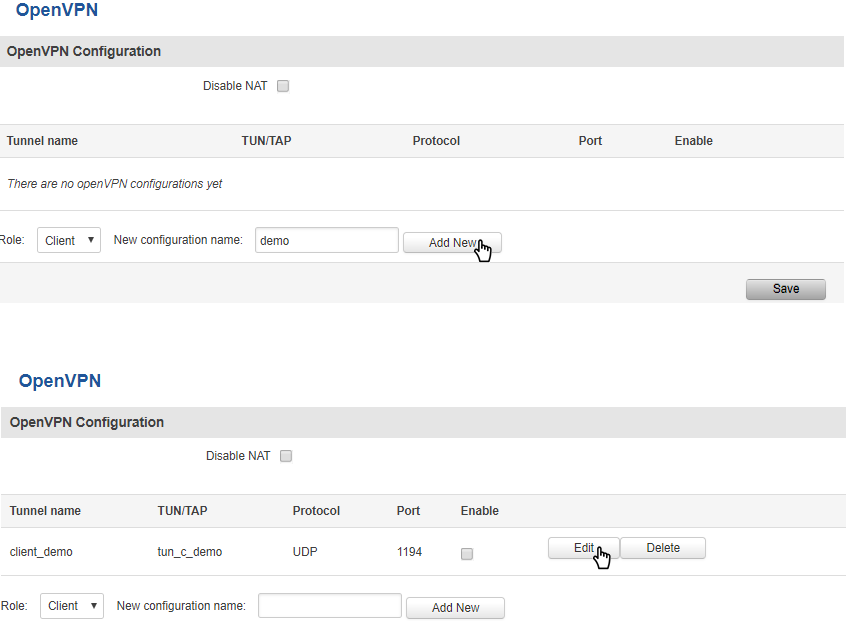
The default OpenVPN Configuration list is empty, so you have to define your own configuration to establish any sort of OpenVPN connection. OpenVPN configurations can have one of two roles: client or server. Let’s start with an OpenVPN client. To create it, enter the desired instance name in the New configuration name field, select the instance’s role from the Role list and press the Add New button.
Once you’ve added a new OpenVPN instance there is no need to press the Save button, since the Add New button both creates and saves the new instance. By default the instance will be disabled and unconfigured. In order to establish an OpenVPN connection you must Enable your instance, enter an OpenVPN server address, choose an authentication method and a few other things, all of which can be configured in the Settings window, which can reached by pressing the Edit button next to your OpenVPN instance (as shown in the figure above).
OpenVPN Client
This section is overview of OpenVPN Client configuration.
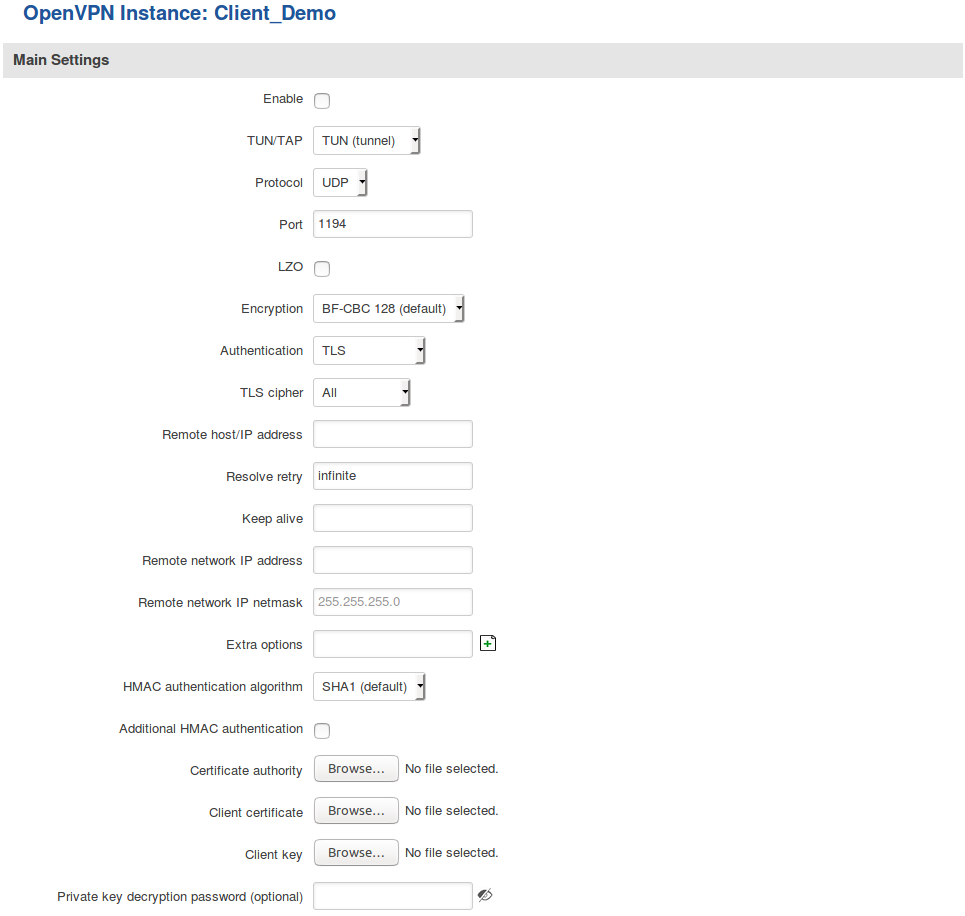
The figure above is an example of a configured OpenVPN Client instance that uses the UDP protocol and TLS/Password authentication. Comprehensible explanations on how to configure each field are presented in the table below.
| field name | value | description |
|---|---|---|
| Enable | yes | no; Default: no | Enables the OpenVPN instance |
| TUN/TAP | TUN (tunnel) | TAP (bridged); Default: TUN (tunnel) | OpenVPN interface type. TUN is most often in typical VPN connections, however, TAP is required in some Ethernet bridging configurations |
| Protocol | UDP | TCP; Default: UDP | The transfer protocol used by the OpenVPN connection. TCP is connection oriented – once a connection is established, data can be sent bidirectionally. UDP is a simpler, connectionless Internet protocol. UDP is usually faster but TCP has more security features. Choose the connection protocol according to your needs. |
| Port | integer [0..65535]; Default: 1194 | TCP/UDP Port number for both local and remote endpoints (make sure that the chosen port is allowed by firewall) |
| LZO | yes | no; Default: no | With LZO compression, your VPN connection will generate less network traffic. However, enabling this causes a higher CPU load. Use it carefully with a high traffic rate or low CPU resources |
| Encryption | DES-CBC 64 | RC2-CBC 128 | DES-EDE-CBC 128 | DES-EDE3-CBC 192 | DESX-CBC 192 | BF-CBC 128 | RC2-40-CBC 40 | CAST5-CBC 128 | RC2-40CBC 40 | CAST5-CBC 128 | RC2-64-CBC 64| AES-128-CBC 128 | AES-192-CBC 192 | AES-256-CBC 256 | none; Default: BF-CBC 128 | Packet encryption algorithm |
| Authentication | TLS | Static Key | Password | TLS/Password; Default: TLS | Authentication mode, used to secure data sessions.
Static key is a secret key used for server–client authentication. TLS authentication mode uses X.509 type certificates: Certificate Authority (CA), Client certificate, Client key. All mentioned certificates can be generated using OpenVPN or Open SSL utilities on any type of host machine. Password is a simple username/password based authentication where the owner of the OpenVPN server provides the login data. TLS/Password uses both TLS and Password authentication |
| TLS cipher | all | DHE+RSA | custom; Default: all | Packet encryption algorithm cipher |
| Remote host / IP address | ip; Default: " " | IP address or hostname of an OpenVPN server |
| Resolve retry | integer | infinite; Default: infinite | Time in seconds to resolve server hostname periodically in case of first resolve failure before generating service exception |
| Keep alive | integer *space* integer; Default: " " | Defines two time intervals: one is used to periodically send ICMP request to the OpenVPN server, the other defines a time window, which is used to restart the OpenVPN service, if no ICMP response is received during the window time slice. Example: 10 60 |
| Remote network IP address | ip; Default: " " | LAN IP address of the remote network (server) |
| Remote network IP netmask | ip; Default: " " | LAN IP subnet mask of the remote network (server) |
| Username | string; Default: " " | User name used for authentication |
| Password | string; Default: " " | Password name used for authentication |
| Extra options | string; Default: " " | Extra options to be used by the OpenVPN instance |
| HMAC authentication algorithm | none | SHA1 | SHA256 | SHA384 | SHA512; Default: SHA1 | HMAC authentication algorithm type |
| Additional HMAC authentication | yes | no; Default: no | An additional layer of HMAC authentication on top of the TLS control channel to protect against DoS attacks |
| Certificate authority | .ca file; Default: " " | Certificate authority is an entity that issues digital certificates. A digital certificate certifies the ownership of a public key by the named subject of the certificate |
| Client certificate | .crt file; Default: " " | Client certificate is a type of digital certificate that is used by client systems to make authenticated requests to a remote server. Client certificates play a key role in many mutual authentication designs, providing strong assurances of a requester's identity |
| Client key | .key file; Default: " " | Authenticates the client to the server and establishes precisely who they are |
| Private key decryption password (optional) | string; Default: " " | Decrypts server private key password. Use only if server's .key file is encrypted with a password |
After setting any of these parameters press the Save button or else the changes will not be applied. Some of the selected parameters will be shown in the configuration list table. You should also be aware of the fact that the router will launch a separate OpenVPN service for every configuration entry (if it is defined as active at the time, of course) so the router has the ability to act as server and client at the same time.
OpenVPN Server
This section is an overview of OpenVPN Server configuration.
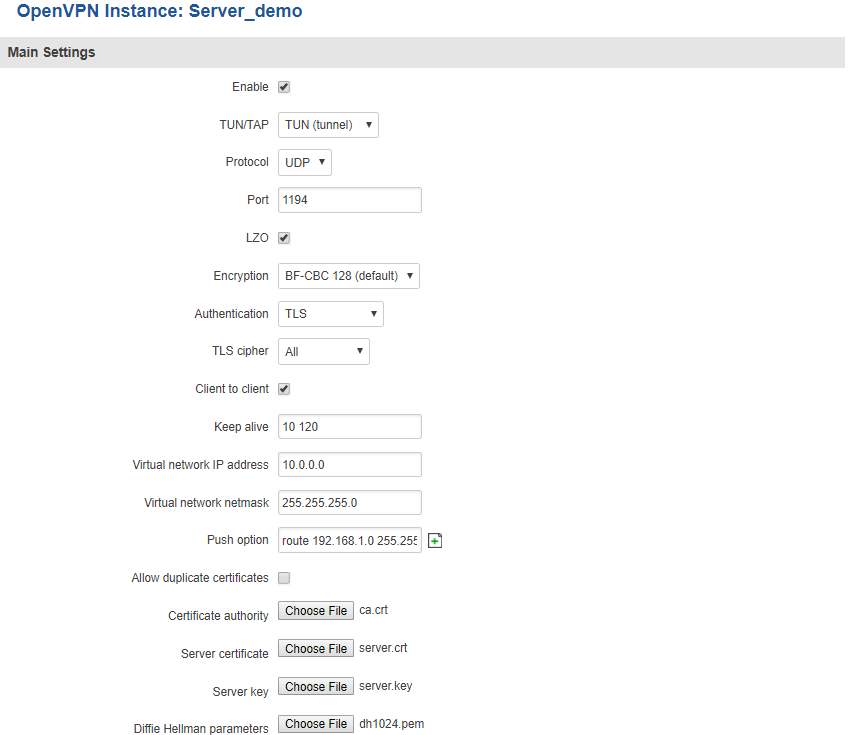
The figure above is an example of a configured OpenVPN Server instance that uses the UDP protocol and TLS authentication. As you can see, the configuration is similar to OpenVPN Client but with a few key differences. Comprehensible explanations on each field are presented in the table below:
| field name | value | description |
|---|---|---|
| Enable | yes | no; Default: no | Enables the OpenVPN instance |
| TUN/TAP | TUN (tunnel) | TAP (bridged); Default: TUN (tunnel) | OpenVPN interface type. TUN is most often in typical VPN connections, however, TAP is required in some Ethernet bridging configurations |
| Protocol | UDP | TCP; Default: UDP | The transfer protocol used by the OpenVPN connection. TCP is connection oriented – once a connection is established, data can be sent bidirectionally. UDP is a simpler, connectionless Internet protocol. UDP is usually faster but TCP has more security features. Choose the connection protocol according to your needs. |
| Port | integer [0..65535]; Default: 1194 | TCP/UDP Port number for both local and remote endpoints (make sure that the chosen port is allowed by firewall) |
| LZO | yes | no; Default: no | With LZO compression, your VPN connection will generate less network traffic. However, enabling this causes a higher CPU load. Use it carefully with a high traffic rate or low CPU resources |
| Encryption | DES-CBC 64 | RC2-CBC 128 | DES-EDE-CBC 128 | DES-EDE3-CBC 192 | DESX-CBC 192 | BF-CBC 128 | RC2-40-CBC 40 | CAST5-CBC 128 | RC2-40CBC 40 | CAST5-CBC 128 | RC2-64-CBC 64| AES-128-CBC 128 | AES-192-CBC 192 | AES-256-CBC 256 | none; Default: BF-CBC 128 | Packet encryption algorithm |
| Authentication | TLS* | Static Key | Password | TLS/Password; Default: TLS | Authentication mode, used to secure data sessions.
Static key is a secret key used for server–client authentication. TLS authentication mode uses X.509 type certificates: Certificate Authority (CA), Client certificate, Client key. All mentioned certificates can be generated using OpenVPN or Open SSL utilities on any type of host machine. Password is a simple username/password based authentication where the owner of the OpenVPN server provides the login data. TLS/Password uses both TLS and Password authentication |
| TLS cipher | all | DHE+RSA | custom; Default: all | Packet encryption algorithm cipher |
| Client to client | yes | no; Default: no | Enables client to client communication in the Virtual network. In order for Client to client to work, the TLS Clients section most be utilized |
| Keep alive | integer *space* integer; Default: " " | efines two time intervals: one is used to periodically send ICMP request to the OpenVPN server, the other defines a time window, which is used to restart the OpenVPN service, if no ICMP response is received during the window time slice. Example: 10 60 |
| Virtual network IP address | ip; Default: " " | IP address of the Virtual network, e.g., 10.0.8.0 |
| Virtual network IP netmask | ip; Default: " " | Subnet mask of the Virtual network |
| Push option | string; Default: " " | Push options are a way to “push” user defined routes to connecting clients’ routing tables. In the example above, the server will push the route of 192.168.1.0 network with the 255.255.255.0 netmask to connecting clients. Therefore, the client will be able to reach devices in the 192.168.1.0 network. This is useful when a client needs to reach devices located in the OpenVPN server’s LAN. |
| Allow duplicate certificates | yes | no; Default: no | If checked, the server allows clients to connect with identical certificates |
| Certificate authority | .ca file; Default: " " | Certificate authority is an entity that issues digital certificates. A digital certificate certifies the ownership of a public key by the named subject of the certificate |
| Server certificate | .crt file; Default: " " | Server certificate is a type of digital certificate that is used to identify the OpenVPN server |
| Server key | .key file; Default: " " | Authenticates clients to the server |
| Diffie Hellman parameters | .pem file; Default: " " | DH parameters define how OpenSSL performs the Diffie-Hellman (DH) key-exchange. |
* You can find detailed instructions on how to generate your own TLS certificates here.
TLS Clients
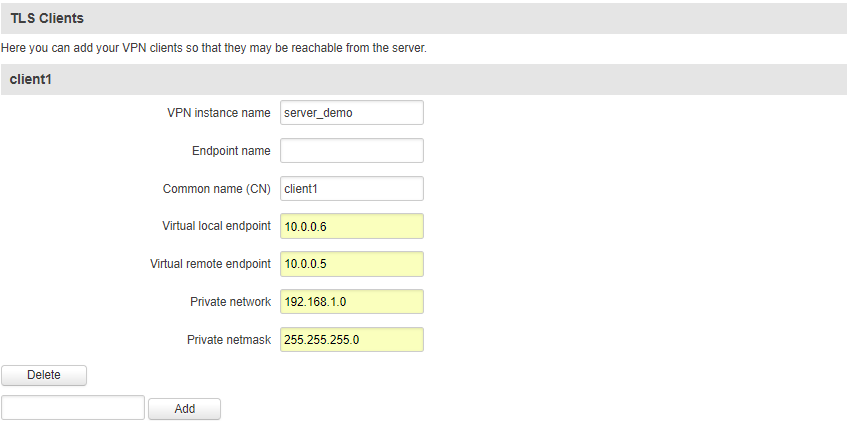
TLS Clients is a way to more specifically differentiate clients by their Common Name (CN) found in the client certificate file. It can be used to assign specific VPN addresses to specific clients and bind them to their LAN addresses so that other device‘s in the client‘s LAN can be reached from the server or other clients.
The TLS Clients section can be found in the OpenVPN Server configuration window, provided that the OpenVPN server uses TLS or TLS/Password authentication methods. To create a new TLS client, type in the new client‘s name in the text field found bellow the TLS Clients tab and press the Add button.
| field name | value | description |
|---|---|---|
| VPN instance name | string; Default: " " | With what VPN instance should the TLS Client be associated with |
| Endpoint name | string; Default: " " | Your endpoint name |
| Common name (CN) | string; Default: " " | Client’s Common Name (CN) found in the client’s certificate file |
| Virtual local endpoint | ip; Default: " " | Client’s virtual local address in the virtual network |
| Virtual remote endpoint | ip; Default: " " | Client’s virtual remote address in the virtual network |
| Private network | ip; Default: " " | Client’s private network (LAN) IP address |
| Private netmask | ip; Default: " " | Client’s private network (LAN) IP netmask |
IPsec
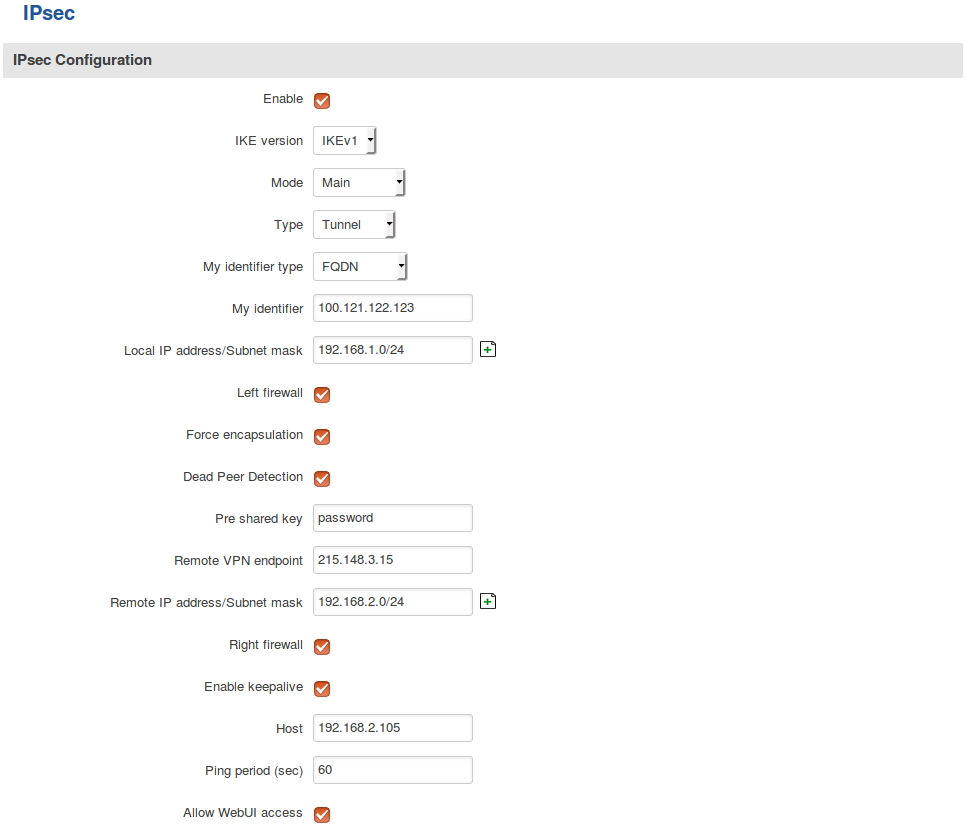
The IPsec protocol client enables the router to establish a secure connection to an IPsec peer via the Internet. IPsec is supported in two modes - transport and tunnel. Transport mode creates a secure point to point channel between two hosts. Tunnel mode can be used to build a secure connection between two remote LANs serving as a VPN solution.
IPsec system maintains two databases: Security Policy Database (SPD) which defines whether to apply IPsec to a packet or not and specify which/how IPsec-SA is applied and Security Association Database (SAD), which contains a Key of each IPsec-SA.
The establishment of the Security Association (IPsec-SA) between two peers is needed for IPsec communication. It can be done by using manual or automated configuration.
NOTE: the router starts establishing a tunnel when data is sent from the router to a remote site over the tunnel. The Keep Alive feature is used for automatic tunnel establishment.
For a more in-depth configuration example, visit the IPsec configuration examples page.
To create a new IPsec instance, go to the IPsec tab, type in a name for your new instance in the text field below the IPsec tab and press the Add button next to it.
NOTE: You can create a maximum of 5 IPsec instances.
| field name | value | description |
|---|---|---|
| Enable | yes | no; Default: no | Toggles the IPsec instance ON or OFF |
| IKE version | IKEv1 | IKEv2; Default: IKEv1 | Method of key exchange |
| Mode | Main | Aggressive; Default: Main | ISAKMP phase 1 exchange mode |
| Type | Tunnel | Transport; Default: Tunnel | Type of connection. Tunnel: protects the internal routing information by encrypting the IP header of the original packet. The original packet is encapsulated by a another set of IP headers. NAT traversal is supported with the tunnel mode. Transport: encrypts only the payload and Encapsulating Security Payload (ESP) trailer; so the IP header of the original packet is not encrypted. Transport mode is usually used when another tunneling protocol (such as GRE, L2TP (click here for a configuration example on L2TP over IPsec)) is used to first encapsulate the IP data packet, then IPsec is used to protect the GRE/L2TP tunnel packets. NAT traversal is not supported with the transport mode. |
| My identifier type | Address | FQDN | User FQDN; Default: FQDN | Type of connection |
| My identifier | string; Default: " " | In case RUT has a Private IP, its identifier should be its own LAN network address. In this way, the Road Warrior approach is possible |
| Local IP address/Subnet mask | ip/netmask | Default: " " | Local network secure group IP address and mask used to determine at what subnet an IP address can be accessed. Netmask range [0 - 32]. If left empty IP address will be selected automatically |
| Left firewall | yes | no; Default: yes | Excludes IPsec tunnel from firewall rules |
| Force encapsulation | yes | no; Default: no | Forces UDP encapsulation for ESP packets even if no NAT situation is detected |
| Dead Peer Detection | yes | no; Default: no | The values 'clear', 'hold' and 'restart' all activate DPD |
| Pre-shared key | string; Default: " " | A shared password used for authentication between the peers |
| Remote VPN endpoint | host | ip; Default: " " | IP address or hostname of the remote IPsec instance |
| Remote IP address/subnet mask | ip/integer [0..32]; Default: " " | Remote network secure group IP address and mask used to determine to what subnet an IP address belongs to. Should differ from device’s LAN IP |
| Right firewall | yes | no; Default: yes | Excludes remote side IPsec tunnel from firewall rules |
| Enable keep alive | yes | no; Default: no | Toggles the tunnel's keep alive function ON or OFF. When enabled, the instance sends ICMP packets to the specified host at the specified frequency. If no response is received, the instance attempts to restart the connection |
| Host | host | ip; Default: " " | Hostname or IP address to which ICMP packets will be sent to. Best to use a hostname/IP address belonging to the opposite instance's LAN |
| Ping period (sec) | integer [0..9999999]; Default: " " | The period (in seconds) at which ICMP packets will be sent to the specified keep alive host |
| Allow WebUI access | yes | no; Default: no | Allows WebUI access for hosts from the opposite instance |
Phase 1/Phase 2
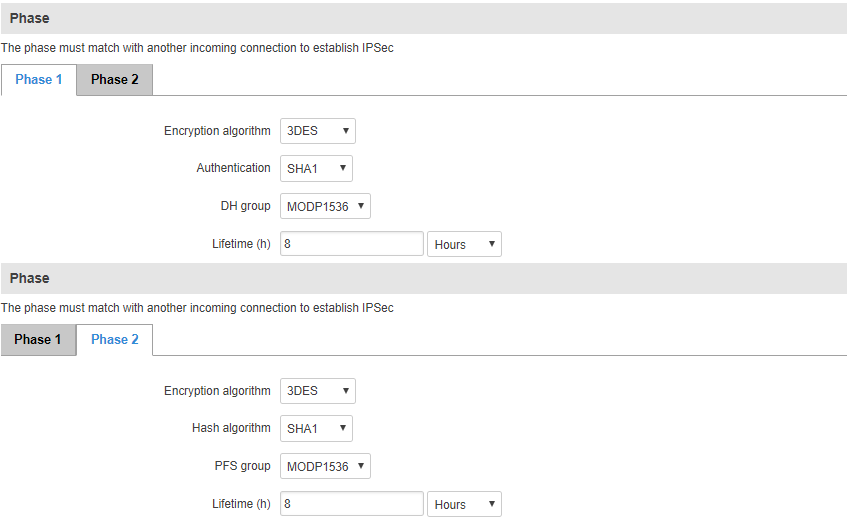
Phase 1 and Phase 2 must be configured in accordance with the IPSec server configuration, thus algorithms, authentication and lifetimes of each phase must be identical.
| field name | value | description |
|---|---|---|
| Encryption algorithm | DES | 3DES | AES 128 | AES 192 | AES256; Default: 3DES | The encryption algorithm must match with another incoming connection |
| Authentication | MD5 | SHA1 | SHA256 | SHA384 | SHA512; Default: SHA1 | The authentication algorithm must match with another incoming connection |
| Has algorithm | MD5 | SHA1 | SHA256 | SHA384 | SHA512; Default: SHA1 | The hash algorithm must match with another incoming connection |
| DH group | MODP768 | MODP1024 | MODP1536 | MODP2048 | MODP3072 | MODP4096; Default: MODP1536 | The DH (Diffie-Helman) group must match with another incoming connection |
| PFS group | MODP768 | MODP1024 | MODP1536 | MODP2048 | MODP3072 | MODP4096 | No PFS; Default: MODP1536 | The PFS (Perfect Forward Secrecy) group must match with another incoming connection |
| Lifetime | time; Default: 8 hours | Duration for the phase |
GRE Tunnel
GRE (Generic Routing Encapsulation RFC2784) is a solution for tunneling RFC1812 private address-space traffic over an intermediate TCP/IP network such as the Internet. GRE tunneling does not use encryption it simply encapsulates data and sends it over the wide area network (WAN).
In the example network diagram two distant networks LAN1 and LAN2 are connected. To create A GRE tunnel the user must know the following parameters:
- Source and destination IP addresses
- Tunnel’s local IP address
- Distant network’s IP address and Subnet mask
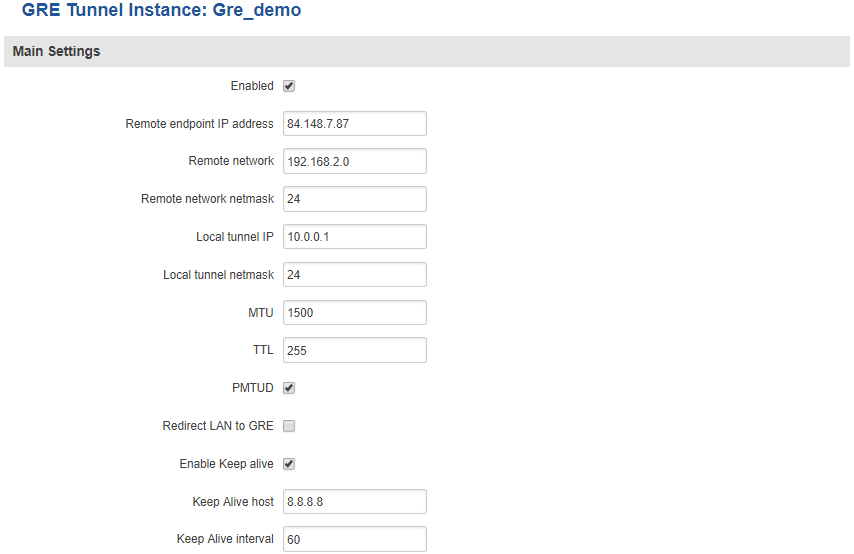
To create a new GRE instance, go to the GRE Tunnel tab, type in a name for your new instance in the text field below the GRE Tunnel tab and press the Add New button next to it. The newly created instance will be disabled and unconfigured. To configure it press the Edit button located next to it. This action will redirect you to the instance’s GRE Tunnel Configuration window.
| field name | value | description |
|---|---|---|
| Enabled | yes | no; Default: no | Toggles GRE Tunnel ON or OFF |
| Remote endpoint IP address | ip; Default: " " | WAN IP address or hostname of the remote GRE Tunnel instance |
| Remote network | integer [0..32]; Default: " " | LAN IP address of the remote device |
| Remote network netmask | integer [0..32]; Default: " " | LAN netmask of the remote device |
| Local tunnel IP | ip; Default: " " | Local virtual IP address. Can’t be in the same subnet as LAN network |
| MTU | integer [0..255]; Default: 255 | Toggles the Path Maximum Transmission Unit Discovery (PMTUD) status on this tunnel ON or OFF |
| TTL | integer [0..255]; Default: 255 | Fixed time-to-live (TTL) value on tunneled packets. The 0 is a special value meaning that packets inherit the TTL value |
| PMTUD | yes | no; Default: no | Toggles the Path Maximum Transmission Unit Discovery (PMTUD) status on this tunnel ON or OFF |
| Redirect LAN to GRE | yes | no; Default: no | Redirects LAN traffic to the GRE interface |
| Enable Keep alive | yes | no; Default: no | Gives the ability for one side to originate and receive keep alive packets to and from a remote router |
| Keep Alive host | host | ip; Default: " " | Keep Alive IP address to send pings to. Preferably this should be an IP address which belongs to the LAN network on the remote device |
| Keep alive interval | integer [0..255]; Default: " " | Frequency at which ICMP packets are sent by the Keep Alive function (in seconds) |
To find a more in-depth GRE Tunnel configuration example, visit this page
PPTP
Point-to-Point Tunneling Protocol (PPTP) is a protocol (set of communication rules) that allows corporations to extend their own corporate network through private "tunnels" over the public Internet. Effectively, a corporation uses a wide-area network as a single large local area network. A company no longer needs to lease its own lines for wide-area communication but can securely use the public networks.
For a more in-depth configuration example, visit the PPTP configuration examples page.
PPTP Client
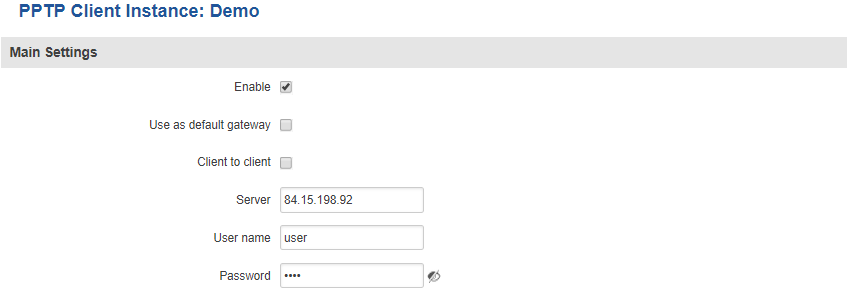
To create a new PPTP instance, go to the PPTP tab, select the Role (server or client) of your instance, type in a name in the New configuration name field and press the Add button next to it. The newly created instance will be disabled and unconfigured. To configure it click the Edit button located next to it. This action will redirect you to the instance’s PPTP Configuration window.
| field name | value | description |
|---|---|---|
| Enable | yes | no; Default: no | Toggles PPTP Client ON or OFF |
| Use as default gateway | yes | no; Default: no | Use this PPTP instance as default gateway |
| Client to client | yes | no; Default: no | Toggles client to client on the PPTP tunnel ON or OFF |
| Server | host | ip; Default: " " | PPTP server's IP address or hostname |
| Username | string; Default: " " | User name for authorization with the server |
| Password | string; Default: " " | Password used for authorization with the server |
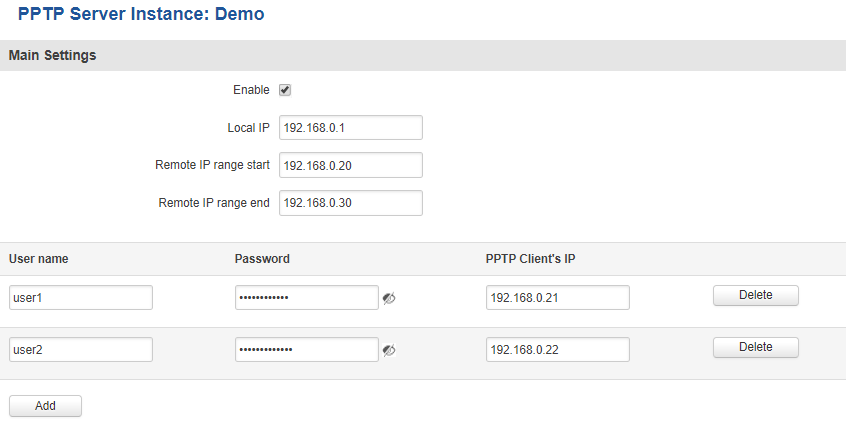
PPTP Server
| field name | value | description |
|---|---|---|
| Enable | yes | no; Default: no | Toggles PPTP Server ON or OFF |
| Local IP | ip; Default: 192.168.0.1 | Virtual IP Address of this PPTP server |
| Remote IP range begin | ip; Default: 192.168.0.20 | Client IP address leases beginning |
| Remote IP range end | ip; Default: 192.168.0.30 | Client IP address leases end |
| User name | string; Default: youruser | Client's user name used for authentication with this server |
| Password | string; Default: yourpass | Client's password used for authentication with this server |
| PPTP Client's IP | ip; Default: " " | Client’s IP address. Leave empty to assign a random IP from the IP range specified above |
L2TP
In computer networking, Layer 2 Tunneling Protocol (L2TP) is a tunneling protocol used to support virtual private networks (VPNs). It is more secure than PPTP but, because it encapsulates the transferred date twice, but it is slower and uses more CPU power.
For a more in-depth configuration example, visit the L2TP configuration examples page.
L2TP Client
To create a new L2TP instance, go to the L2TP tab, select the Role (server or client) of your instance, type in a name in the New configuration name field and press the Add button next to it. The newly created instance will be disabled and unconfigured. To configure it press the Edit button located next to it. This action will redirect you to the instance’s L2TP Configuration window.
| field name | value | description |
|---|---|---|
| Enable | yes | no; Default: no | Toggles L2TP Client ON or OFF |
| Server | host | ip; Default: " " | L2TP server's remote IP address or hostname |
| Username | string; Default: " " | User name used to authenticate you to the L2TP server |
| Password | string; Default: " " | Password used to authenticate you to the server |
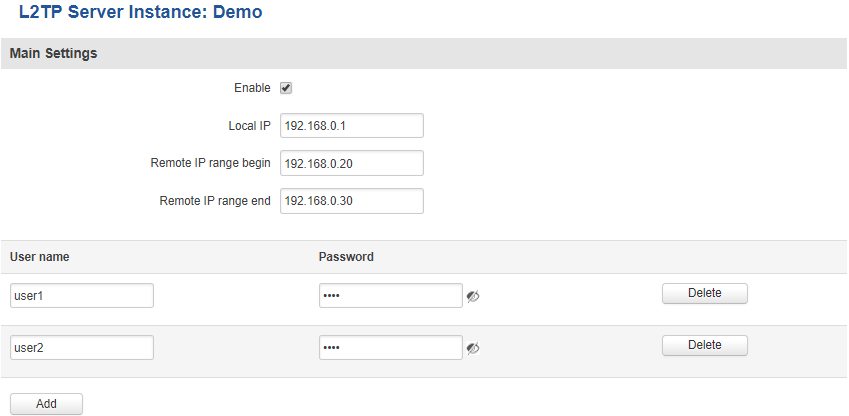
L2TP Server
| field name | value | description |
|---|---|---|
| Enable | yes | no; Default: no | Toggles L2TP Server ON or OFF |
| Local IP | ip; Default: 192.168.0.1 | Virtual IP Address of this L2TP server |
| Remote IP range begin | ip; Default: 192.168.0.20 | Client IP address leases beginning |
| Remote IP range end | ip; Default: 192.168.0.30 | Client IP address leases end |
| User name | string; Default: user | Client's user name used for authentication with this server |
| Password | string; Default: pass | Client's password used for authentication with this server |
See also
- Configuration examples for RUTxxx VPN services:
- Configuration examples for third party VPN services
- Other related examples:

