Difference between revisions of "Command Line Interfaces RutOS"
| Line 1: | Line 1: | ||
==Introduction== | ==Introduction== | ||
| − | A '''command line interface''' ('''CLI''') is a means of interacting with a computer program or system where the user (or client) issues commands to the program in the form of successive lines of text (command lines). A program that handles the interface is called a '''command language interpreter''' or '''shell'''. | + | A '''command line interface''' ('''CLI''') is a means of interacting with a computer program or system where the user (or client) issues commands to the program in the form of successive lines of text (command lines). A program that handles the interface is called a '''command language interpreter,''' or '''shell'''. |
| − | Teltonika-Networks devices support a variety of different command line interfaces all of which will be described in this article. Only the methods of reaching and logging in via a specified CLI will be described here | + | Teltonika-Networks devices support a variety of different command line interfaces, all of which will be described in this article. Only the methods of reaching and logging in via a specified CLI will be described here, not any specific command usage. |
| − | In all cases, CLI login information for Teltonika-Networks devices | + | In all cases, the CLI login information for Teltonika-Networks devices is: |
* User name: '''root''' | * User name: '''root''' | ||
| Line 12: | Line 12: | ||
==CLI (WebUI)== | ==CLI (WebUI)== | ||
| − | + | Teltonika Networks routers and gateways have a command-line interface built-in to their '''Web User Interfaces''' ('''WebUI'''). This is the most accessible method because all you need is a web browser. | |
| − | + | ||
| − | + | To access the WebUI CLI, '''log in to the WebUI''' by typing the '''router's LAN IP address''' into the '''URL field of your web browser''.''''' After this, you will be greeted with the login window. Type in the user name "'''admin'''" and the '''router's admin password''', and '''click Login'''. | |
| − | |||
[[File:RutOS WebUI Login fixed.png|border|class=tlt-border]] | [[File:RutOS WebUI Login fixed.png|border|class=tlt-border]] | ||
| − | + | Then locate the '''CLI''' section under the System tab. Type in the login name "'''root"''' and the '''router's admin password'''. You should be greeted with a message such as this: | |
| − | |||
[[File:RutOS WebUI CLI logged in fixed.png|border|class=tlt-border]] | [[File:RutOS WebUI CLI logged in fixed.png|border|class=tlt-border]] | ||
| Line 30: | Line 28: | ||
===Linux=== | ===Linux=== | ||
---- | ---- | ||
| − | Linux operating systems support many applications that can be used to log in to a | + | Linux operating systems support many applications that can be used to log in to a router or a gateway via SSH, but the most common is '''Terminal''', which we'll be using for this example. |
| − | + | Open a new Terminal window, type '''ssh [email protected].''' If this is your first time logging in, you might be asked to clarify whether you really want to log in. In that case, just type '''yes'''. Then type in the '''router's admin password''' to finish the login process. | |
[[ File:Ubuntu_SSH_login.png|border|class=tlt-border]] | [[ File:Ubuntu_SSH_login.png|border|class=tlt-border]] | ||
| − | |||
| − | |||
====RSA key==== | ====RSA key==== | ||
| Line 44: | Line 40: | ||
===Windows=== | ===Windows=== | ||
---- | ---- | ||
| − | To | + | To access SSH on the Windows OS, you will need an SSH client application. The most common is '''PuTTY''' - free, open source SSH and Telnet client, which we'll be using for this example. You can download PuTTY from '''[https://www.chiark.greenend.org.uk/~sgtatham/putty/latest.html here]'''. |
| − | + | ||
| − | + | Launch PuTTY and select the '''SSH''' option. Type in the '''router's LAN IP address''' into the '''"Host Name (or IP address)"''' field, specify the SSH port into the '''"Port"''' field ('''22''' by default), and '''click "Open"''': | |
[[File:SSH Putty login.png|border|class=tlt-border]] | [[File:SSH Putty login.png|border|class=tlt-border]] | ||
| − | + | ||
| − | + | In the next window, type in the login name '''root''' and the '''router's admin password'''. You should be greeted with a message such as this: | |
[[File:SSH Putty logged in.png|border|class=tlt-border]] | [[File:SSH Putty logged in.png|border|class=tlt-border]] | ||
| − | + | '''Note:''' Newer Windows 10 editions already have a built-in SSH client. see https://docs.microsoft.com/en-us/windows/terminal/tutorials/ssh | |
| − | |||
| − | |||
==== RSA key==== | ==== RSA key==== | ||
| Line 63: | Line 57: | ||
==RS232/RS485 console (only with RUT955)== | ==RS232/RS485 console (only with RUT955)== | ||
| − | It is also possible to control | + | It is also possible to control routers or gateways via RS232 or RS485 consoles if they have those serial ports. For this, you will need the adequate cables: |
| − | + | ||
{| class="wikitable" style="border:2px solid white; background: white" | {| class="wikitable" style="border:2px solid white; background: white" | ||
|+ | |+ | ||
| Line 71: | Line 65: | ||
| style="border:1px solid white; width: 400px" |'''USB to RS232 (Male) cable''' <br> [[File:Usb to rs232 male.png|187px|left]] | | style="border:1px solid white; width: 400px" |'''USB to RS232 (Male) cable''' <br> [[File:Usb to rs232 male.png|187px|left]] | ||
|- | |- | ||
| − | |} | + | |}You can log in to the RS485 console with a 2-wire cable or you can use the RS485 jack that comes with the router for one end; the other end of the cable basically depends on your end device's capabilities (it can be USB, RS232, etc.) |
| − | |||
| − | |||
| − | You can log in to the RS485 console with a 2-wire cable | ||
===Router configuration=== | ===Router configuration=== | ||
| − | ---- | + | ----The configuration on the device side is fairly simple. Just '''log in to the device WebUI''', go to '''Services → Serial Utilities → Console,''' enable the instance, and configure the rest according to your serial device settings. In the example below, default values were used. |
| − | |||
[[File:Rs232 console configuration v4.png|border|class=tlt-border]] | [[File:Rs232 console configuration v4.png|border|class=tlt-border]] | ||
| − | |||
| − | |||
===Linux=== | ===Linux=== | ||
| − | ---- | + | ----To login from a Linux PC, you'll need an application for serial communication like '''minicom''' or '''gtkterm'''. For this example, we'll be using minicom. You can download it by typing these lines into the Terminal: |
| − | |||
| − | |||
$ sudo apt-get update | $ sudo apt-get update | ||
$ sudo apt-get install minicom | $ sudo apt-get install minicom | ||
Revision as of 15:09, 22 March 2023
Main Page > General Information > Configuration Examples > Router control and monitoring > Command Line Interfaces RutOSIntroduction
A command line interface (CLI) is a means of interacting with a computer program or system where the user (or client) issues commands to the program in the form of successive lines of text (command lines). A program that handles the interface is called a command language interpreter, or shell.
Teltonika-Networks devices support a variety of different command line interfaces, all of which will be described in this article. Only the methods of reaching and logging in via a specified CLI will be described here, not any specific command usage.
In all cases, the CLI login information for Teltonika-Networks devices is:
- User name: root
- Password: router's admin password
CLI (WebUI)
Teltonika Networks routers and gateways have a command-line interface built-in to their Web User Interfaces (WebUI). This is the most accessible method because all you need is a web browser.
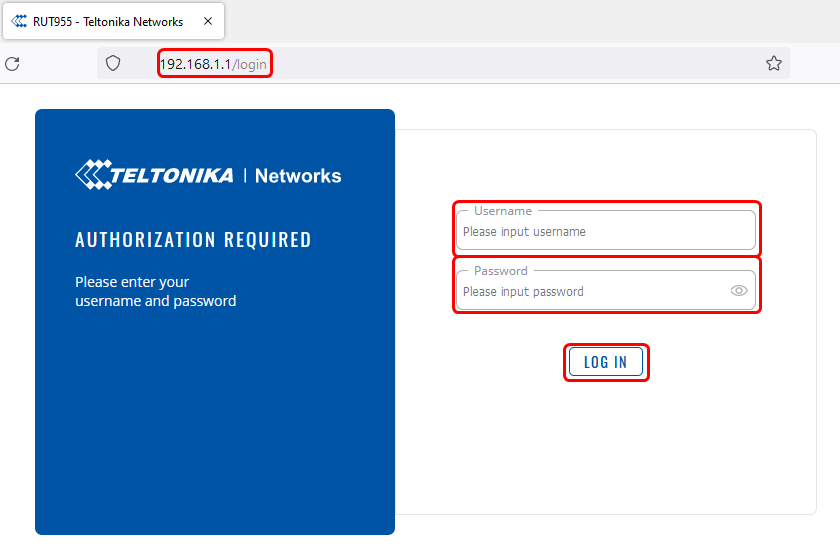
To access the WebUI CLI, log in to the WebUI by typing the router's LAN IP address into the URL field of your web browser. After this, you will be greeted with the login window. Type in the user name "admin" and the router's admin password, and click Login.
Then locate the CLI section under the System tab. Type in the login name "root" and the router's admin password. You should be greeted with a message such as this:
File:RutOS WebUI CLI logged in fixed.png
SSH
Secure Shell (SSH) is a cryptographic network protocol for operating network services securely over an unsecured network. The best-known example application is for remote login to computer systems by users. The login process is different for different operating systems. Therefore, this section is split into two parts: Linux and Windows.
Linux
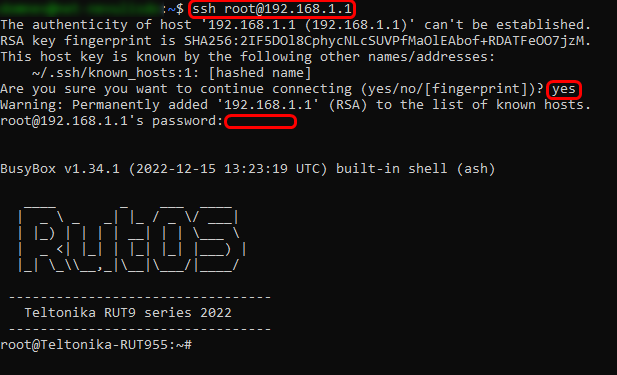
Linux operating systems support many applications that can be used to log in to a router or a gateway via SSH, but the most common is Terminal, which we'll be using for this example.
Open a new Terminal window, type ssh [email protected]. If this is your first time logging in, you might be asked to clarify whether you really want to log in. In that case, just type yes. Then type in the router's admin password to finish the login process.
RSA key
There is a possibility to use an RSA key instead of a password when logging in via SSH. This process is described here in detail.
Windows
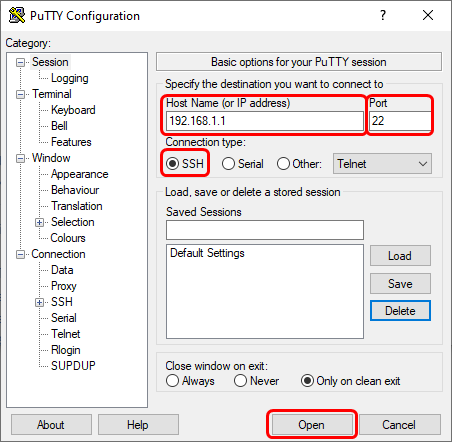
To access SSH on the Windows OS, you will need an SSH client application. The most common is PuTTY - free, open source SSH and Telnet client, which we'll be using for this example. You can download PuTTY from here.
Launch PuTTY and select the SSH option. Type in the router's LAN IP address into the "Host Name (or IP address)" field, specify the SSH port into the "Port" field (22 by default), and click "Open":
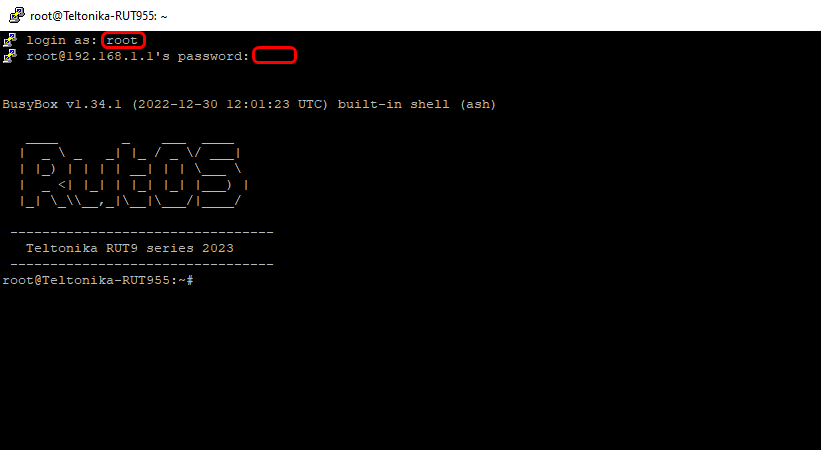
In the next window, type in the login name root and the router's admin password. You should be greeted with a message such as this:
Note: Newer Windows 10 editions already have a built-in SSH client. see https://docs.microsoft.com/en-us/windows/terminal/tutorials/ssh
RSA key
There is a possibility to use an RSA key instead of a password when logging in via SSH. This process is described here in detail.
RS232/RS485 console (only with RUT955)
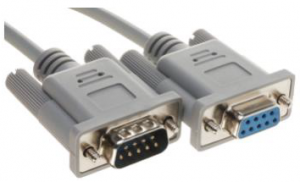
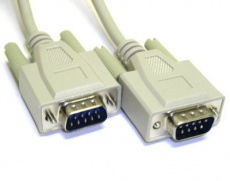
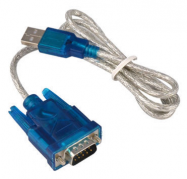
It is also possible to control routers or gateways via RS232 or RS485 consoles if they have those serial ports. For this, you will need the adequate cables:
| Straight-through Female/Male RS232 cable |
Null-modem (crossed) Male/Male RS232 cable |
USB to RS232 (Male) cable |
You can log in to the RS485 console with a 2-wire cable or you can use the RS485 jack that comes with the router for one end; the other end of the cable basically depends on your end device's capabilities (it can be USB, RS232, etc.)
Router configuration
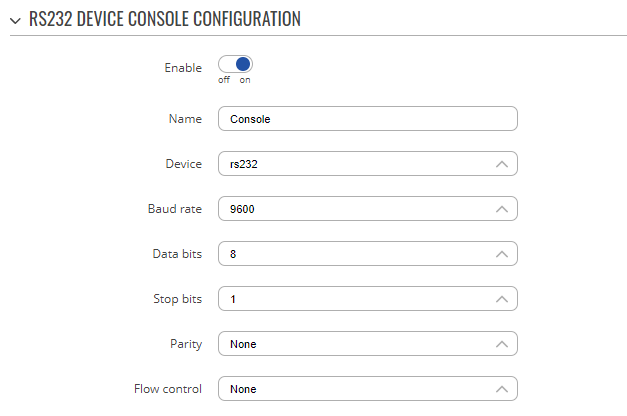
The configuration on the device side is fairly simple. Just log in to the device WebUI, go to Services → Serial Utilities → Console, enable the instance, and configure the rest according to your serial device settings. In the example below, default values were used.
Linux
To login from a Linux PC, you'll need an application for serial communication like minicom or gtkterm. For this example, we'll be using minicom. You can download it by typing these lines into the Terminal:
$ sudo apt-get update
$ sudo apt-get install minicom
update downloads a list of newest software packages; install minicom downloads and installs minicom.
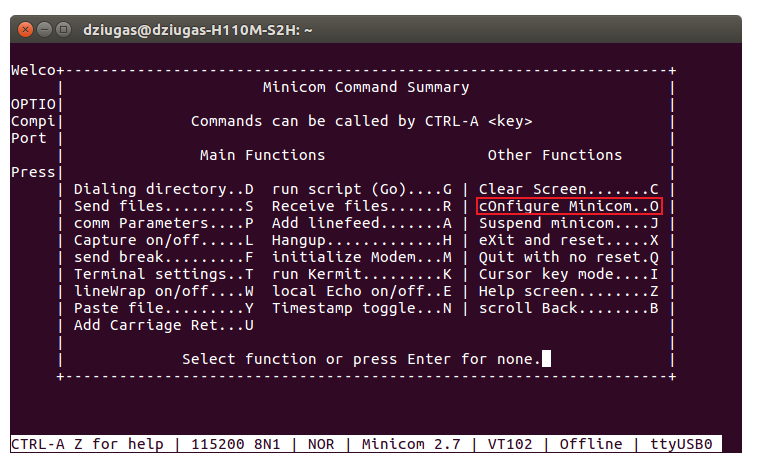
- Once you've installed minicom, you can run it with the command sudo minicom from the Linux Terminal. This will open a new console window where you will need to set some things up. Press Ctrl + A at once on your keyboard, then press "Z" which will direct you to the settings menu:
- Press "O" on your keyboard. This will direct you to the main settings menu. From there you should specify the name of the serial device and the same parameters that you entered in the router's configuration. A picture with corresponding parameters is presented below:
File:Minicom settings port v2.png
Once done, press "Enter". In the next menu, you can save these settings as defaults by selecting Save setup as dfl so that you wouldn't need to set everything up the next time you use the console.
- Press "Esc" on your keyboard to return to the console window and type in the login name root, press "Enter", type in the router's admin password, and press "Enter" again. After this, you will be able to use the RS232/RS485 console.
Windows
To log in from a Windows PC, you'll need an application for serial communication. The most common is PuTTY - a free, open source SSH and Telnet client, which we'll be using for this example. You can download PuTTY from here.
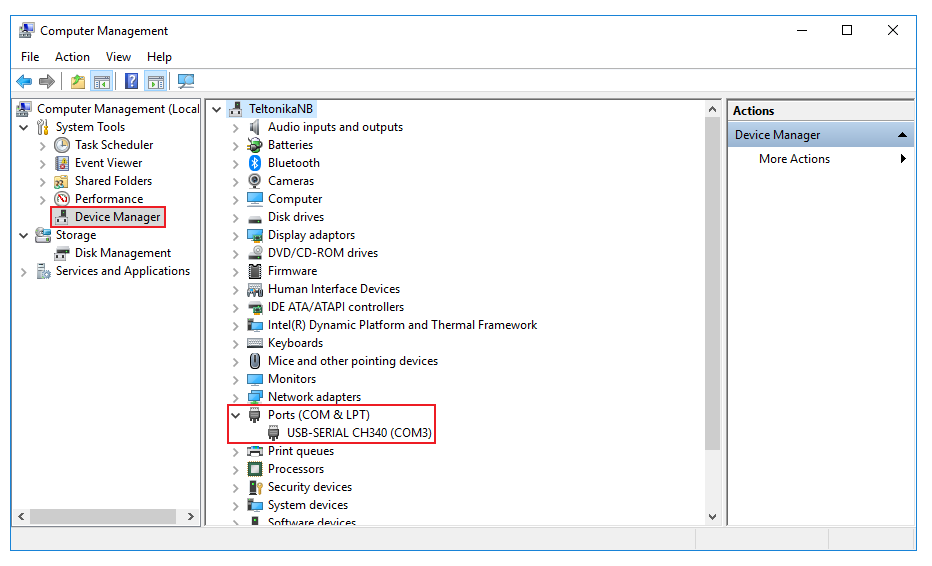
- First you must find out which Serial line (or COM port) your cable uses. To do so, go to Windows Device Manager (you can find it easily via the search field or in the Control Panel). Find Ports (COM & LPT) in the device list and expand that section. Locate your serial device (depends on the type of cable) and take note of its COM port number (COM3 in our example):
- Launch PuTTY and select the Serial option under the "Connection type" field. Specify the COM port (COM3 from our example) in the "Serial line" field and the Baud rate from your router's configuration in the "Speed" field (115200 from our example) and click "Open":
File:Putty serial login 2 v2.PNG
- In the next window type in the login name root, press "Enter", type in the router's admin password, and press "Enter" again. You should be greeted with a message such as this:
File:Putty serial login 3 v2.PNG
See also
External links
- https://www.chiark.greenend.org.uk/~sgtatham/putty/latest.html - PuTTY downloads page
