Difference between revisions of "Connecting to a Hotspot WiFi for Internet Connectivity"
DaumantasG (talk | contribs) |
DaumantasG (talk | contribs) |
||
| Line 22: | Line 22: | ||
---- | ---- | ||
Connecting to a hotspot network will be the same as connecting to any other wireless network. | Connecting to a hotspot network will be the same as connecting to any other wireless network. | ||
| − | * Navigate to Network → Wireless; | + | * Navigate to '''Network → Wireless'''; |
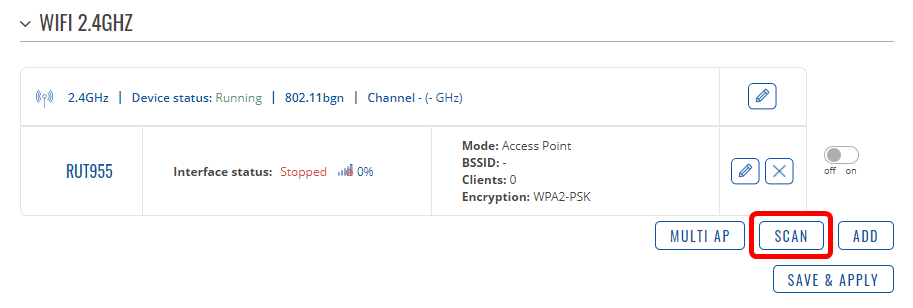
| − | * Press the Scan button under the wireless band used by the hotspot network | + | * Press the '''Scan''' button under the wireless band used by the hotspot network; |
[[File:Hotspot_as_wan_scan_network.png|border|class=tlt-border]] | [[File:Hotspot_as_wan_scan_network.png|border|class=tlt-border]] | ||
| + | * Press the Join Network button on the HotSpot network; | ||
| + | [[File:Hotspot_as_wan_scan_results.png|border|class=tlt-border]] | ||
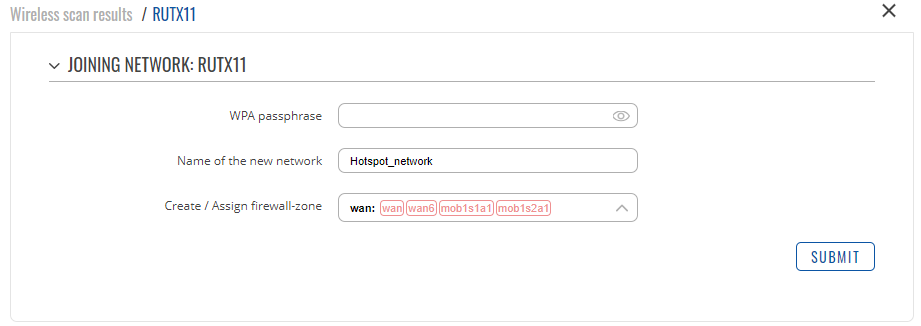
| + | * If the network requires it, enter the authentication details for the WiFi network (''not the HotSpot itself''). Otherwise, leave the WPA Passphrase field empty. The name of the Hotspot network should also be entered for identification; | ||
| + | [[File:Hotspot_as_wan_joining_hotspot.png|border|class=tlt-border]] | ||
| + | * Once the wireless interface configuration opens up, validate the settings, and press '''Save & Apply'''; | ||
| + | * Finally, the network interface settings can be also be saved; | ||
Revision as of 10:13, 3 July 2023
Main Page > General Information > Configuration Examples > WIFI > Connecting to a Hotspot WiFi for Internet ConnectivityThe information in this page is updated in accordance with 00.07.04.4 firmware version. .
Introduction
This article contains instructions on connecting to an existing Captive portal wireless network and using it as a WAN source for your local network. This feature works by utilizing the TravelMate package. Once you connect to the Hotspot wireless network with the router, it will redirect a LAN client to the Captive portal to accept the Terms of Service, log in, or otherwise authenticate to the hotspot network.
Perquisites
There are a few things that need to be done before connecting to the hotspot network:
- Make sure the WebUI is in Advanced mode. This setting can be changed by clicking the Mode toggle in the top-right corner of the WebUI:
- TravelMate package needs to be installed from the Package manager by navigating to Services → Package Manager → Packages.
- Alternatively, if the router does not have an internet connection, the package can be downloaded from the Package Downloads page on our Wiki. This page can be found by selecting the model of your device on the Wiki home page.
Configuration
For this configuration example we will be using:
- RUTX11 with a configured hotspot network;
- RUT956 connected to the RUTX11 in wireless client mode;
- An Android phone connected to the RUT956 wireless network;
Authentication on the Captive portal will be handled by the Android phone.
*Schematic*
Connecting to a hotspot wireless network
Connecting to a hotspot network will be the same as connecting to any other wireless network.
- Navigate to Network → Wireless;
- Press the Scan button under the wireless band used by the hotspot network;
- Press the Join Network button on the HotSpot network;
- If the network requires it, enter the authentication details for the WiFi network (not the HotSpot itself). Otherwise, leave the WPA Passphrase field empty. The name of the Hotspot network should also be entered for identification;
- Once the wireless interface configuration opens up, validate the settings, and press Save & Apply;
- Finally, the network interface settings can be also be saved;


