|
|
| Line 56: |
Line 56: |
| | </ol>[[File:Networking_rutos_configuration_examples_cumulocity_7.png]] | | </ol>[[File:Networking_rutos_configuration_examples_cumulocity_7.png]] |
| | </li> | | </li> |
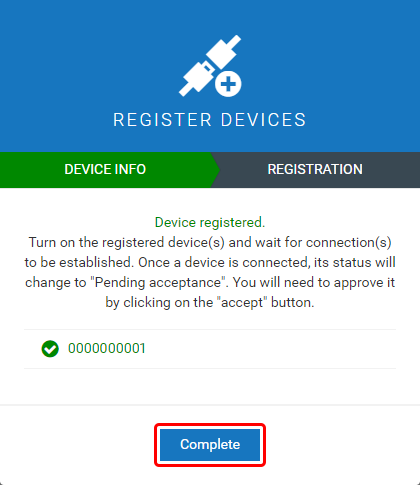
| − | <li>If the device connects successfully, you should see an indication similar to the one below. Click 'Complete' to finish the registration.</li> | + | <li>If the device connects successfully, you should see an indication similar to the one below. Click 'Complete' to finish the registration.<br>[[File:Networking_rutos_configuration_examples_cumulocity_8.png|border|class=tlt-border]]</li> |
| | </ul> | | </ul> |
| − | <!-- | + | <!--==Configuring and launching example application== |
| − | ==Installing example application== | |
| | | | |
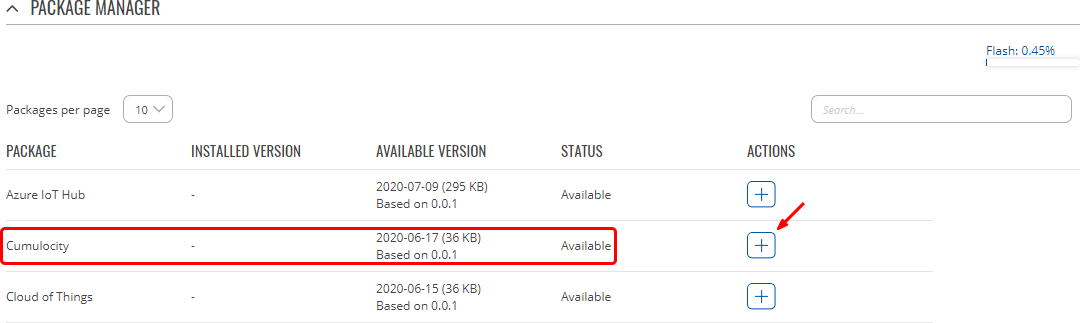
| − | First, you need to install Cumulocity. Go to System -> Package manager:
| + | If everything is correct with adding the device, a new device widget should show up with a status „PENDING ACCEPTANCE“: |
| − | | |
| − | [[File:Package manager.jpg]]
| |
| − | | |
| − | When you open package manager you will see a list of packages. You need click install on Cumulocity, see below:
| |
| − | | |
| − | | |
| − | [[File:Screenshot from 2019-11-27 16-00-24.png]]
| |
| − | | |
| − | ==Configuring and launching example application==
| |
| − | After you successfully installed Cumulocity, in „Services“ tab there should be an option called „IoT Platforms“.
| |
| − | | |
| − | [[File:cumiot.png]]
| |
| − | | |
| − | [[File:cumiotwindow.png]]
| |
| − | | |
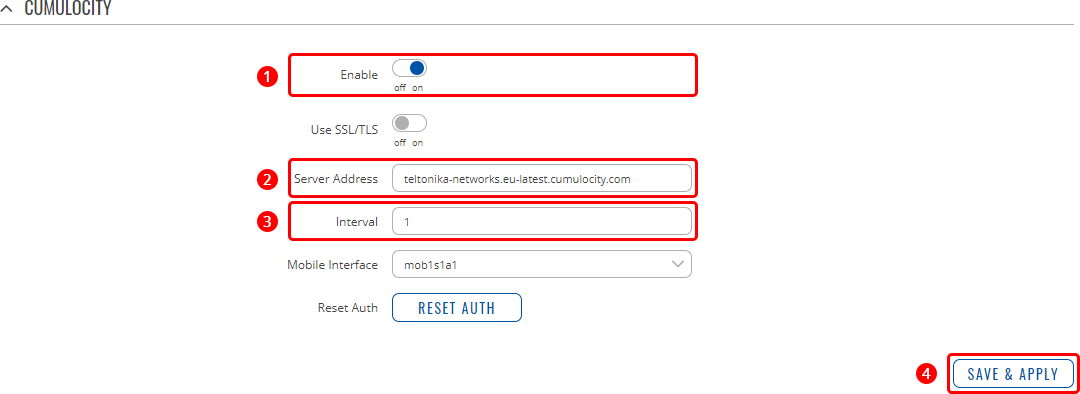
| − | Only single field is required, which is Server Address. This is the same URL of Cumulocity Cockpit website. In this example, it is myservername.cumulocity.com.
| |
| − | | |
| − | Explanation of other options:
| |
| − | | |
| − | Use SSL/TLS – connection will use TLS, however, you need to have a signed SSL certificate, otherwise application would not be able to connect to the Cumulocity server.
| |
| − | | |
| − | Reset Auth – once device has been removed from the Cumulocity Device Management, you will need to reset authentication in order to re-register device.
| |
| − | | |
| − | Also click „Enable“ to enable example application. See below:
| |
| − | | |
| − | [[File:cumiotvalues.png]]
| |
| − | | |
| − | Now click „Save“ and if everything is correct – example application will successfully connect to the Cumulocity server.
| |
| − | | |
| − | Now you need to register device on Device Management in Cumulocity Cockpit.
| |
| − | | |
| − | Device registration is done by writing down device's serial number. In order to obtain your device's serial number, look at the backplate of it or navigate to your device's control panel and then to „Status → Device“ page:
| |
| − | | |
| − | [[File:cumdevice.png]]
| |
| − | | |
| − | In this case, serial number is 09516845.
| |
| − | | |
| − | Now log into your Cumulocity Cockpit portal, in this example URL is https://myservername.cumulocity.com.
| |
| − | | |
| − | Go to the Device Management page:
| |
| − | | |
| − | [[File:cumcockpit.png]]
| |
| − | | |
| − | [[File:cumdevicemanagement.png]]
| |
| − | | |
| − | Then navigate to Registration page:
| |
| − | | |
| − | [[File:cumdevicepage.png]]
| |
| − | | |
| − | Click „Register device“:
| |
| − | | |
| − | [[File:cumdeviceregister.png]]
| |
| − | | |
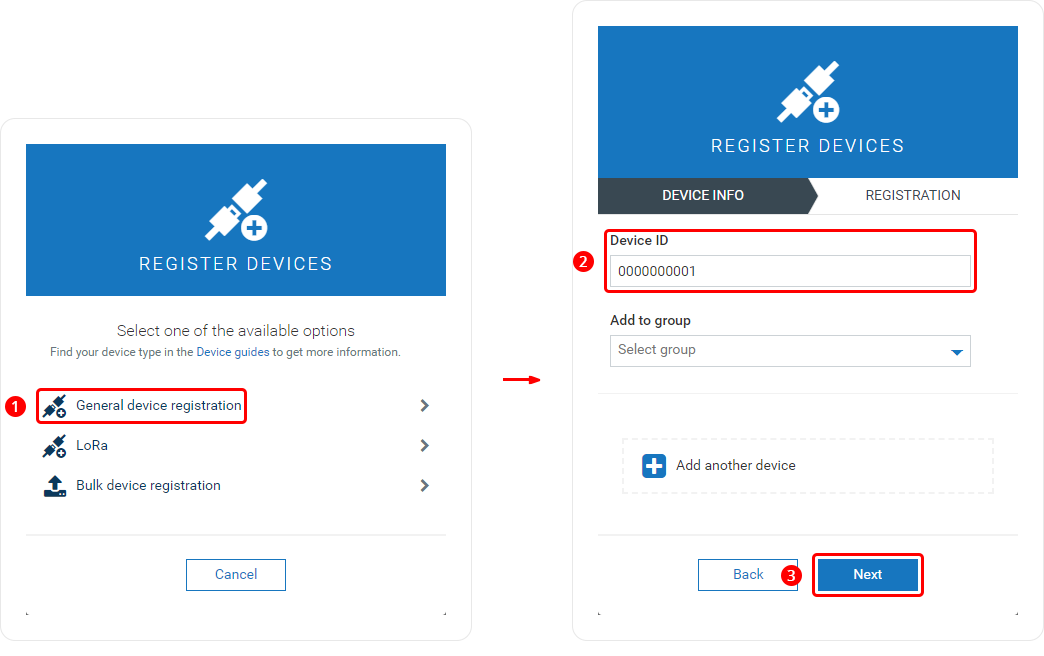
| − | Click „General device registration“:
| |
| − | | |
| − | [[File:cumnewdevice.png]]
| |
| − | | |
| − | Write device’s serial number in „Device ID“ field and click „Next“:
| |
| − | | |
| − | [[File:cumdeviceregistration.png]]
| |
| − | | |
| − | As shown below, registration is successful:
| |
| − | | |
| − | [[File:cumsuccessresgister.png]]
| |
| − | | |
| − | Click „Finish“ to close this pop-up. Now if everything is correct, a new device widget should show up with a status „PENDING ACCEPTANCE“:
| |
| | | | |
| | [[File:cumpendingdevice.png]] | | [[File:cumpendingdevice.png]] |
| Line 182: |
Line 115: |
| | | | |
| | [[File:cumdevicewidgetinfo.png]] | | [[File:cumdevicewidgetinfo.png]] |
| − |
| |
| − | ==Explanation of example application==
| |
| − | There are two steps when adding new properties:
| |
| − |
| |
| − | 1. Writing template
| |
| − |
| |
| − | 2. Writing lua script which will stream information.
| |
| − |
| |
| − | By default, template location inside router is „/usr/lib/lua/cm/srtemplate.txt“. It contains such content:
| |
| − |
| |
| − | rut955-v0.01
| |
| − |
| |
| − | 10,100,GET,/identity/externalIds/SerialNumber/%%,,application/json,%%,STRING,
| |
| − |
| |
| − | 10,101,POST,/inventory/managedObjects,application/json,application/json,%%,STRING,"{""name"":""%%"",""c8y_IsDevice"":{},""com_cumulocity_model_Agent"":{}}"
| |
| − |
| |
| − | 10,102,POST,/identity/globalIds/%%/externalIds,application/json,application/json,%%,STRING STRING,"{""externalId"":""%%"",""type"":""SerialNumber""}"
| |
| − |
| |
| − | 10,103,PUT,/inventory/managedObjects/%%,application/json,application/json,%%,STRING STRING STRING,"{""name"": ""%%"", ""type"": ""%%""}"
| |
| − |
| |
| − | 10,104,PUT,/inventory/managedObjects/%%,application/json,application/json,%%,STRING STRING STRING STRING,"{""c8y_Hardware"": {""model"":""%%"",""revision"":""%%"",""serialNumber"":""%%""}}"
| |
| − |
| |
| − | 10,105,PUT,/inventory/managedObjects/%%,application/json,application/json,%%,STRING STRING STRING STRING STRING STRING STRING,"{""c8y_Mobile"": {""imei"":""%%"",""cellId"":""%%"",""iccid"":""%%"",""connType"":""%%"",""currentOperat or"":""%%""},""signal"":""%%""}"
| |
| − |
| |
| − | 10,106,PUT,/inventory/managedObjects/%%,application/json,application/json,%%,STRING STRING STRING,"{""c8y_Network"":{""c8y_WAN"":{""ip"":""%%""}},""wanType"":""%%""}"
| |
| − |
| |
| − | 10,107,PUT,/inventory/managedObjects/%%,application/json,application/json,%%,UNSIGNED STRING,"{""c8y_SupportedOperations"":[""%%""]}"
| |
| − |
| |
| − | 10,108,PUT,/devicecontrol/operations/%%,application/json,application/json,%%,UNSIGNED STRING,"{""status"":""%%""}"
| |
| − |
| |
| − | 11,500,$.managedObject,,$.id
| |
| − | 11,501,,$.c8y_IsDevice,$.id
| |
| − | 11,502,,$.c8y_Restart,$.id,$.deviceId
| |
| − |
| |
| − | First line contains template version. In this case it is „rut955-v0.01“.
| |
| − |
| |
| − | When template is updated, version must be updated aswell, otherwise device will use non-updated template version.
| |
| − |
| |
| − | The following lines contains requests starting with a number „10“ and responses - starting with a number „11“. Now explanation of request:
| |
| − |
| |
| − | Type - 10
| |
| − |
| |
| − | Code - 101
| |
| − |
| |
| − | Method - POST
| |
| − |
| |
| − | URL - /inventory/managedObjects
| |
| − |
| |
| − | Content Type - application/json
| |
| − |
| |
| − | Accept - application/json
| |
| − |
| |
| − | Placeholder - %%
| |
| − |
| |
| − | Params - STRING STRING
| |
| − |
| |
| − | Template - JSON
| |
| − |
| |
| − |
| |
| − |
| |
| − | Type – requests are identified by a number 10
| |
| − |
| |
| − | Code – request code number, each request must contain unique number
| |
| − |
| |
| − | Method – HTTP method of request
| |
| − |
| |
| − | URL – URL that will be used in request
| |
| − |
| |
| − | Content Type – it is Content-Type header field value
| |
| − |
| |
| − | Accept – it is Accept header field value, mostly equal to Content Type
| |
| − |
| |
| − | Placeholder - string which will be replaced in URL or Template JSON
| |
| − |
| |
| − | Params – what kind of params are replaced, JSON template contains two strings
| |
| − |
| |
| − | Template – JSON template which will be sent
| |
| − |
| |
| − |
| |
| − | Explanation of response:
| |
| − |
| |
| − | Type - 11
| |
| − |
| |
| − | Code - 502
| |
| − |
| |
| − | Cond - <none>
| |
| − |
| |
| − | Value 1 - $.c8y_Restart
| |
| − |
| |
| − | Value 2 - $.id
| |
| − |
| |
| − | Value3 - $.deviceId
| |
| − |
| |
| − |
| |
| − | Type – responses are identified by a number 11
| |
| − |
| |
| − | Code – response code, each response must contain unique number
| |
| − |
| |
| − | Cond – JSON path base pointing to an object or object list from which values are
| |
| − | extracted
| |
| − |
| |
| − | Value… - JSON values
| |
| − |
| |
| − | Take a look for more information about templates: https://www.cumulocity.com/guides/reference/smartrest.
| |
| − |
| |
| − | Now explanation of logic inside lua script. By default, example application’s lua script location is „/usr/bin/lua/cm“. Application will scan this folder for any *.lua files and load them if they contains „init“ function. Script’s „stream.lua“ content:
| |
| − |
| |
| − | -- stream.lua
| |
| − | local utl = require "luci.util"
| |
| − | local sys = require "luci.sys"
| |
| − | local DEVICE_NAME = 'TLT-RUT955 Router'
| |
| − | local DEVICE_TYPE = 'Router'
| |
| − |
| |
| − | function restart(r)
| |
| − | local deviceId = r:value(2)
| |
| − | c8y:send('108,'..deviceId..',SUCCESSFUL')
| |
| − | sys.exec("reboot")
| |
| − | end
| |
| − |
| |
| − | function init()
| |
| − | srInfo('*** Stream Init ***')
| |
| − | -- set device name and type
| |
| − | c8y:send('103,'..c8y.ID..','..DEVICE_NAME..','..DEVICE_TYPE)
| |
| − | -- set restart as supported operation
| |
| − | c8y:send('107,'..c8y.ID..',c8y_Restart')
| |
| − | -- set imei, cellid and iccid first time
| |
| − | mobileDataStream()
| |
| − | -- create timer which will stream mobile info data
| |
| − | local m_timer = c8y:addTimer(10 * 1000, 'mobileDataStream')
| |
| − | m_timer:start()
| |
| − | -- register restart handler
| |
| − | c8y:addMsgHandler(502, 'restart')
| |
| − | return 0
| |
| − | end
| |
| − |
| |
| − | function mobileDataStream()
| |
| − | local imei = utl.trim(sys.exec("gsmctl -i"))
| |
| − | local cell = utl.trim(sys.exec("gsmctl -C"))
| |
| − | local icc = utl.trim(sys.exec("gsmctl -J"))
| |
| − | local type = utl.trim(sys.exec("gsmctl -t"))
| |
| − | local oper = utl.trim(sys.exec("gsmctl -o"))
| |
| − | local sign = utl.trim(sys.exec("gsmctl -q"))..' dBm'
| |
| − | local req = '105,'..c8y.ID
| |
| − | req = req..','..imei
| |
| − | req = req..','..cell
| |
| − | req = req..','..icc
| |
| − | req = req..','..type
| |
| − | req = req..','..oper
| |
| − | req = req..','..sign
| |
| − | -- send mobile info
| |
| − | c8y:send(req)
| |
| − | local wantype = utl.trim(sys.exec("uci get -q network.wan.ifname"))
| |
| − | local wanip = utl.trim(sys.exec("curl -s http://whatismyip.akamai.com"))
| |
| − | -- send wan info
| |
| − | c8y:send('106,'..c8y.ID..','..wanip..','..wantype)
| |
| − | end
| |
| − |
| |
| − |
| |
| − | Once application finds lua script, it will call „init“ function. This is where all initialization of timers and other stuff should be.
| |
| − |
| |
| − | Sending information is quite simple:
| |
| − |
| |
| − | c8y:send('103,'..c8y.ID..','..DEVICE_NAME..','..DEVICE_TYPE)
| |
| − |
| |
| − | By using „c8y:send“ function, first string contains request code, which was defined in the template, earlier. Then comma must appear after each value. The above line shows how we update device name and device type with our own.
| |
| − |
| |
| − | For more information about Lua API, download Cumulocity C++ SDK: https://bitbucket.org/m2m/cumulocity-sdk-c/downloads and look up inside „sdk/doc/lua.html“ with a browser.
| |
| | | | |
| | ==External Links== | | ==External Links== |