Difference between revisions of "VLAN Set Up"
| Line 11: | Line 11: | ||
* Access your devices WebUI by typing your Routers Private or Public IP in you browser (my router has private IP 192.168.1.1) | * Access your devices WebUI by typing your Routers Private or Public IP in you browser (my router has private IP 192.168.1.1) | ||
* Next navigate to: '''Network > Vlan > Port Based''' | * Next navigate to: '''Network > Vlan > Port Based''' | ||
| − | * Now you'll need to add new VLAN and change first VLAN (ID:1) configuration. So basically you need to choose witch port you will use for yourself and turn that port Off in VLAN (ID:1). In my example I've | + | * Now you'll need to add new VLAN and change first VLAN ('''ID:1''') configuration. So basically you need to choose witch port you will use for yourself and turn that port Off in VLAN ('''ID:1'''). In my example I've chosen second Ethernet port for myself. |
| − | I've turned off in first VLAN's LAN 2 port and in my new VLAN 3 I've turned on (by choosing Untagged) LAN2 port: | + | I've turned '''off''' in first '''VLAN's LAN 2''' port and in my new '''VLAN 3''' I've turned '''on''' (by choosing '''Untagged''') '''LAN2''' port: |
| − | [[File:Vlan1.png|thumb]] | + | [[File:Vlan1.png|thumb|alt=|center|824x824px]] |
| + | |||
| + | *Press '''Save & Apply''' | ||
| + | |||
| + | ==Creating Interface's== | ||
| + | |||
| + | *Now navigate to '''Network > Interfaces''' | ||
| + | *Add a new instance, by entering any interface name and pressing '''ADD''' button: | ||
| + | [[File:Vlan2.png|center|thumb|948x948px]] | ||
| + | |||
| + | *Now a new window for your interface configuration will pop up: | ||
| + | *#For protocol select "'''Static'''" | ||
| + | *#For IPv4 type IP of your choice with different subnet. For example if you are using default router configurations your device should have IP: '''192.168.1.1''' and netmask: '''255.255.255.0''', for this example we can change only one number, type: '''192.168.2.1''' | ||
| + | *#For Netmask you can leave it default: '''255.255.255.0''' | ||
| + | *#Press the button "'''SETUP DHCP SERVER'''" | ||
| + | *#And leave everything else default, your configuration should look like this: | ||
| + | |||
| + | [[File:Vlan3.png|center|thumb|632x632px]] | ||
| + | |||
| + | *Next go to the "'''PHYSICAL SETTINGS'''" | ||
| + | *Select your newly created VLAN in Interface drop-down (it should be named '''eth0.3'''): | ||
| + | |||
| + | [[File:Vlan4.png|center|thumb|761x761px]] | ||
| + | |||
| + | *Press "'''SAVE & APPLY'''" button | ||
| + | *If you've configurated everything correctly your new Interface should be running like in my case: | ||
| + | |||
| + | [[File:Vlan5.png|center|thumb|954x954px]] | ||
| + | |||
| + | ==Testing new VLAN== | ||
| + | |||
| + | Now by plugging my PC in Ethernet cable with RUTX11 LAN2 port you need to check if everything is working correctly. To do that you'll need: | ||
| + | |||
| + | *On your Windows machine open '''CMD''' (you can do it by typing in Windows search "'''CMD'''" and press '''Enter'''): | ||
| + | |||
| + | [[File:Vlan6.png|center|thumb]] | ||
| + | |||
| + | *In CMD type command "'''ipconfig'''", press '''Enter''' and search for '''Ethernet adapter''' and check if you got '''IP''' address like I did ('''192.168.2.x'''): | ||
| + | |||
| + | [[File:Vlan7.png|center|thumb|499x499px]] | ||
| + | If you did, then you've done everything correctly, if you didn't go trough all set up again and check if you have missed anything. | ||
| + | |||
| + | |||
| + | ==Setting up data limit on interface== | ||
| + | |||
| + | This step is optional, complete this if you need to limit internet data on one of your interface (or both). | ||
| + | |||
| + | You'll need to create '''QoS''' configuration, for this you'll need to download '''QoS''' package in '''Services > Package Manager > Packages''' and limit internet speed for interface that you want to be limited. | ||
| + | |||
| + | Note: If you set '''QoS''' for the '''LAN''' interface, the direction logic is naturally inverted. Egress means "from router towards '''LAN'''" = in practice "download from '''WAN''' forwarded to '''LAN'''". | ||
| + | |||
| + | On more detailed information about how to configurate QoS and how does it work you can read [https://wiki.teltonika-networks.com/view/RUTX11_Traffic_Shaping here]. | ||
| + | |||
| + | [[Category:Networking]] | ||
Revision as of 15:03, 29 March 2022
Main Page > FAQ > Networking > VLAN Set UpIntroduction
This article contains instructions o how to set up VLAN using a Teltonika-Networks device. Fallowing this example you will be able to create two different networks (network interfaces) and limit speed on one of the interface (or both of them).
For this example I will be using RUTX11 device.
Creating VLAN
To create VLAN fallow all the steps bellow:
- Access your devices WebUI by typing your Routers Private or Public IP in you browser (my router has private IP 192.168.1.1)
- Next navigate to: Network > Vlan > Port Based
- Now you'll need to add new VLAN and change first VLAN (ID:1) configuration. So basically you need to choose witch port you will use for yourself and turn that port Off in VLAN (ID:1). In my example I've chosen second Ethernet port for myself.
I've turned off in first VLAN's LAN 2 port and in my new VLAN 3 I've turned on (by choosing Untagged) LAN2 port:
- Press Save & Apply
Creating Interface's
- Now navigate to Network > Interfaces
- Add a new instance, by entering any interface name and pressing ADD button:
- Now a new window for your interface configuration will pop up:
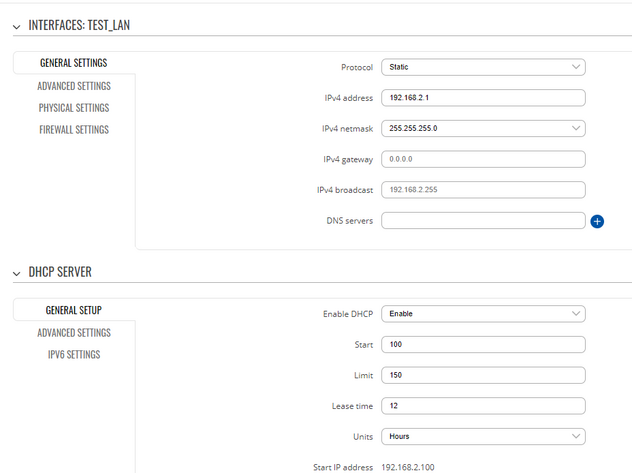
- For protocol select "Static"
- For IPv4 type IP of your choice with different subnet. For example if you are using default router configurations your device should have IP: 192.168.1.1 and netmask: 255.255.255.0, for this example we can change only one number, type: 192.168.2.1
- For Netmask you can leave it default: 255.255.255.0
- Press the button "SETUP DHCP SERVER"
- And leave everything else default, your configuration should look like this:
- Next go to the "PHYSICAL SETTINGS"
- Select your newly created VLAN in Interface drop-down (it should be named eth0.3):
- Press "SAVE & APPLY" button
- If you've configurated everything correctly your new Interface should be running like in my case:
Testing new VLAN
Now by plugging my PC in Ethernet cable with RUTX11 LAN2 port you need to check if everything is working correctly. To do that you'll need:
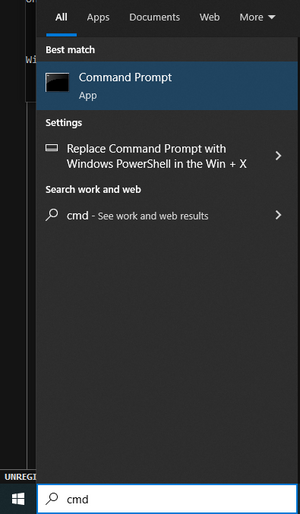
- On your Windows machine open CMD (you can do it by typing in Windows search "CMD" and press Enter):
- In CMD type command "ipconfig", press Enter and search for Ethernet adapter and check if you got IP address like I did (192.168.2.x):
If you did, then you've done everything correctly, if you didn't go trough all set up again and check if you have missed anything.
Setting up data limit on interface
This step is optional, complete this if you need to limit internet data on one of your interface (or both).
You'll need to create QoS configuration, for this you'll need to download QoS package in Services > Package Manager > Packages and limit internet speed for interface that you want to be limited.
Note: If you set QoS for the LAN interface, the direction logic is naturally inverted. Egress means "from router towards LAN" = in practice "download from WAN forwarded to LAN".
On more detailed information about how to configurate QoS and how does it work you can read here.


