OpenVPN configuration examples: Difference between revisions
mNo edit summary |
|||
| (7 intermediate revisions by 4 users not shown) | |||
| Line 44: | Line 44: | ||
Before you continue you'll have to obtain the necessary certificates and keys. When you use a third-party OpenVPN service, they should provide you with their certificates and even configuration files. | Before you continue you'll have to obtain the necessary certificates and keys. When you use a third-party OpenVPN service, they should provide you with their certificates and even configuration files. | ||
If you're creating your server, you'll have to generate these files yourself. To get detailed instructions on how to generate TLS certificates and keys check out our article on the topic of '''[[ | If you're creating your server, you'll have to generate these files yourself. The most simple way to generate certificates is by navigating '''[[RUTX50_Administration#Certificate_Generation|System → Administration → Certificates]]''' on WebUI and pressing the '''Generate''' button. | ||
After devices has finished generating all the files, you can download them by navigating to | |||
'''[[RUTX50_Administration#Certificate_Import|System → Administration → Certificates → Certificates Manager]]''' and pressing the '''Export''' button next to the required files. | |||
To get detailed instructions on how to generate TLS certificates and keys on RUTOS devices, check out our article on the topic of '''[[TLS_Certificates|TLS Certificates]]'''. | |||
===Configuration=== | ===Configuration=== | ||
---- | ---- | ||
Now we can start configuring OpenVPN Server and Client instances. For this example we will be creating a TUN (Tunnel) type connection that uses the UDP protocol for data transfer and TLS for Authentication. We will be using two RUT routers: '''RUT1''' ('''Server'''; LAN IP: '''192.168.1.1'''; WAN (Public static) IP: '''213. | Now we can start configuring OpenVPN Server and Client instances. For this example we will be creating a TUN (Tunnel) type connection that uses the UDP protocol for data transfer and TLS for Authentication. We will be using two RUT routers: '''RUT1''' ('''Server'''; LAN IP: '''192.168.1.1'''; WAN (Public static) IP: '''213.***.***.***''') and '''RUT2''' ('''Client'''; LAN IP: '''192.168.2.1'''); that will be connected into virtual network (with the virtual address: '''172.16.1.0''') | ||
====OpenVPN Server configuration==== | |||
---- | |||
Start by configuring OpenVPN Server on '''RUT1''' device. Login to the WebUI, navigate to '''Services → VPN → OpenVPN''', enter any name and select role as '''Server'''. After pressing the '''Add button''', make the following changes: | |||
'''Note:''' ''Not specified fields can be left as is or changed according to your needs.'' | |||
<table class="nd-othertables_2"> | |||
<tr> | |||
<th width=330; style="border-bottom: 1px solid white;></th> | |||
<th width=800; style="border-bottom: 1px solid white;" rowspan=2> | |||
[[File:Openvpn tls authentication server conf.png|border]]</th> | |||
</tr> | |||
<tr> | |||
<td style="border-bottom: 4px solid white> | |||
# '''Enable''' the instance | |||
#<li value="2">Select '''Server''' role | |||
#<li value="3">'''Name''' your instance | |||
#<li value="4">Select '''Manual''' as configuration type | |||
#<li value="5">Select '''TLS''' authentication | |||
#<li value="6">Select '''Tunnel''' mode | |||
#<li value="7">Choose the method for assigning virtual IPs. '''NET30''' is selected by default. | |||
#<li value="8">Select '''UDP''' protocol | |||
#<li value="9">Select '''Port''' | |||
#<li value="10">Set virtual network '''IP address''' | |||
#<li value="11">Set virtual network '''Netmask''' | |||
#<li value="12">'''Keep alive''' period | |||
#<li value="13">If you generated certificates on the device, turn this option '''ON''' | |||
#<li value="14">Select '''Certificate authority''' | |||
#<li value="15">Select '''Server certificate''' | |||
#<li value="16">Select '''Server key''' | |||
#<li value="17">Select '''Diffie Hellman''' parameters | |||
#<li value="18">[[File:Networking_save_apply_button_fw76_v1.png|70px]] | |||
</td> | |||
</tr> | |||
</table> | |||
====OpenVPN Client configuration==== | |||
---- | |||
Next, configure OpenVPN Client on '''RUT2''' device. Login to the WebUI, navigate to '''Services → VPN → OpenVPN''', enter any name and select role as '''Client'''. After pressing the '''Add button''', make the following changes: | |||
'''Note:''' ''Not specified fields can be left as is or changed according to your needs.'' | |||
<table class="nd-othertables_2"> | |||
<tr> | |||
<th width=330; style="border-bottom: 1px solid white;></th> | |||
<th width=800; style="border-bottom: 1px solid white;" rowspan=2> | |||
[[File:Openvpn tls authentication client conf 1.png|border]]</th> | |||
</tr> | |||
<tr> | |||
<td style="border-bottom: 4px solid white> | |||
# '''Enable''' the instance | |||
#<li value="2">Select '''Client''' role | |||
#<li value="3">'''Name''' your instance | |||
#<li value="4">Select '''Manual''' as configuration type | |||
#<li value="5">Select '''TLS''' authentication | |||
#<li value="6">Select '''Tunnel''' mode | |||
#<li value="7">Choose the method for assigning virtual IPs. '''NET30''' is selected by default. | |||
#<li value="8">Select '''UDP''' protocol | |||
#<li value="9">Select '''Port''' | |||
#<li value="10">Enter OpenVPN server's '''IP address''' | |||
#<li value="11">Enter OpenVPN server's '''Subnet IP address and mask''' | |||
#<li value="12">'''Keep alive''' period | |||
#<li value="13">If you generated certificates on the device, turn this option '''ON''' | |||
#<li value="14">Select '''Certificate authority''' | |||
#<li value="15">Select '''Client certificate''' | |||
#<li value="16">Select '''Client key''' | |||
From the Client side, make sure to enter the correct '''Remote host/IP address''' (213. | |||
#<li value="17">[[File:Networking_save_apply_button_fw76_v1.png|70px]] | |||
</td> | |||
</tr> | |||
</table> | |||
To sum up, just make sure the Server and the Clients use the same parameters (same authentication, same port, same protocol, etc.). Another important aspect is the '''Virtual network IP address''' (172.16.1.0 in this case). The Server and the connected Clients will be given IP addresses that belong to this network. If you're creating an exceptionally large network, you might want to change the '''Virtual network netmask'''. | |||
From the Client side, make sure to enter the correct '''Remote host/IP address''' (213.***.***.*** in this case). This is the Server's Public IP address, not the virtual IP address. | |||
==Static key Authentication== | ==Static key Authentication== | ||
| Line 66: | Line 210: | ||
====Within the router==== | ====Within the router==== | ||
---- | ---- | ||
In order to generate a Static key within the router connect to the device via the '''[[CLI|Command Line Interface]]''' ('''[[CLI]]''') or '''SSH''' (the default username is '''root''', the password is your router's admin password | In order to generate a Static key within the router connect to the device via the '''[[CLI|Command Line Interface]]''' ('''[[CLI]]''') or '''SSH''' (the default username is '''root''', the password is your router's admin password that you use to login to router's WEB UI). CLI can be found in the router's WebUI, under Services. To connect to the router via SSH, use the Terminal app (type ssh '''[email protected]'''; replace 192.168.1.1 with your router's LAN IP address) if you're using a Linux-based OS. Or download '''PuTTY''', a free SSH and telnet client, if you're using Windows. | ||
When you have connected to the router, relocate to the directory (for example, '''cd /etc | When you have connected to the router, relocate to the directory (for example, '''cd /etc/''') where you want to store your Static key and use this command: | ||
# openvpn --genkey | # openvpn --genkey secret static.key | ||
The newly generated Static key will appear in the same directory where you issued the command above. | The newly generated Static key will appear in the same directory where you issued the command above. | ||
| Line 78: | Line 222: | ||
If you are using a Linux-based OS, extracting files from the router is simple. Just go to the directory on your PC where you want to relocate the files, right click anywhere and choose the '''Open in Terminal''' option. In the Terminal command line use the '''Secure Copy''' ('''scp''') command to copy the files from the router. The full command should look something like this: | If you are using a Linux-based OS, extracting files from the router is simple. Just go to the directory on your PC where you want to relocate the files, right click anywhere and choose the '''Open in Terminal''' option. In the Terminal command line use the '''Secure Copy''' ('''scp''') command to copy the files from the router. The full command should look something like this: | ||
$ scp [email protected]:/etc | $ scp [email protected]:/etc/static.key ./ | ||
The '''[email protected]:/etc | The '''[email protected]:/etc/static.key''' specifies the path to where the Static key is located (replace the IP address with your router's LAN IP); the '''./''' denotes that you want to copy the contents to the directory you are in at the moment. | ||
If you are using Windows, you can copy files from the router using '''WinSCP''', an Open source freeware SFTP, SCP, and FTP client for Windows OS. Use the same login information with WinSCP as with CLI or SSH. Once you've connected to the router with WinSCP, copying the files should be simple enough: just relocate to the directory where you generated the key, select the Static key file and drag it to a directory on your PC where you would like to store it. | If you are using Windows, you can copy files from the router using '''WinSCP''', an Open source freeware SFTP, SCP, and FTP client for Windows OS. Use the same login information with WinSCP as with CLI or SSH. Once you've connected to the router with WinSCP, copying the files should be simple enough: just relocate to the directory where you generated the key, select the Static key file and drag it to a directory on your PC where you would like to store it. | ||
| Line 90: | Line 234: | ||
To generate a Static key on a Linux PC, go to the directory where you want the key to appear, right-click anywhere in that directory, and chose the option '''Open in Terminal'''. In the Terminal window execute this command: | To generate a Static key on a Linux PC, go to the directory where you want the key to appear, right-click anywhere in that directory, and chose the option '''Open in Terminal'''. In the Terminal window execute this command: | ||
$ openvpn --genkey | $ openvpn --genkey secret static.key | ||
The newly generated key should then appear in the directory you were in. | The newly generated key should then appear in the directory you were in. | ||
===Configuration=== | ===Configuration=== | ||
---- | ---- | ||
When you have a Static key, you can start configuring OpenVPN Server and Client instances. For this example we will be creating a TUN (Tunnel) type connection that uses the UDP protocol for data transfer and Static key for Authentication. We will be using two RUT routers: '''RUT1''' ('''Server'''; LAN IP: '''192.168.1.1'''; WAN (Public static) IP: '''213. | When you have a Static key, you can start configuring OpenVPN Server and Client instances. For this example we will be creating a TUN (Tunnel) type connection that uses the UDP protocol for data transfer and Static key for Authentication. We will be using two RUT routers: '''RUT1''' ('''Server'''; LAN IP: '''192.168.1.1'''; WAN (Public static) IP: '''213.***.***.***''') and '''RUT2''' ('''Client'''; LAN IP: '''192.168.2.1'''); the two routers will be connected via OpenVPN; the Server's Virtual IP address will be '''172.16.0.1'''; the Client's - '''172.16.0.2''': | ||
====Server configuration==== | |||
---- | |||
Start by configuring OpenVPN Server on '''RUT1''' device. Login to the WebUI, navigate to '''Services → VPN → OpenVPN''' enter any name and select role as '''Server'''. After pressing the '''Add button''', make the following changes: | |||
'''Note:''' ''Not specified fields can be left as is or changed according to your needs.'' | |||
<table class="nd-othertables_2"> | |||
<tr> | |||
<th width=440; style="border-bottom: 1px solid white;></th> | |||
<th width=800; style="border-bottom: 1px solid white;" rowspan=2> | |||
[[File:VPN server static key rev1.png|border|class=tlt-border]]</th> | |||
</tr> | |||
<tr> | |||
<td style="border-bottom: 4px solid white> | |||
# '''Enable''' the instance | |||
# Select '''Tunnel''' mode | |||
# Select '''UDP''' protocol | |||
# Select '''Port''' | |||
# Select '''Static key''' | |||
# Set '''Local''' tunnel endpoint IP (virtual IP of '''RUT1''') | |||
# Set '''Remote''' tunnel endpoint IP (virtual IP of '''RUT2''') | |||
# Set '''Remote''' network IP address (LAN network of '''RUT2''') | |||
# Set remote network '''Netmask''' | |||
# Select '''Static key''' | |||
#[[File:Networking_save_apply_button_fw76_v1.png|70px]] | |||
</td> | |||
</tr> | |||
</table> | |||
====Client configuration==== | |||
---- | |||
Next, configure OpenVPN Client on '''RUT2''' device. Login to the WebUI, navigate to '''Services → VPN → OpenVPN''', enter any name and select role as '''Client'''. After pressing the '''Add button''', make the following changes: | |||
'''Note:''' ''Not specified fields can be left as is or changed according to your needs.'' | |||
<table class="nd-othertables_2"> | |||
<tr> | |||
<th width=440; style="border-bottom: 1px solid white;></th> | |||
<th width=800; style="border-bottom: 1px solid white;" rowspan=2> | |||
[[File:VPN client static key rev1.png|border|class=tlt-border]]</th> | |||
</tr> | |||
<tr> | |||
<td style="border-bottom: 4px solid white> | |||
# '''Enable''' the instance | |||
# Select '''Tunnel''' mode | |||
# Select '''UDP''' protocol | |||
# Select '''Port''' | |||
# Select '''Static key''' | |||
# Enter '''Public IP address''' of server (WAN IP of '''RUT1''') | |||
# Set '''Local tunnel endpoint IP''' (virtual IP of '''RUT2''') | |||
# Set '''Remote tunnel endpoint IP''' (virtual IP of '''RUT1''') | |||
# Set '''Remote network IP address''' (LAN network of '''RUT1''') | |||
# Set remote network '''Netmask''' | |||
# Select '''Static key''' | |||
#[[File:Networking_save_apply_button_fw76_v1.png|70px]] | |||
</td> | |||
</tr> | |||
</table> | |||
To sum up, just make sure the Server and the Clients use the same parameters (same authentication, same port, same protocol, etc.). Other important aspects are the '''Local tunnel endpoint IP''' and the '''Remote tunnel endpoint IP'''. Take note these two particular parameter values are reversed for the individual Client and the Server configurations since these values represent opposite things depending on the instance's perspective. | To sum up, just make sure the Server and the Clients use the same parameters (same authentication, same port, same protocol, etc.). Other important aspects are the '''Local tunnel endpoint IP''' and the '''Remote tunnel endpoint IP'''. Take note these two particular parameter values are reversed for the individual Client and the Server configurations since these values represent opposite things depending on the instance's perspective. | ||
From the Client side, make sure to enter the correct '''Remote host/IP address''' (213. | From the Client side, make sure to enter the correct '''Remote host/IP address''' (213.***.***.*** in this case). This is the Server's Public IP address, not the virtual IP address. | ||
==TAP (bridged) OpenVPN== | ==TAP (bridged) OpenVPN== | ||
This section provides a guide on how to configure a successful OpenVPN TAP (bridged) connection between an OpenVPN Client and Server on RUT routers. | This section provides a guide on how to configure a successful OpenVPN TAP (bridged) connection between an OpenVPN Client and Server on RUT routers. | ||
===Configuration=== | ===Configuration=== | ||
---- | ---- | ||
TAP is used for creating a network bridge between Ethernet segments in different locations. For this example we will be creating a TAP (bridged) type connection that uses the UDP protocol for data transfer and TLS for Authentication. We will be using two RUT routers: '''RUT1''' ('''Server'''; LAN IP: '''192.168.1.1'''; WAN (Public static) IP: '''213. | TAP is used for creating a network bridge between Ethernet segments in different locations. For this example we will be creating a TAP (bridged) type connection that uses the UDP protocol for data transfer and TLS for Authentication. We will be using two RUT routers: '''RUT1''' ('''Server'''; LAN IP: '''192.168.1.1'''; WAN (Public static) IP: '''213.***.***.***''') and '''RUT2''' ('''Client'''; LAN IP: '''192.168.1.2'''); the two routers will be connected via OpenVPN. | ||
====Server configuration==== | |||
---- | |||
Start by configuring OpenVPN TAP Server on '''RUT1''' device. Login to the WebUI, navigate to '''Services → VPN → OpenVPN''', enter any name and select role as '''Server'''. After pressing the '''Add button''', make the following changes: | |||
'''Note:''' ''Not specified fields can be left as is or changed according to your needs.'' | |||
<table class="nd-othertables_2"> | |||
<tr> | |||
<th width=440; style="border-bottom: 1px solid white;></th> | |||
<th width=800; style="border-bottom: 1px solid white;" rowspan=2> | |||
[[File:VPN TAP server configuration rev1.png|border|class=tlt-border]]</th> | |||
</tr> | |||
<tr> | |||
<td style="border-bottom: 4px solid white> | |||
# '''Enable''' the instance | |||
# Select '''TAP (bridged)''' mode | |||
# Select '''Interface''' that you like to bridge | |||
# Select '''UDP''' protocol | |||
# Select '''Port''' | |||
# Select '''TLS''' authentication | |||
# If you generated certificates on the device, turn this option '''ON''' | |||
# Select '''Certificate authority''' | |||
# Select '''Server certificate''' | |||
# Select '''Server key''' | |||
# Select '''Diffie Hellman''' parameters | |||
#[[File:Networking_save_apply_button_fw76_v1.png|70px]] | |||
</td> | |||
</tr> | |||
</table> | |||
====Client configuration==== | |||
---- | |||
Next, configure OpenVPN TAP Client on '''RUT2''' device. Login to the WebUI, navigate to '''Services → VPN → OpenVPN''', enter any name and select role as '''Client'''. After pressing the '''Add button''', make the following changes: | |||
'''Note:''' ''Not specified fields can be left as is or changed according to your needs.'' | |||
<table class="nd-othertables_2"> | |||
<tr> | |||
<th width=440; style="border-bottom: 1px solid white;></th> | |||
<th width=800; style="border-bottom: 1px solid white;" rowspan=2> | |||
[[File:VPN TAP client configuration rev2.png|border|class=tlt-border]]</th> | |||
</tr> | |||
<tr> | |||
<td style="border-bottom: 4px solid white> | |||
# '''Enable''' the instance | |||
# Select '''TAP (bridged)''' mode | |||
# Select '''Interface''' that you like to bridge | |||
# Select '''UDP''' protocol | |||
# Select '''Port''' | |||
# Select '''TLS''' authentication | |||
# Enter '''Public IP''' address of server (WAN IP of '''RUT1''') | |||
# Select '''Certificate authority''' | |||
# Select '''Client certificate''' | |||
# Select '''Client key''' | |||
#[[File:Networking_save_apply_button_fw76_v1.png|70px]] | |||
</td> | |||
</tr> | |||
</table> | |||
To sum up, just make sure the Server and the Clients use the same parameters (same authentication, same port, same protocol, etc.). Since the OpenVPN interface that comes up is bridged with the LAN interface, make sure the routers are in the '''same subnet''' (192.168.1.0 in this case). While making sure of that, don't forget that the routers can't have the same IP address, just the same subnet (for example, if both routers have the LAN IP 192.168.1.1, the connection won't work; if one has, for example, 192.168.1.1 and the other 192.168.1.100, then the connection will work). | To sum up, just make sure the Server and the Clients use the same parameters (same authentication, same port, same protocol, etc.). Since the OpenVPN interface that comes up is bridged with the LAN interface, make sure the routers are in the '''same subnet''' (192.168.1.0 in this case). While making sure of that, don't forget that the routers can't have the same IP address, just the same subnet (for example, if both routers have the LAN IP 192.168.1.1, the connection won't work; if one has, for example, 192.168.1.1 and the other 192.168.1.100, then the connection will work). | ||
| Line 118: | Line 383: | ||
For this example, we used TLS Authentication. If you want to use a different Authentication method, refer to the relevant section of this article. The authentication configuration will not be different because of the chosen OpenVPN type (TUN or TAP). | For this example, we used TLS Authentication. If you want to use a different Authentication method, refer to the relevant section of this article. The authentication configuration will not be different because of the chosen OpenVPN type (TUN or TAP). | ||
From the Client side, make sure to enter the correct '''Remote host/IP address''' (213. | From the Client side, make sure to enter the correct '''Remote host/IP address''' (213.***.***.*** in this case). This is the Server's Public IP address, not the LAN IP address. | ||
==Testing an OpenVPN connection== | ==Testing an OpenVPN connection== | ||
The most important thing after configuration is making sure that the newly established connection works. You can check the status of an OpenVPN connection on the ''' | The most important thing after configuration is making sure that the newly established connection works. You can check the status of an OpenVPN connection on the '''Services → VPN → OpenVPN''' page: | ||
'''Server side''' | '''Server side''' | ||
[[File: | [[File:Server status rev3.png|border|class=tlt-border|1000px]] | ||
'''Client side''' | '''Client side''' | ||
[[File: | [[File:VPN client tunnel status rev1.png|border|class=tlt-border|1000px]] | ||
If you check the server - the status should be Active. If you check the client - the status should be Connected. The server should have active client and if you check logs, you should find line "Initialization Sequence Completed" | |||
[[File: | [[File:VPN logs.png|border|class=tlt-border]] | ||
Another method of testing pinging the other instance's virtual or private IP address. You can send ping packets via CLI, SSH, or from the '''[[RUT241_Maintenance#Diagnostics|System → Maintenance → Troubleshoot → Diagnostics]]''' section of the router's WebUI: | |||
[[File:VPN troubleshoot ping rev3.png|alt=|border|class=tlt-border]] | |||
Ping the Client's virtual IP address from the Server or vice versa. If the ping packets are transmitted successfully, congratulations, your OpenVPN connection is working. | |||
==Additional configuration== | ==Additional configuration== | ||
| Line 145: | Line 414: | ||
---- | ---- | ||
You may want your OpenVPN Clients to be able to reach devices that are in the Server device's private network (LAN) or vice versa. This section will provide directions on how to do that. | You may want your OpenVPN Clients to be able to reach devices that are in the Server device's private network (LAN) or vice versa. This section will provide directions on how to do that. | ||
====Server from Client==== | ====Server from Client==== | ||
| Line 152: | Line 423: | ||
Another method of reaching the OpenVPN Server's private network from the Client is specifying the network in the OpenVPN Client's configuration. To do so, open the Client's configuration window and fill in these two fields: | Another method of reaching the OpenVPN Server's private network from the Client is specifying the network in the OpenVPN Client's configuration. To do so, open the Client's configuration window and fill in these two fields: | ||
[[File: | [[File:Openvpn client option network.png|alt=|border|class=tlt-border]] | ||
As you can see, the two fields in question are '''Remote network IP address''' and '''Remote network IP netmask'''. The values placed in these fields specify the Server's LAN address and having them filled will automatically add the necessary route into the routing table when the OpenVPN connection goes up. However, if your OpenVPN Server has multiple Clients, you would need to do this for all of them. If that is the case, use this next method. | As you can see, the two fields in question are '''Remote network IP address''' and '''Remote network IP netmask'''. The values placed in these fields specify the Server's LAN address and having them filled will automatically add the necessary route into the routing table when the OpenVPN connection goes up. However, if your OpenVPN Server has multiple Clients, you would need to do this for all of them. If that is the case, use this next method. | ||
| Line 160: | Line 431: | ||
To accomplish this, go to OpenVPN Server's configuration window and locate the '''Push option''' field. Let's say that the Server's LAN IP address is 192.168.1.1. In this case use the line '''route 192.168.1.0 255.255.255.0''' | To accomplish this, go to OpenVPN Server's configuration window and locate the '''Push option''' field. Let's say that the Server's LAN IP address is 192.168.1.1. In this case use the line '''route 192.168.1.0 255.255.255.0''' | ||
[[File: | [[File:VPN push option.png|alt=|border|class=tlt-border]] | ||
Modify the information so that it reflects your own configuration. Do not specify the gateway, because the command will not work. The correct gateway will be assigned automatically. | Modify the information so that it reflects your own configuration. Do not specify the gateway, because the command will not work. The correct gateway will be assigned automatically. | ||
| Line 172: | Line 443: | ||
In other words, TLS Clients bind Common Names (found in Client certificates) to Clients' private networks. If the certificate hasn't been tampered with in any after generation, the Common name should be the same as the file name (without the file type extension). For example, a certificate called '''client1.crt''' will likely have the Common Name of '''client1'''. But just to be sure you can open the certificate and check: | In other words, TLS Clients bind Common Names (found in Client certificates) to Clients' private networks. If the certificate hasn't been tampered with in any after generation, the Common name should be the same as the file name (without the file type extension). For example, a certificate called '''client1.crt''' will likely have the Common Name of '''client1'''. But just to be sure you can open the certificate and check: | ||
[[File:Checking common name.png|alt=|border|class=tlt-border]] | [[File:Checking common name rev2.png|alt=|border|class=tlt-border]] | ||
Once you know the Common Names and LAN IP Addresses of your OpenVPN Clients, you can create TLS Clients instances for each of them. Navigate to '''[[RUT241_VPN#OpenVPN|Services → VPN → OpenVPN]]''' and edit existing server configuration. Scroll down, and you will find TLS clients section. | |||
Make the following changes: | |||
# Enter Common name | |||
# Edit the new client instance | |||
[[File:VPN TLS pre client.png|alt=|border|class=tlt-border]] | |||
In a pop-up window make the following changes: | |||
#<li value="3">Enter Common name | |||
# Enter the local VPN tunnel endpoint IP address of the client instance | |||
# Enter the local VPN tunnel endpoint IP address of the client instance | |||
# Enter private network of the client | |||
#[[File:Networking_save_apply_button_fw76_v1.png|70px]] | |||
[[File: | [[File:TLS client addition no LAN rev1.png|alt=|border|class=tlt-border]] | ||
Now you should be able to reach client's RUT2 private LAN network which is 192.168.2.0 from previous example. | |||
====Client to Client==== | ====Client to Client==== | ||
| Line 190: | Line 474: | ||
=====TLS Clients===== | =====TLS Clients===== | ||
---- | ---- | ||
First, configure TLS Clients | First, configure TLS Clients. This is necessary in the case of multiple Clients because the Server will not only be pushing the routes of other Clients but also the routes to the Clients' own networks to their routing tables. This would cause the Clients' routers to be unreachable until the OpenVPN connection is terminated. | ||
TLS Clients solves this issue because the configuration then "tells" the router not to push certain routes to certain Clients. For example, if a router pushes the route '''192.168.5.0 255.255.555.0''' to a Client whose LAN IP address is 192.168.5.1, that Client will not be able to reach its network. TLS Clients prevent this - if a Client, for example, has the LAN IP address of 192.168.5.1, he will not receive the ''route 192.168.5.0 255.255.555.0''. | TLS Clients solves this issue because the configuration then "tells" the router not to push certain routes to certain Clients. For example, if a router pushes the route '''192.168.5.0 255.255.555.0''' to a Client whose LAN IP address is 192.168.5.1, that Client will not be able to reach its network. TLS Clients prevent this - if a Client, for example, has the LAN IP address of 192.168.5.1, he will not receive the ''route 192.168.5.0 255.255.555.0''. | ||
| Line 210: | Line 494: | ||
The configuration should look something like this: | The configuration should look something like this: | ||
[[File: | [[File:VPN Push option v2.png|alt=|border|class=tlt-border]] | ||
=====Enable Client to Client===== | =====Enable Client to Client===== | ||
| Line 216: | Line 501: | ||
The next and final step is to enable the Client to Client functionality. To do this, go to the OpenVPN server's configuration window and put a checkmark at the '''Client to client''' option: | The next and final step is to enable the Client to Client functionality. To do this, go to the OpenVPN server's configuration window and put a checkmark at the '''Client to client''' option: | ||
[[File: | [[File:VPN client to client.png|alt=|border|class=tlt-border]] | ||
If you did so and followed all of the previous steps in the section, your OpenVPN Clients should now be able to communicate with each other. | If you did so and followed all of the previous steps in the section, your OpenVPN Clients should now be able to communicate with each other. | ||
| Line 224: | Line 509: | ||
OpenVPN Servers can be used as Proxies by OpenVPN Clients. This means that the client will be assigned the Public IP address of the OpenVPN server and will be seen as using that IP address when browsing the Internet, transferring data or doing any other online activities. This section provides directions on how to set up an OpenVPN Proxy on RUT routers. | OpenVPN Servers can be used as Proxies by OpenVPN Clients. This means that the client will be assigned the Public IP address of the OpenVPN server and will be seen as using that IP address when browsing the Internet, transferring data or doing any other online activities. This section provides directions on how to set up an OpenVPN Proxy on RUT routers. | ||
Configure Push options in the OpenVPN Server configuration that will change the Clients' default WAN route to OpenVPN and set the DNS server to the OpenVPN Server's LAN IP. To do so open the OpenVPN configuration window and add these options to the Push option field: | |||
'''redirect-gateway def1''' | '''redirect-gateway def1''' | ||
| Line 233: | Line 517: | ||
In this context, 192.168.1.1 is the OpenVPN Server's LAN IP address. Replace this value with your own Server's LAN IP address. | In this context, 192.168.1.1 is the OpenVPN Server's LAN IP address. Replace this value with your own Server's LAN IP address. | ||
After saving the configuration, on the device behind the OpenVPN Client go to '''http://www.whatsmyip.org/'''. If the website shows the Public IP address of the OpenVPN server, it means the Proxy works. | |||
==Remote configuration== | ==Remote configuration== | ||
| Line 276: | Line 552: | ||
In case you have a dynamic public IP address, it is recommended to use the '''[[Dynamic DNS]]''' functionality, and use the hostname provided by the DDNS service as the OpenVPN Server address. You can find some Dynamic DNS configuration examples [[DDNS Configuration Examples|here]]. | In case you have a dynamic public IP address, it is recommended to use the '''[[Dynamic DNS]]''' functionality, and use the hostname provided by the DDNS service as the OpenVPN Server address. You can find some Dynamic DNS configuration examples [[DDNS Configuration Examples|here]]. | ||
===OpenVPN Server configuration=== | ===OpenVPN Server configuration=== | ||
----For this example we will be creating a TUN (Tunnel) type connection that uses the UDP protocol for data transfer and TLS Authentication, you can refer to [[How to generate TLS certificates (Windows)?|this]] article for more information about TLS certificates and keys. Here is the router '''RUT1''' OpenVPN configuration ('''Server'''; LAN IP: '''192.168.1.1'''; WAN (Public static) IP: ''' | ----For this example we will be creating a TUN (Tunnel) type connection that uses the UDP protocol for data transfer and TLS Authentication, you can refer to [[How to generate TLS certificates (Windows)?|this]] article for more information about TLS certificates and keys. Here is the router '''RUT1''' OpenVPN configuration ('''Server'''; LAN IP: '''192.168.1.1'''; WAN (Public static) IP: '''215.***.***.***;''' OpenVPN Virtual network will be '''172.16.1.0/24'''). | ||
[[File:OpenVPN | |||
Start by configuring OpenVPN Server on '''RUT1''' device. Login to the WebUI, navigate to '''Services → VPN → OpenVPN''' enter any name and select role as '''Server'''. After pressing the '''Add button''', make the following changes: | |||
'''Note:''' ''Not specified fields can be left as is or changed according to your needs.'' | |||
<table class="nd-othertables_2"> | |||
<tr> | |||
<th width=330; style="border-bottom: 1px solid white;></th> | |||
<th width=800; style="border-bottom: 1px solid white;" rowspan=2> | |||
[[File:OpenVPN server on Windows rev1.png|border|class=tlt-border]]</th> | |||
</tr> | |||
<tr> | |||
<td style="border-bottom: 4px solid white> | |||
# '''Enable''' the instance | |||
# Select '''Tunnel''' mode | |||
# Select '''UDP''' protocol | |||
# Select '''Port''' | |||
# Select '''TLS''' authentication | |||
# Set '''Keep alive''' period | |||
# Set virtual network '''IP address''' | |||
# Set virtual network '''Netmask''' | |||
# Enter '''Push option''' to route to the server's LAN network | |||
# If you generated certificates on the device, turn this option '''ON''' | |||
# Select '''Certificate authority''' | |||
# Select '''Server certificate''' | |||
# Select '''Server key''' | |||
# Select '''Diffie Hellman''' parameters | |||
#[[File:Networking_save_apply_button_fw76_v1.png|70px]] | |||
</td> | |||
</tr> | |||
</table> | |||
You can add push option ('''route 192.168.1.0 255.255.255.0''') to allow VPN clients to connect to the router LAN network. | You can add push option ('''route 192.168.1.0 255.255.255.0''') to allow VPN clients to connect to the router LAN network. | ||
| Line 285: | Line 594: | ||
Once the VPN server is ready, It will change its status to Active: | Once the VPN server is ready, It will change its status to Active: | ||
[[File: | [[File:VPN server status on Windows rev1.png|border]] | ||
===OpenVPN Windows client configuration | ===OpenVPN Windows client configuration=== | ||
----For this step, you'll need to prepare a configuration file folder, it must contain the following files: | ----For this step, you'll need to prepare a configuration file folder, it must contain the following files: | ||
| Line 300: | Line 609: | ||
And this is the content of the OpenVPN client config file: | And this is the content of the OpenVPN client config file: | ||
[[File:VPN windows config file.png|border]] | |||
After saving the configuration file, you can open the '''OpenVPN Connect''' software on your Windows operating system, upload the configuration file, and click connect: | After saving the configuration file, you can open the '''OpenVPN Connect''' software on your Windows operating system, upload the configuration file, and click connect: | ||
[[File: | [[File:VPN windows connect window.png|border|379x599px]] | ||
The OpenVPN Windows client is now connected to the OpenVPN server. | The OpenVPN Windows client is now connected to the OpenVPN server. | ||
Latest revision as of 07:03, 25 August 2025
Main Page > General Information > Configuration Examples > VPN > OpenVPN configuration examplesIntroduction
OpenVPN is an open-source software application that implements virtual private network (VPN) techniques for creating secure point-to-point or site-to-site connections in routed or bridged configurations and remote access facilities.
This article contains various OpenVPN configuration examples that require more in-depth explanations to achieve a successful configuration. All of the examples given concern two or more RUT routers. For more basic explanations on the OpenVPN WebUI section, visit our VPN manual page.
OpenVPN configuration type
Before configuring anything you should first know what type of OpenVPN connection suits your needs the best. The key things to be considered here are the type of connection (TUN (tunnel) or TAP (bridged)), the data transfer protocol (User Datagram Protocol (UDP) or Transmission Control Protocol (TCP)), and the authentication type (TLS or Static key). Here is a short overview of the differences:
- Type
- TUN (tunnel) - simulates a network layer device and it operates with layer 3 packets like IP packets. TUN is used for routing and connecting multiple clients to a single server.
- TAP (bridged) - simulates a link layer device and it operates with layer 2 packets like Ethernet frames. TAP is used for creating a network bridge between two Ethernet segments in different locations.
- Protocol
- UDP - is used by apps to deliver a faster stream of information by doing away with error-checking.
- TCP - a suite of protocols used by devices to communicate over the Internet and most local networks. It provides apps a way to deliver (and receive) an ordered and error-checked stream of information packets over the network.
- Authentication
- TLS - uses SSL/TLS + certificates for authentication and key exchange.
- Static key - uses a pre-shared Static key. Can only be used between two peers.
Overviews of most of these types and variations are provided in this article. Concerning TCP vs UDP, we will be using UDP for all examples. Choosing between TCP and UDP doesn't affect the rest of the configuration, so you can still follow the given examples no matter which protocol you are using. Simply choose the one that suits your purposes.
TLS Authentication
This section provides a guide on how to configure a successful OpenVPN connection between an OpenVPN Client and Server, using the TLS Authentication method on RUTxxx routers.
Generating TLS certificates/keys
A connection that uses TLS requires multiple certificates and keys for authentication:
- OpenVPN server
- The root certificate file (Certificate Authority)
- Server certificate
- Server key
- Diffie Hellman Parameters
- OpenVPN client
- The root certificate file (Certificate Authority)
- Client certificate
- Client key
Before you continue you'll have to obtain the necessary certificates and keys. When you use a third-party OpenVPN service, they should provide you with their certificates and even configuration files.
If you're creating your server, you'll have to generate these files yourself. The most simple way to generate certificates is by navigating System → Administration → Certificates on WebUI and pressing the Generate button.
After devices has finished generating all the files, you can download them by navigating to System → Administration → Certificates → Certificates Manager and pressing the Export button next to the required files.
To get detailed instructions on how to generate TLS certificates and keys on RUTOS devices, check out our article on the topic of TLS Certificates.
Configuration
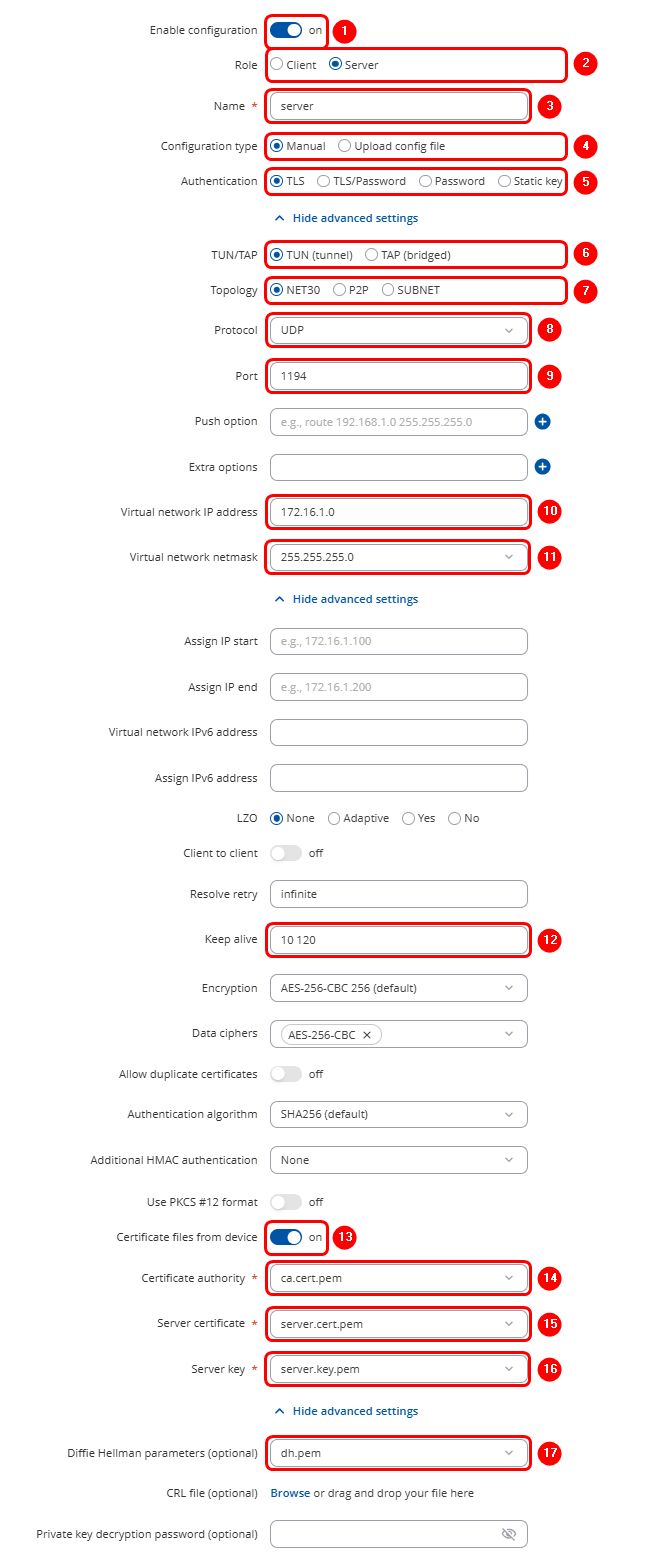
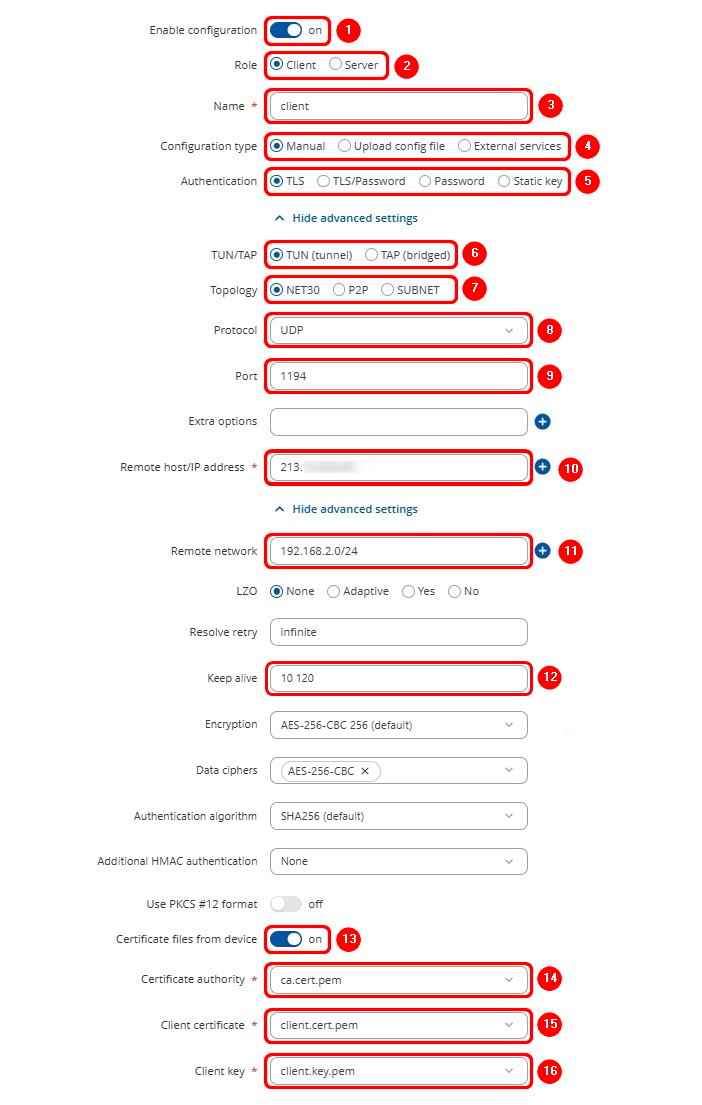
Now we can start configuring OpenVPN Server and Client instances. For this example we will be creating a TUN (Tunnel) type connection that uses the UDP protocol for data transfer and TLS for Authentication. We will be using two RUT routers: RUT1 (Server; LAN IP: 192.168.1.1; WAN (Public static) IP: 213.***.***.***) and RUT2 (Client; LAN IP: 192.168.2.1); that will be connected into virtual network (with the virtual address: 172.16.1.0)
OpenVPN Server configuration
Start by configuring OpenVPN Server on RUT1 device. Login to the WebUI, navigate to Services → VPN → OpenVPN, enter any name and select role as Server. After pressing the Add button, make the following changes:
Note: Not specified fields can be left as is or changed according to your needs.
OpenVPN Client configuration
Next, configure OpenVPN Client on RUT2 device. Login to the WebUI, navigate to Services → VPN → OpenVPN, enter any name and select role as Client. After pressing the Add button, make the following changes:
Note: Not specified fields can be left as is or changed according to your needs.
To sum up, just make sure the Server and the Clients use the same parameters (same authentication, same port, same protocol, etc.). Another important aspect is the Virtual network IP address (172.16.1.0 in this case). The Server and the connected Clients will be given IP addresses that belong to this network. If you're creating an exceptionally large network, you might want to change the Virtual network netmask.
From the Client side, make sure to enter the correct Remote host/IP address (213.***.***.*** in this case). This is the Server's Public IP address, not the virtual IP address.
Static key Authentication
This section provides a guide on how to configure a successful OpenVPN connection between an OpenVPN Client and Server, using the Static key Authentication method on RUT routers.
Creating a Static key
A Static key connection uses a pre-shared for authentication between a Server and one Client. You can generate a Static key within the router itself or with a PC that uses a Linux-based OS.
Within the router
In order to generate a Static key within the router connect to the device via the Command Line Interface (CLI) or SSH (the default username is root, the password is your router's admin password that you use to login to router's WEB UI). CLI can be found in the router's WebUI, under Services. To connect to the router via SSH, use the Terminal app (type ssh [email protected]; replace 192.168.1.1 with your router's LAN IP address) if you're using a Linux-based OS. Or download PuTTY, a free SSH and telnet client, if you're using Windows.
When you have connected to the router, relocate to the directory (for example, cd /etc/) where you want to store your Static key and use this command:
# openvpn --genkey secret static.key
The newly generated Static key will appear in the same directory where you issued the command above.
Extracting the key
If you are using a Linux-based OS, extracting files from the router is simple. Just go to the directory on your PC where you want to relocate the files, right click anywhere and choose the Open in Terminal option. In the Terminal command line use the Secure Copy (scp) command to copy the files from the router. The full command should look something like this:
$ scp [email protected]:/etc/static.key ./
The [email protected]:/etc/static.key specifies the path to where the Static key is located (replace the IP address with your router's LAN IP); the ./ denotes that you want to copy the contents to the directory you are in at the moment.
If you are using Windows, you can copy files from the router using WinSCP, an Open source freeware SFTP, SCP, and FTP client for Windows OS. Use the same login information with WinSCP as with CLI or SSH. Once you've connected to the router with WinSCP, copying the files should be simple enough: just relocate to the directory where you generated the key, select the Static key file and drag it to a directory on your PC where you would like to store it.
Please note: You must select SCP as File Protocol in WinSCP Session settings.
On a Linux PC
To generate a Static key on a Linux PC, go to the directory where you want the key to appear, right-click anywhere in that directory, and chose the option Open in Terminal. In the Terminal window execute this command:
$ openvpn --genkey secret static.key
The newly generated key should then appear in the directory you were in.
Configuration
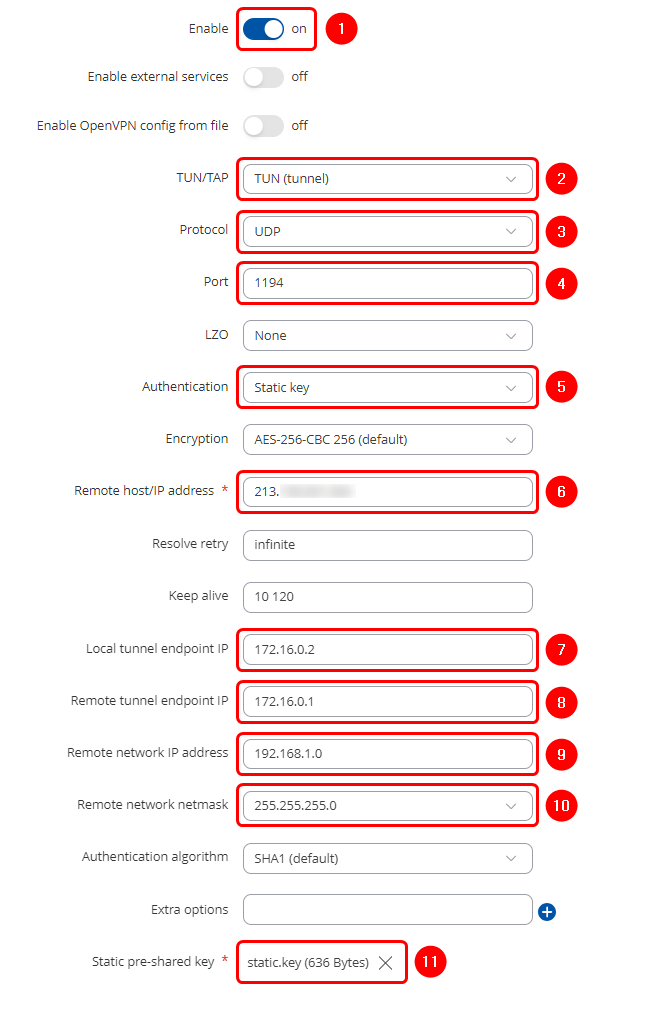
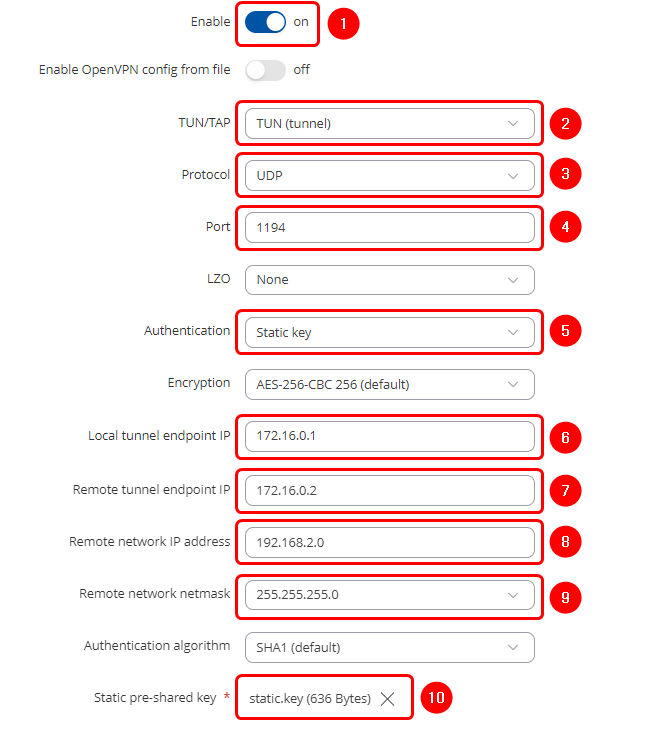
When you have a Static key, you can start configuring OpenVPN Server and Client instances. For this example we will be creating a TUN (Tunnel) type connection that uses the UDP protocol for data transfer and Static key for Authentication. We will be using two RUT routers: RUT1 (Server; LAN IP: 192.168.1.1; WAN (Public static) IP: 213.***.***.***) and RUT2 (Client; LAN IP: 192.168.2.1); the two routers will be connected via OpenVPN; the Server's Virtual IP address will be 172.16.0.1; the Client's - 172.16.0.2:
Server configuration
Start by configuring OpenVPN Server on RUT1 device. Login to the WebUI, navigate to Services → VPN → OpenVPN enter any name and select role as Server. After pressing the Add button, make the following changes:
Note: Not specified fields can be left as is or changed according to your needs.
 |
|
|---|---|
Client configuration
Next, configure OpenVPN Client on RUT2 device. Login to the WebUI, navigate to Services → VPN → OpenVPN, enter any name and select role as Client. After pressing the Add button, make the following changes:
Note: Not specified fields can be left as is or changed according to your needs.
To sum up, just make sure the Server and the Clients use the same parameters (same authentication, same port, same protocol, etc.). Other important aspects are the Local tunnel endpoint IP and the Remote tunnel endpoint IP. Take note these two particular parameter values are reversed for the individual Client and the Server configurations since these values represent opposite things depending on the instance's perspective.
From the Client side, make sure to enter the correct Remote host/IP address (213.***.***.*** in this case). This is the Server's Public IP address, not the virtual IP address.
TAP (bridged) OpenVPN
This section provides a guide on how to configure a successful OpenVPN TAP (bridged) connection between an OpenVPN Client and Server on RUT routers.
Configuration
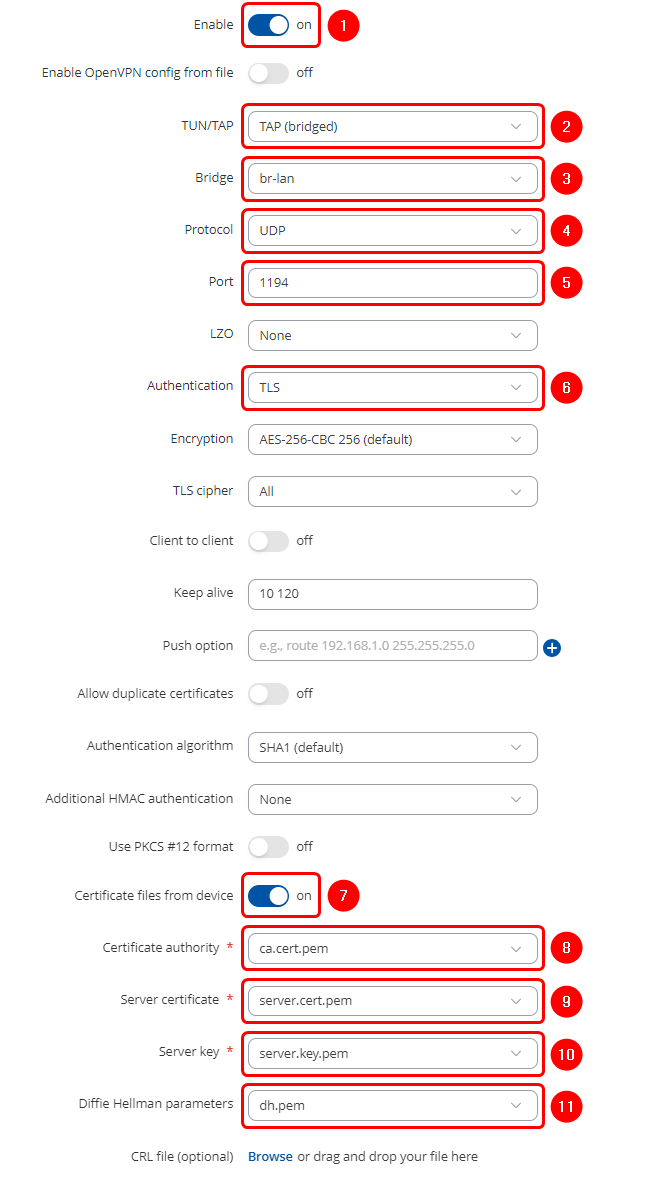
TAP is used for creating a network bridge between Ethernet segments in different locations. For this example we will be creating a TAP (bridged) type connection that uses the UDP protocol for data transfer and TLS for Authentication. We will be using two RUT routers: RUT1 (Server; LAN IP: 192.168.1.1; WAN (Public static) IP: 213.***.***.***) and RUT2 (Client; LAN IP: 192.168.1.2); the two routers will be connected via OpenVPN.
Server configuration
Start by configuring OpenVPN TAP Server on RUT1 device. Login to the WebUI, navigate to Services → VPN → OpenVPN, enter any name and select role as Server. After pressing the Add button, make the following changes:
Note: Not specified fields can be left as is or changed according to your needs.
Client configuration
Next, configure OpenVPN TAP Client on RUT2 device. Login to the WebUI, navigate to Services → VPN → OpenVPN, enter any name and select role as Client. After pressing the Add button, make the following changes:
Note: Not specified fields can be left as is or changed according to your needs.
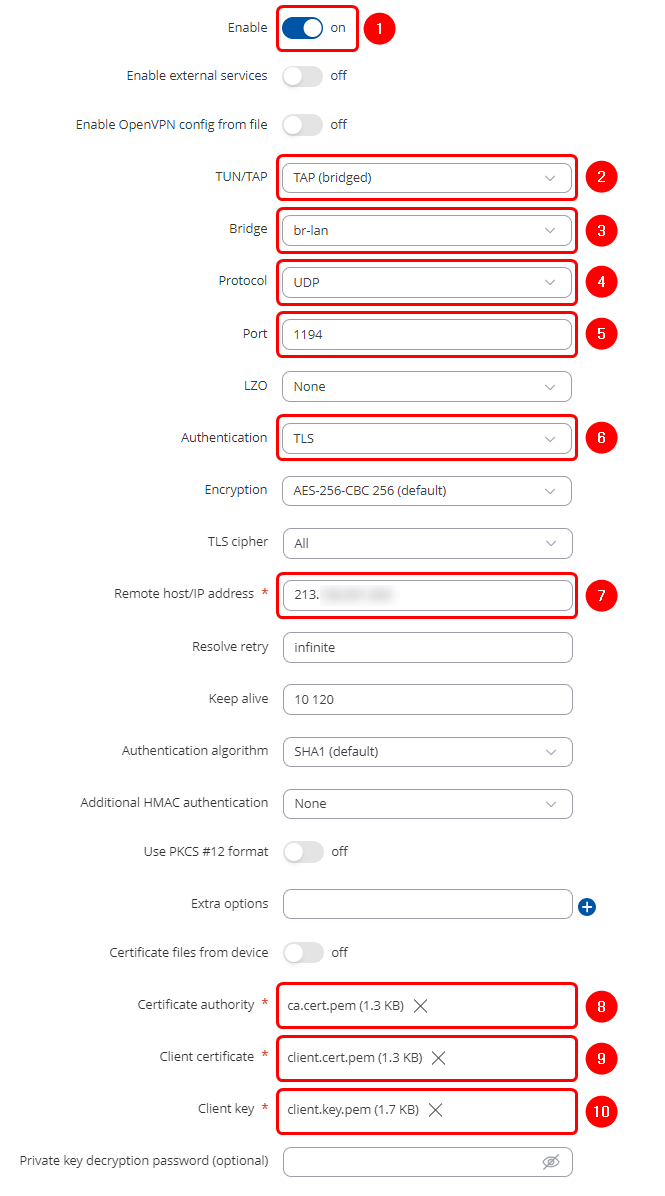 |
|
|---|---|
To sum up, just make sure the Server and the Clients use the same parameters (same authentication, same port, same protocol, etc.). Since the OpenVPN interface that comes up is bridged with the LAN interface, make sure the routers are in the same subnet (192.168.1.0 in this case). While making sure of that, don't forget that the routers can't have the same IP address, just the same subnet (for example, if both routers have the LAN IP 192.168.1.1, the connection won't work; if one has, for example, 192.168.1.1 and the other 192.168.1.100, then the connection will work).
For this example, we used TLS Authentication. If you want to use a different Authentication method, refer to the relevant section of this article. The authentication configuration will not be different because of the chosen OpenVPN type (TUN or TAP).
From the Client side, make sure to enter the correct Remote host/IP address (213.***.***.*** in this case). This is the Server's Public IP address, not the LAN IP address.
Testing an OpenVPN connection
The most important thing after configuration is making sure that the newly established connection works. You can check the status of an OpenVPN connection on the Services → VPN → OpenVPN page:
Server side
Client side
If you check the server - the status should be Active. If you check the client - the status should be Connected. The server should have active client and if you check logs, you should find line "Initialization Sequence Completed"
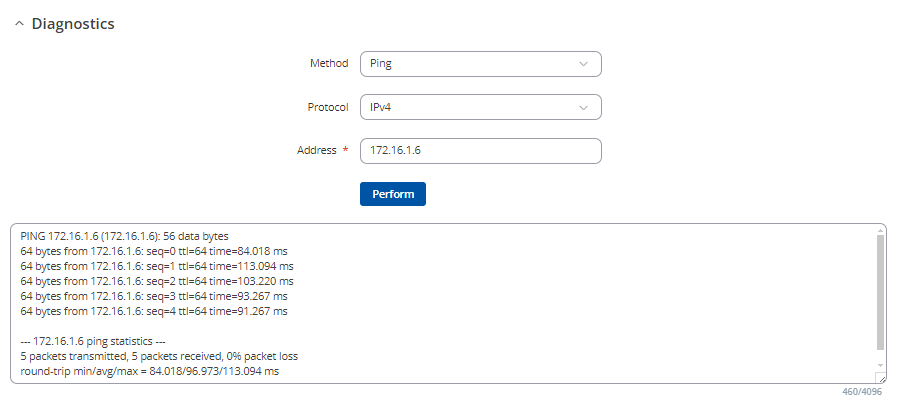
Another method of testing pinging the other instance's virtual or private IP address. You can send ping packets via CLI, SSH, or from the System → Maintenance → Troubleshoot → Diagnostics section of the router's WebUI:
Ping the Client's virtual IP address from the Server or vice versa. If the ping packets are transmitted successfully, congratulations, your OpenVPN connection is working.
Additional configuration
This section will provide examples of some additional OpenVPN-related configurations like how to reach another OpenVPN instance's private LAN or how to use an OpenVPN instance as a Proxy.
Reaching a device's LAN network
You may want your OpenVPN Clients to be able to reach devices that are in the Server device's private network (LAN) or vice versa. This section will provide directions on how to do that.
Server from Client
To reach another OpenVPN instance's LAN network, you have to have a route to that network with the Virtual remote endpoint as the gateway. You can add Static routes via the command line, but these routes are removed automatically when the router reboots or when the connection goes down even if only for a moment. To solve this, you add permanent static routes via the router's WebUI in the Network → Routing → Static Routes page. But this method is also not foolproof since it means that if an address ever changes, you would have to also modify the static route on all related devices.
Another method of reaching the OpenVPN Server's private network from the Client is specifying the network in the OpenVPN Client's configuration. To do so, open the Client's configuration window and fill in these two fields:
As you can see, the two fields in question are Remote network IP address and Remote network IP netmask. The values placed in these fields specify the Server's LAN address and having them filled will automatically add the necessary route into the routing table when the OpenVPN connection goes up. However, if your OpenVPN Server has multiple Clients, you would need to do this for all of them. If that is the case, use this next method.
Even another method is pushing the necessary routes via the OpenVPN Server. This method is the most foolproof because it will generate a route to the Server's private network for all connecting Clients. Therefore, in case of configuration changes, you would only have to edit one field in the Server's configuration instead of having to edit all of the Clients' configurations.
To accomplish this, go to OpenVPN Server's configuration window and locate the Push option field. Let's say that the Server's LAN IP address is 192.168.1.1. In this case use the line route 192.168.1.0 255.255.255.0
Modify the information so that it reflects your own configuration. Do not specify the gateway, because the command will not work. The correct gateway will be assigned automatically.
Clients from Server
Reaching OpenVPN Clients' private networks from the Server is a bit trickier than the opposite because in order to do so the Server has to be aware of the different specific addresses and Common Names of specific Clients.
To accomplish this, we can use the TLS Clients function. TLS Clients is a way to more specifically differentiate Clients by their Common Name (CN) found in the client certificate file. It can be used to assign specific VPN addresses to specific Clients and bind them to their LAN addresses so that other devices in the Client‘s LAN can be reached from the Server.
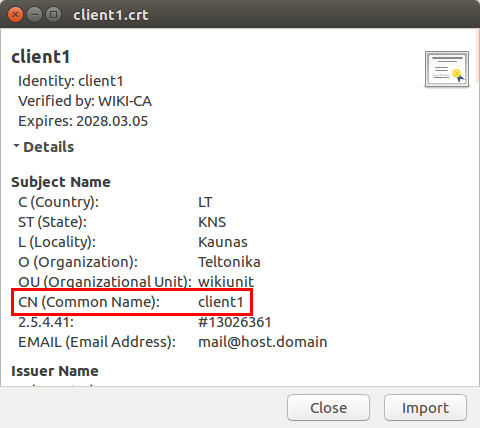
In other words, TLS Clients bind Common Names (found in Client certificates) to Clients' private networks. If the certificate hasn't been tampered with in any after generation, the Common name should be the same as the file name (without the file type extension). For example, a certificate called client1.crt will likely have the Common Name of client1. But just to be sure you can open the certificate and check:
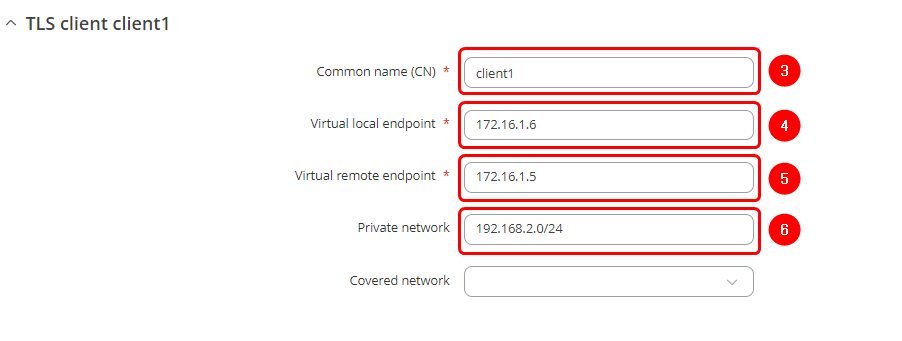
Once you know the Common Names and LAN IP Addresses of your OpenVPN Clients, you can create TLS Clients instances for each of them. Navigate to Services → VPN → OpenVPN and edit existing server configuration. Scroll down, and you will find TLS clients section.
Make the following changes:
- Enter Common name
- Edit the new client instance
In a pop-up window make the following changes:
- Enter Common name
- Enter the local VPN tunnel endpoint IP address of the client instance
- Enter the local VPN tunnel endpoint IP address of the client instance
- Enter private network of the client

Now you should be able to reach client's RUT2 private LAN network which is 192.168.2.0 from previous example.
Client to Client
For Client to Client communication to work you have to do three things:
- Create unique TLS Clients instances for each of the Clients
- Push the necessary routes via the Push option field
- Enable Client to Client functionality in the Server's configuration
TLS Clients
First, configure TLS Clients. This is necessary in the case of multiple Clients because the Server will not only be pushing the routes of other Clients but also the routes to the Clients' own networks to their routing tables. This would cause the Clients' routers to be unreachable until the OpenVPN connection is terminated.
TLS Clients solves this issue because the configuration then "tells" the router not to push certain routes to certain Clients. For example, if a router pushes the route 192.168.5.0 255.255.555.0 to a Client whose LAN IP address is 192.168.5.1, that Client will not be able to reach its network. TLS Clients prevent this - if a Client, for example, has the LAN IP address of 192.168.5.1, he will not receive the route 192.168.5.0 255.255.555.0.
Push options
Next, configure the necessary push options. You will have to include all Clients' networks if you want them all to communicate with each other. For the sake of argument, let's say you have three Clients that belong to three distinct LAN networks:
- 192.168.5.0
- 192.168.6.0
- 192.168.7.0
To give them all the necessary routes, you would have to include these three push options:
route 192.168.5.0 255.255.255.0
route 192.168.6.0 255.255.255.0
route 192.168.7.0 255.255.255.0
The configuration should look something like this:
Enable Client to Client
The next and final step is to enable the Client to Client functionality. To do this, go to the OpenVPN server's configuration window and put a checkmark at the Client to client option:
If you did so and followed all of the previous steps in the section, your OpenVPN Clients should now be able to communicate with each other.
OpenVPN Proxy
OpenVPN Servers can be used as Proxies by OpenVPN Clients. This means that the client will be assigned the Public IP address of the OpenVPN server and will be seen as using that IP address when browsing the Internet, transferring data or doing any other online activities. This section provides directions on how to set up an OpenVPN Proxy on RUT routers.
Configure Push options in the OpenVPN Server configuration that will change the Clients' default WAN route to OpenVPN and set the DNS server to the OpenVPN Server's LAN IP. To do so open the OpenVPN configuration window and add these options to the Push option field:
redirect-gateway def1
dhcp-option DNS 192.168.1.1
In this context, 192.168.1.1 is the OpenVPN Server's LAN IP address. Replace this value with your own Server's LAN IP address.
After saving the configuration, on the device behind the OpenVPN Client go to http://www.whatsmyip.org/. If the website shows the Public IP address of the OpenVPN server, it means the Proxy works.
Remote configuration
If you don't have physical or local access in general to the router, there are a few options to configure OpenVPN instances remotely.
Remote HTTP
You can access your router's WebUI from remote locations by enabling the Remote HTTP option in the System → Administration → Access Control. This will only work, however, if you have a Public Static or Public Dynamic IP (not Public Shared; more on IP address types here.
You can also enable the SMS Utilities web rule. More on that here.
Note: before enabling any type of remote access it is highly recommended that you change the router's default admin password to minimize the risk of malicious remote connections. You can change your password in the System → Administration → General section.
Remote Configuration (SMS Utilities)
You can send OpenVPN configurations via Remote Configuration tool located in the Services → SMS Utilities section. This method allows you to configure OpenVPN (among other things) just as you would in the OpenVPN section and then send these configurations to another router via SMS. The configuration method is identical to regular OpenVPN configuration. Therefore, additional instructions will not be provided here, but you can find more information on the subject of Remote Configuration here.
UCI
Yet another method would be using the SMS Utilities uci rule. You can find information on the rule itself SMS Utilities manual article and more detailed information the UCI System in general here.
OpenVPN TLS configuration example with Windows client
This is an OpenVPN configuration example with a Windows client (OpenVPN Connect). This configuration requires the router to have a public IP address (Either static or dynamic IP).
Public IP: Static / Dynamic
If your router have a static public IP address on one of its WAN interfaces, it will be used as the OpenVPN Server address on the client configuration file.
In case you have a dynamic public IP address, it is recommended to use the Dynamic DNS functionality, and use the hostname provided by the DDNS service as the OpenVPN Server address. You can find some Dynamic DNS configuration examples here.
OpenVPN Server configuration
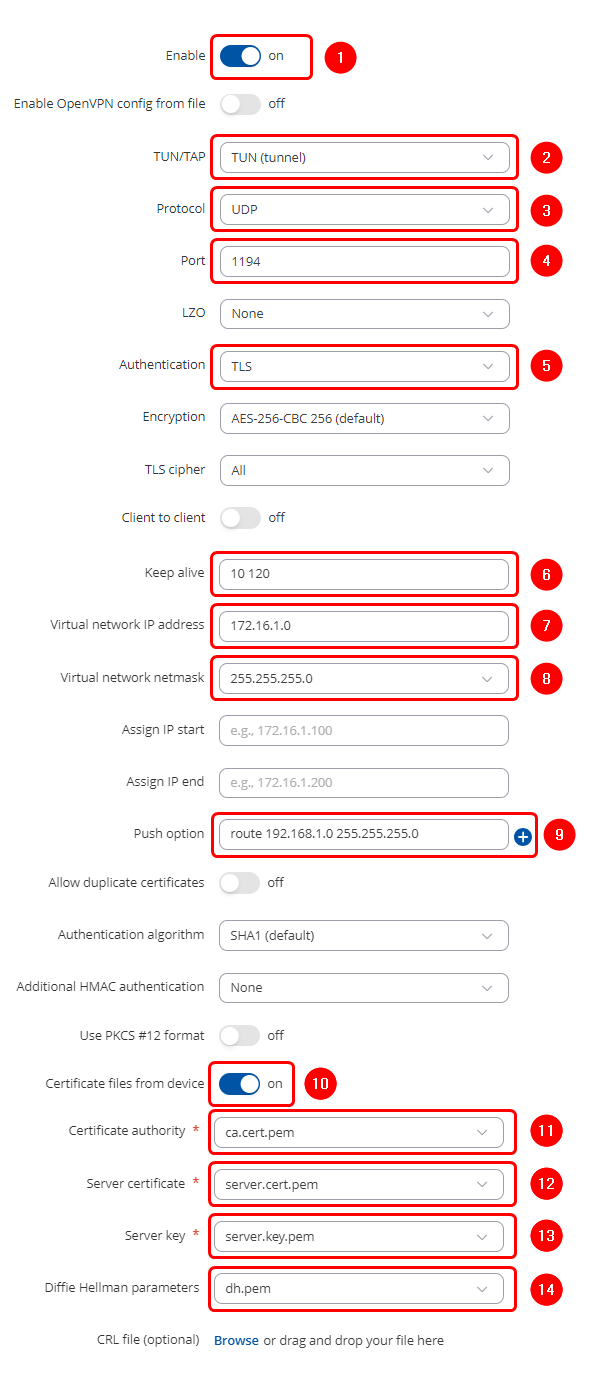
For this example we will be creating a TUN (Tunnel) type connection that uses the UDP protocol for data transfer and TLS Authentication, you can refer to this article for more information about TLS certificates and keys. Here is the router RUT1 OpenVPN configuration (Server; LAN IP: 192.168.1.1; WAN (Public static) IP: 215.***.***.***; OpenVPN Virtual network will be 172.16.1.0/24).
Start by configuring OpenVPN Server on RUT1 device. Login to the WebUI, navigate to Services → VPN → OpenVPN enter any name and select role as Server. After pressing the Add button, make the following changes:
Note: Not specified fields can be left as is or changed according to your needs.
You can add push option (route 192.168.1.0 255.255.255.0) to allow VPN clients to connect to the router LAN network.
Once the VPN server is ready, It will change its status to Active:
OpenVPN Windows client configuration
For this step, you'll need to prepare a configuration file folder, it must contain the following files:
- The root certificate file (Certificate Authority)
- Client certificate
- Client key
- OpenVPN client configuration file (Client_config.ovpn)
Mainly, it should look like this:
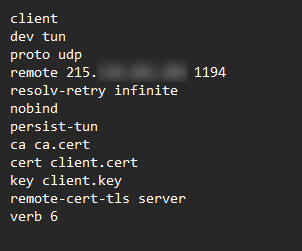
And this is the content of the OpenVPN client config file:
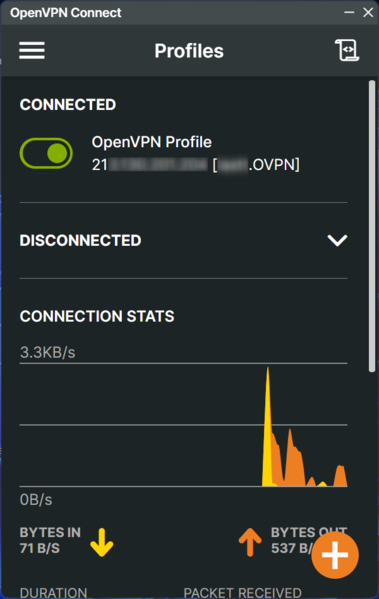
After saving the configuration file, you can open the OpenVPN Connect software on your Windows operating system, upload the configuration file, and click connect:
The OpenVPN Windows client is now connected to the OpenVPN server.
Testing OpenVPN connectivity
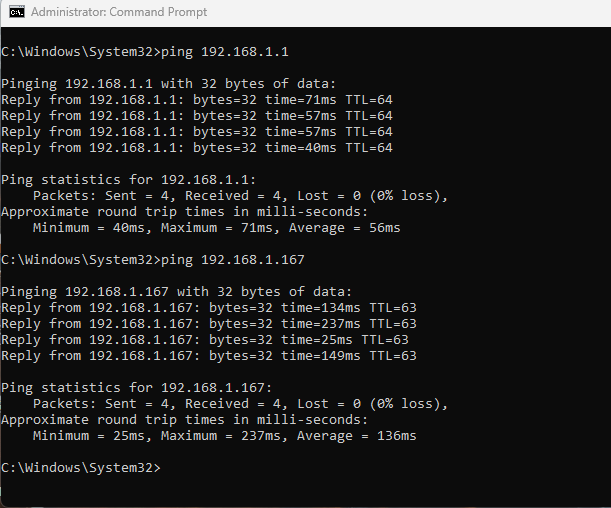
From The Windows client side, you can try to ping the Router's LAN IP address (192.168.1.1) and one of his LAN clients (192.168.1.167):
The Windows OpenVPN Client can now Ping the router's LAN Network successfully.
See also
- How to generate TLS certificates (Windows)?
- OpenVPN client on Windows
- OpenVPN client on Linux
- OpenVPN server on Windows
- OpenVPN traffic split
- Configuration file .ovpn upload tutorial
- Other types of VPNs suported by RUTxxx devices:
External links
https://github.com/OpenVPN/easy-rsa-old - Easy-RSA download
https://winscp.net/eng/download.php - WinSCP download
https://openvpn.net/index.php/open-source/documentation/howto.html - some additional information on OpenVPNs

