Difference between revisions of "Azure IoT Hub cloud connection RUTOS"
| Line 1: | Line 1: | ||
| − | |||
| − | + | <p style="color:red">The information on this page is updated in accordance with the [https://wiki.teltonika-networks.com/view/FW_%26_SDK_Downloads'''00.07.4'''] firmware version .</p> | |
==Introduction== | ==Introduction== | ||
| − | + | <b>Azure IoT Hub</b> is an open and flexible cloud platform that supports open-source SDKs and multiple protocols. This article contains instructions on how to configure a RUT router in order to connect to the Azure IoT Hub.<br> | |
| − | This article contains instructions on how to configure a RUT router in order to connect to the Azure IoT Hub.<br> | ||
==Prerequisites== | ==Prerequisites== | ||
Revision as of 13:35, 29 March 2023
Main Page > General Information > Configuration Examples > Third party services > IoT platforms > Azure IoT Hub cloud connection RUTOSThe information on this page is updated in accordance with the 00.07.4 firmware version .
Introduction
Azure IoT Hub is an open and flexible cloud platform that supports open-source SDKs and multiple protocols. This article contains instructions on how to configure a RUT router in order to connect to the Azure IoT Hub.
Prerequisites
You will need:
- A Teltonika Networks router
- An Azure IoT Hub account
Azure account creation
Visit https://azure.microsoft.com/en-us/ and create an account that will suit your needs, for testing purposes we will be using free Azure account.
Managing Azure services
- First you will want to create a Resource group for easier management of resources that you will add later. In Microsoft Azure home page.
- In new window, select Add
- And then finish creating yours Resource group Select your subscription, we are using Free Trial for this test.
- Name your group
- Finally, choose server location for meta data. We will choose (South America) Brazil South and will use it during test where available.
- At this moment we will skip adding Tags since we will be able to do that later if needed, so simply press Review + create at the bottom of screen and then click Create to finish setup.
- You will be redirected to Homepage, then click on Resource groups. You should see yours newly created group, select it, and press Add.
- Select Internet of Things or simply search IoT Hub and press Create.
- We leave default subscription and resource group and choose:
1. Region – (South America) Brazil South as before2. Create a name for IoT Hub3. Then go to Size and scale tab
- For testing purposes, we are using F1: Free tier
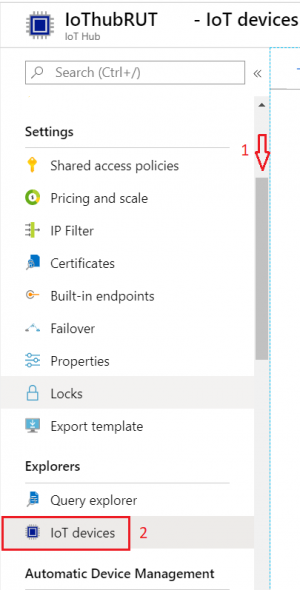
- Inside IoT Hub list:
Scroll down to Explorers and select IoT devices
- Press New
-
In new device creation1. Enter Device ID2. Leave everything else on default and press Save
- After you finish creation, you will be redirected back to IoT devices select yours newly created Device ID
- In your device window you will find information needed to connect RUT devices to Azure IoT Hub.
- Select Resource groups
If it is not in very first page, click More services and locate it there.


Configuring Azure IoT Hub in WebUI
- First open router WebUI, go to System > Package Manager and install Azure IoT Hub package
- Now navigate to Services → Cloud solutions → Azure IoT Hub


Checking if Data reaches Azure IoT Hub
- From router side, connect to it with CLI or SSH client and write in command azure_iothub and press Enter
- From Azure IoT Hub side you can check if it receives data. Go to IoT Hub that you created previously. Select Overview, there you can see:
- To capture logs you will need Device Explorer for IoT Hub Devices.
- Now you will need connection string of yours Azure IoT Hub, Not device. Navigate to IoT hub in your browser, then:
- After that go back to Device Explorer:
- Open Management tab
- Go to Data tab
- Go to Services > MQTT > Broker
- Go to Services → Cloud solutions → Azure IoT Hub


Setting router to Forward MQTT messages/commands to Azure IoT Hub


Testing the configuration
Linux
- Open terminal and publish to MQTT Broker message with previously chosen topic.
For our example we are using example: mosquito_pub -h 192.168.1.1 -p 8883 -m ‘testing Azure MQTT messages’ -t test
![]()

Windows
- Install a MQTT client software to do the test, for this example we used MQTT.fx
- If you did everything right this message will be shown in the device explorer


Setting router to Forward Modbus data to Azure IoT Hub
To send Modbus data to Azure IoT Hub, configure the device with your desired Modbus configuration, then go to Services → Data to server and configure as follows:
- Enable the instance
- Name - enter desired name
- Data source - Modbus data
- Protocol - Azure MQTT
- JSON format - data you would like to receive
- URL/Host/Connection string - Azure connection string

Note: Azure IoT Hub configuration on the device can be left as previous.
Testing the configuration
If everything was configured correctly in Device Explorer, Data tab you should receive message:


