ZeroTier Configuration: Difference between revisions
mNo edit summary |
mNo edit summary |
||
| Line 1: | Line 1: | ||
<span style="color: red;">The information in this page is updated in accordance with the <span style="color: #0054A6;"><b>RUTXXX_R_00_07_02</b></span> firmware version.</span> | |||
<b>ZeroTier One</b> is an open source software which can establish Peer to Peer VPN (P2PVPN) connection between various devices running various operating systems. It also provides network management possibilities such as routing and creating firewall rules. | <b>ZeroTier One</b> is an open source software which can establish Peer to Peer VPN (P2PVPN) connection between various devices running various operating systems. It also provides network management possibilities such as routing and creating firewall rules. | ||
==Introduction== | ==Introduction== | ||
| Line 5: | Line 8: | ||
This article contains step-by-step instructions on how to set up and manage a Zerotier network using Teltonika-Networks devices alongs with other equipment. | This article contains step-by-step instructions on how to set up and manage a Zerotier network using Teltonika-Networks devices alongs with other equipment. | ||
==Setting up a ZeroTier network== | == Setting up a ZeroTier network== | ||
<ul> | <ul> | ||
| Line 25: | Line 28: | ||
The next step is configuring members (aka nodes) for our ZeroTier network. | The next step is configuring members (aka nodes) for our ZeroTier network. | ||
==Node configuration== | ==Node configuration == | ||
Zerotier <b>nodes</b> or <b>members</b> are clients that can connect to a ZeroTier network. This section provides information on how to configure ZeroTier nodes on different types of machines. | Zerotier <b>nodes</b> or <b>members</b> are clients that can connect to a ZeroTier network. This section provides information on how to configure ZeroTier nodes on different types of machines. | ||
| Line 31: | Line 34: | ||
Take note that if 'Private' access control type is selected, the nodes will only come online after they authorized by you from the ZeroTier Central dashboard. To learn how to authorize nodes, read the [[#Node_authorization|node authorization]] section of this article. | Take note that if 'Private' access control type is selected, the nodes will only come online after they authorized by you from the ZeroTier Central dashboard. To learn how to authorize nodes, read the [[#Node_authorization|node authorization]] section of this article. | ||
===Teltonika-Networks device=== | === Teltonika-Networks device=== | ||
---- | ---- | ||
<ul> | <ul> | ||
| Line 71: | Line 74: | ||
</ul> | </ul> | ||
===Android/Apple iOS device=== | === Android/Apple iOS device=== | ||
---- | ---- | ||
<ul> | <ul> | ||
| Line 109: | Line 112: | ||
[[File:Zerotier_configuration_access_scheme.png]] | [[File:Zerotier_configuration_access_scheme.png]] | ||
===ZeroTier routing=== | === ZeroTier routing=== | ||
---- | ---- | ||
<ul> | <ul> | ||
<li>Go ZeroTier Central and find the <b>'Managed Routes'</b> box in the 'Advanced' section.</li> | <li>Go ZeroTier Central and find the <b><nowiki/>'Managed Routes'</b> box in the 'Advanced' section.</li> | ||
<li>Add the following route. | <li>Add the following route. | ||
<ol> | <ol> | ||
| Line 123: | Line 126: | ||
</ul> | </ul> | ||
===Port forwarding=== | === Port forwarding=== | ||
---- | ---- | ||
<ul> | <ul> | ||
| Line 141: | Line 144: | ||
</ul> | </ul> | ||
==Bridge Configuration== | ==Bridge Configuration == | ||
ZeroTier bridge configuration will allow 2 (or more) LAN's in the same Zerotier network to be interconnected. For this example we will use two RUTX routers. Both of these routers should already have ZeroTier package installed and be connected to the ZeroTier Portal. | ZeroTier bridge configuration will allow 2 (or more) LAN's in the same Zerotier network to be interconnected. For this example we will use two RUTX routers. Both of these routers should already have ZeroTier package installed and be connected to the ZeroTier Portal. | ||
| Line 163: | Line 166: | ||
*Navigate to '''''Network → Interfaces → LAN → Physical settings → Interface''''' and add the ZeroTier interface name we found out in the previous step. | *Navigate to '''''Network → Interfaces → LAN → Physical settings → Interface''''' and add the ZeroTier interface name we found out in the previous step. | ||
*Navigate to '''''Network → Interfaces → LAN → General settings''''' and change the '''IPv4 address''' to an IP that is in the same subnet as the first router (We will use 192.168.1.2 for this example) | * Navigate to '''''Network → Interfaces → LAN → General settings''''' and change the '''IPv4 address''' to an IP that is in the same subnet as the first router (We will use 192.168.1.2 for this example) | ||
*Navigate to '''''Network → Interfaces → LAN → DHCP Server''''' and Disable '''DHCP server''' option | *Navigate to '''''Network → Interfaces → LAN → DHCP Server''''' and Disable '''DHCP server''' option | ||
*Save & Apply settings | *Save & Apply settings | ||
| Line 170: | Line 173: | ||
[[File:Zerotier configuration rut 2 configuration v1.png|border|class=tlt-border]] | [[File:Zerotier configuration rut 2 configuration v1.png|border|class=tlt-border]] | ||
===ZeroTier Portal === | === ZeroTier Portal=== | ||
---- | ---- | ||
Revision as of 12:06, 30 December 2022
Main Page > General Information > Configuration Examples > VPN > ZeroTier ConfigurationThe information in this page is updated in accordance with the RUTXXX_R_00_07_02 firmware version.
ZeroTier One is an open source software which can establish Peer to Peer VPN (P2PVPN) connection between various devices running various operating systems. It also provides network management possibilities such as routing and creating firewall rules.
Introduction
This article contains step-by-step instructions on how to set up and manage a Zerotier network using Teltonika-Networks devices alongs with other equipment.
Setting up a ZeroTier network
- Go to https://my.zerotier.com/login and log in or create an account if you haven't already.
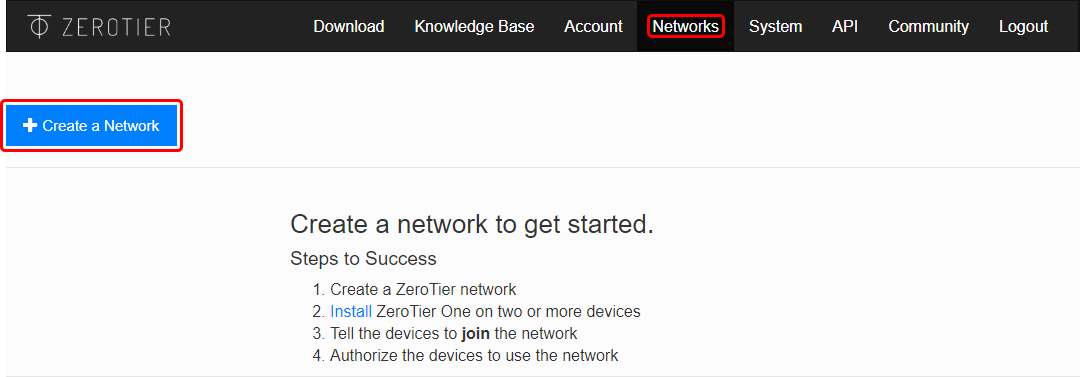
- Open the 'Networks' tab and click the 'Create a Network' button.
- Click the newly created network to begin configuration.

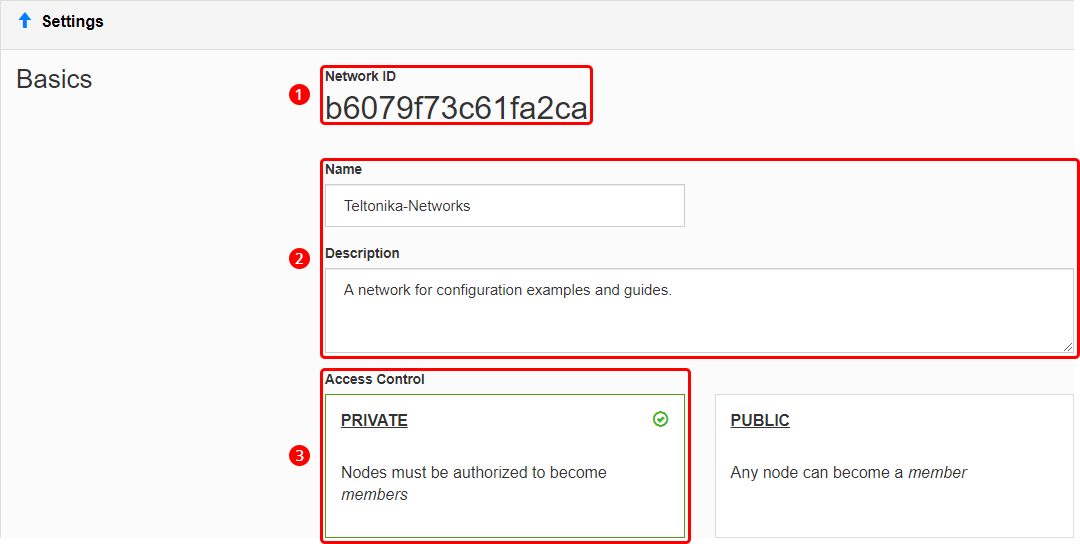
- Before configuring anything else, you may want to set up some basic settings.
- Copy the Network ID; you will need it later for ZeroTier node configuration.
- Optionally, set up a name and description for your network for easier management.
- Select 'Private' access control type; unless you want nodes to connect freely, without authorization.
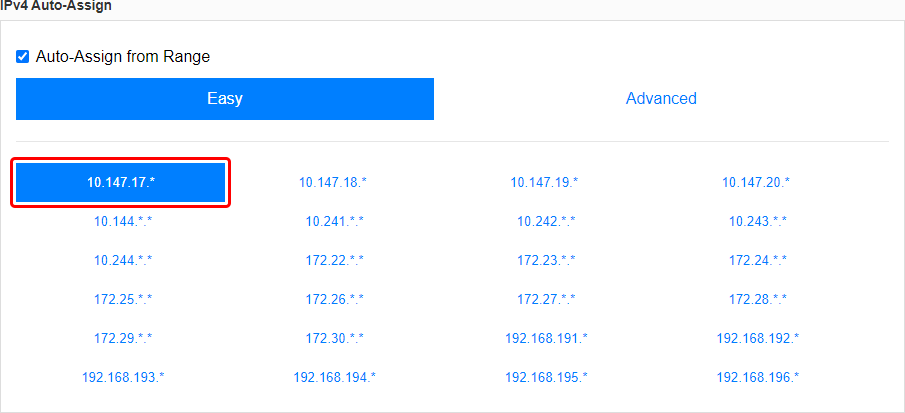
- Scroll down to find the 'IPv4 Auto-Assign' section. Select one of the provided private IP ranges for your network or click 'Advanced' and set up the range manually. For this example we'll be using the 10.147.17.* selection which means our network will be using the 10.147.17.0/24 IP range.
The last step concludes the ZeroTier network configuration. However, you may want to modify to the settings based on your specific requirements, but this particular network will function without any additional settings.
The next step is configuring members (aka nodes) for our ZeroTier network.
Node configuration
Zerotier nodes or members are clients that can connect to a ZeroTier network. This section provides information on how to configure ZeroTier nodes on different types of machines.
Take note that if 'Private' access control type is selected, the nodes will only come online after they authorized by you from the ZeroTier Central dashboard. To learn how to authorize nodes, read the node authorization section of this article.
Teltonika-Networks device
- Log in to your device's WebUI, and navigate to the Services → Package Manager page.
- Find the ZeroTier package in the list and install it.
- Navigate to the Services → VPN → ZeroTier page and create a new ZeroTier configuration.
- Enter a custom name for the configuration.
- Click 'Add'.
- Click the 'Edit' button next to the newly created configuration.

- Complete the configuration.
- Turn the instance on.
- Paste the ZeroTier Network ID into the 'Networks' field.
- Click 'Save & Apply'.

- Go to the ZeroTier Central dashboard and authorize this node.
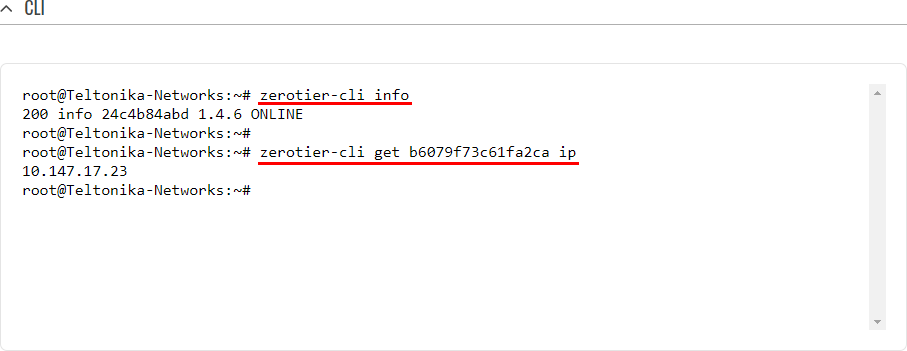
- To check the status of the connection from your device, go to the Services → CLI page and log in.
Check connection status with this command:zerotier-cli info
Check ZeroTier interface IP address with this command (replacing <network> with the ZeroTier Network ID):zerotier-cli get <network> ip
Windows device
- Download and install ZeroTier for Windows from https://www.zerotier.com/download/.
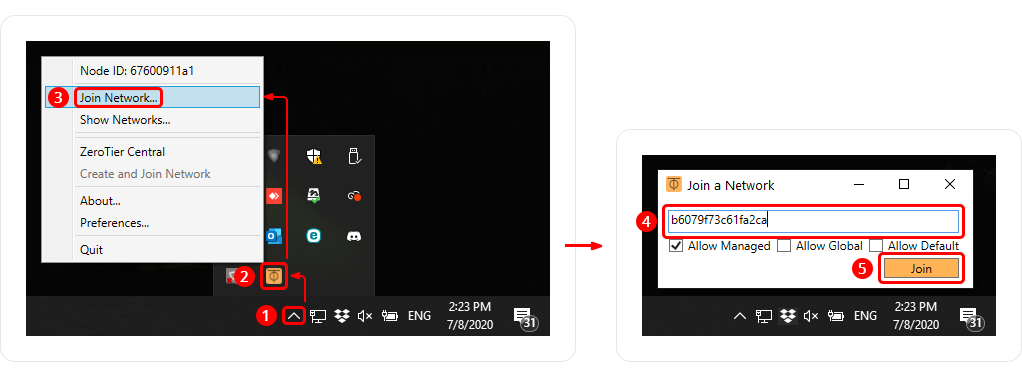
- Look to the right side of the Windows taskbar and perform these actions:
- Click 'Show hidden icons'.
- Right-click the ZeroTier icon.
- Click 'Join Network...'
- Paste the ZeroTier Network ID.
- Click 'Join'.
- Go to the ZeroTier Central dashboard and authorize this node.
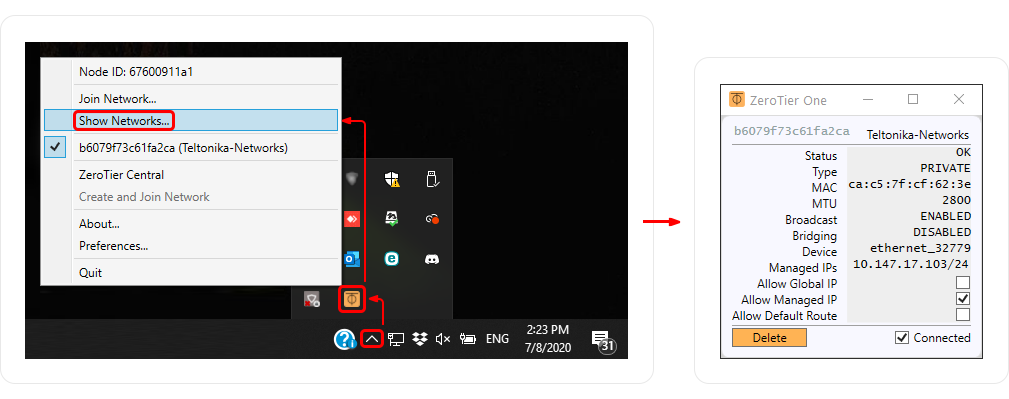
- To check the status of the connection, click 'Show hidden icons' again and click 'Show Networks...'
Android/Apple iOS device
- Open the 'Google Play Store' or the 'App Store' depending on your mobile device.
- Find the 'ZeroTier One' app and install it.
- Open the application and configure it as follows.
- Click the plus symbol.
- Enter the ZeroTier Network ID.
- Click 'Add Network'.
- Enable the connection to this network by moving the slider next to it.
- In the 'Connection request' pop-up click 'OK' to confirm the connection.
- After you have authorized the new member (your phone), the status indication at the bottom of the screen should turn to 'Online'.

Node authorization
When Access Control is set to 'Private', you will have to approve new nodes manually from the ZeroTier dashboard before they can become members of the network.
To do this, simply scroll down to the 'Members' section.
- Place check marks next to nodes that you wish to authorize.
- Additionally, you may want to add names and descriptions for your nodes to make it easier to differentiate between them.
Private network access
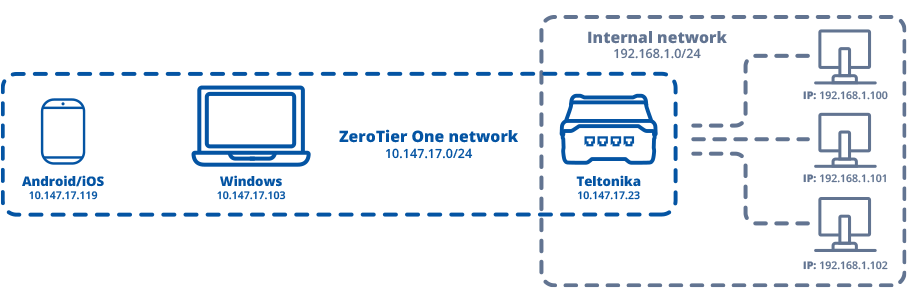
This section provides instructions on how to set up remote access to private networks behind ZeroTier nodes. For the following instruction, we'll use an example ZeroTier network that consists of three members: a Teltonika-Networks device, a computer and a phone.
For the purposes of this example, let's assume we want to provide remote access for the computer and the phone to the 192.168.1.0/24 network behind the Teltonika-Networks device.
ZeroTier routing
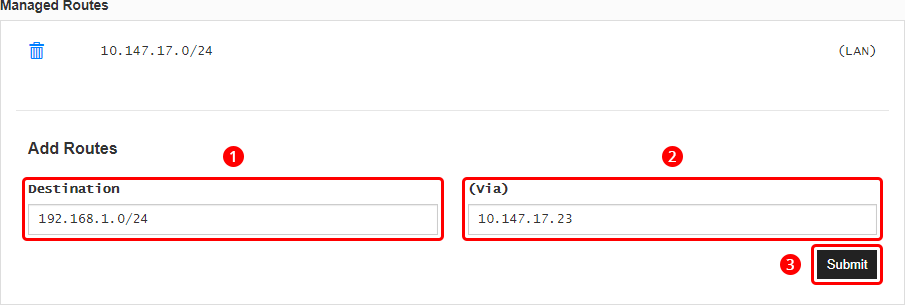
- Go ZeroTier Central and find the 'Managed Routes' box in the 'Advanced' section.
- Add the following route.
- Specify 192.168.1.0/24 as the destination.
- Specify 10.147.17.23 (Teltonika device ZeroTier IP) in the 'via' field.
- Click 'Submit'.
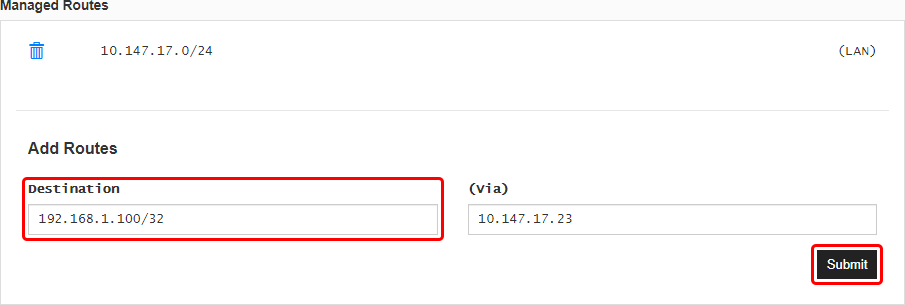
- Configuring it like this will make the entire 192.168.1.0/24 network accessible to other ZeroTier nodes via the Teltonika device's ZeroTier IP address. To configure a route to a single IP address instead, you can specify the address with a /32 netmask:
Port forwarding
- Enter your Teltonika device's WebUI and navigate to the Network → Firewall → Port Forwards page.
- Find the 'Add New Port Forward' section and add rule such as this:
- Enter a custom name for the rule.
- Select zerotier as the external zone.
- Enter an external port number for listening for incoming connections.
- Select lan as the internal zone.
- Enter a device's IP in the local network.
- Enter a device's listening port number.
- Click 'Add'.

- Since this configuration concerns port 80, the default HTTP port, configuring it like this would eliminate WebUI access to the Teltonika device over the ZeroTier network. To maintain that access, consider using a different external port:

Bridge Configuration
ZeroTier bridge configuration will allow 2 (or more) LAN's in the same Zerotier network to be interconnected. For this example we will use two RUTX routers. Both of these routers should already have ZeroTier package installed and be connected to the ZeroTier Portal.
First router
Additional changes that needs to be performed for the first router is having ZeroTier interface name added to the LAN configuration:
- Find out the ZeroTier interface name by executing the following command in the CLI:
ip addr | grep zt
- Navigate to Network → Interfaces → LAN → Physical settings → Interface and add the ZeroTier interface name we found out in the previous step.
- Save & Apply settings
Second Router
- Navigate to Network → Interfaces → LAN → Physical settings → Interface and add the ZeroTier interface name we found out in the previous step.
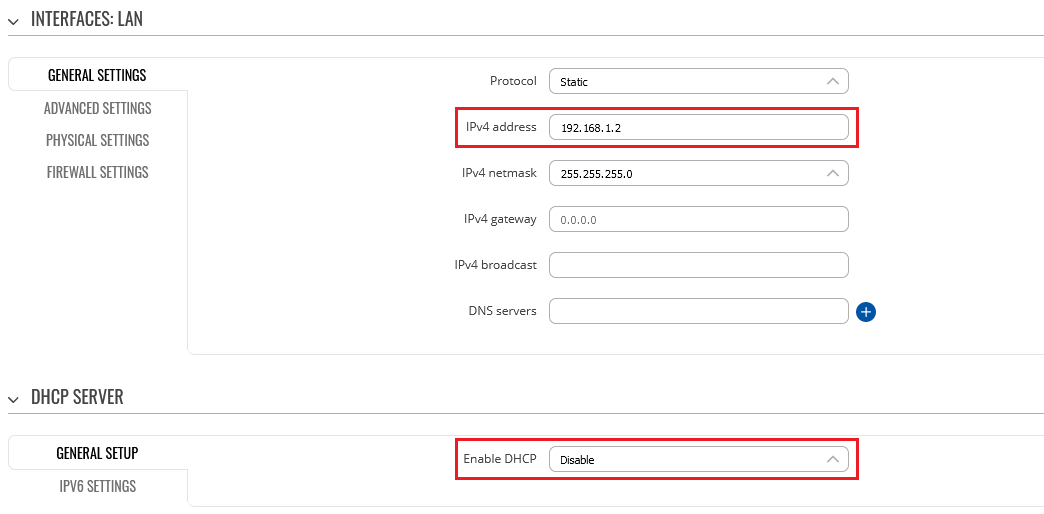
- Navigate to Network → Interfaces → LAN → General settings and change the IPv4 address to an IP that is in the same subnet as the first router (We will use 192.168.1.2 for this example)
- Navigate to Network → Interfaces → LAN → DHCP Server and Disable DHCP server option
- Save & Apply settings
ZeroTier Portal
- Open your ZeroTier Portal (https://my.zerotier.com/) and navigate to your ZeroTier Network.
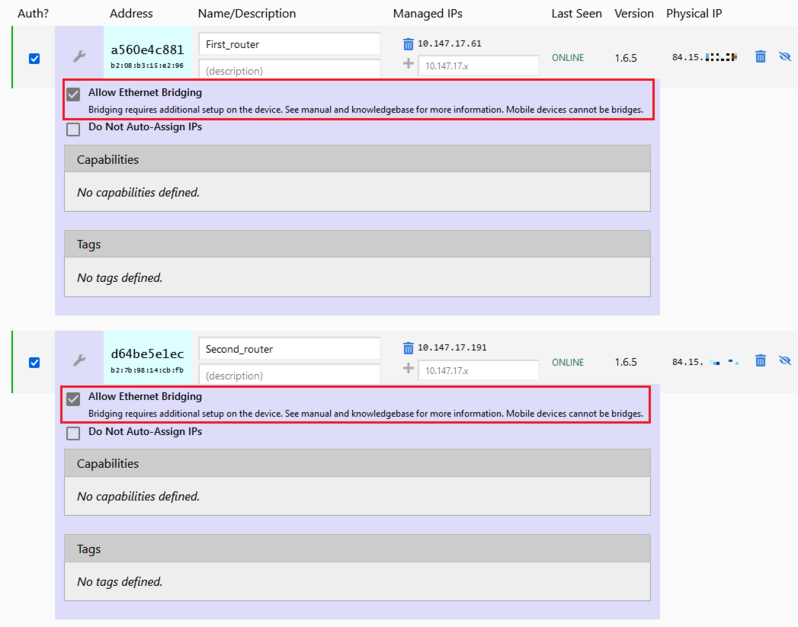
- Scroll down to Members and enable "Allow Ethernet Bridging" option on both devices
If everything was done correctly, you should be able to ping devices connected to separate routers. Let us test this by pinging a laptop connected to the second router (192.168.1.163) from a laptop connected to the first router (192.168.1.220):
Note: If you wish to add more routers to the bridged network, you should configure them according to the second router configuration.


