Difference between revisions of "OpenVPN over Stunnel RutOS"
PauliusRug (talk | contribs) |
|||
| (6 intermediate revisions by 2 users not shown) | |||
| Line 22: | Line 22: | ||
<b>Explanation</b> | <b>Explanation</b> | ||
| − | An OpenVPN client is connected to an OpenVPN server (both hosted on RUT routers) via a TLS encrypted Stunnel connection. This allows the transfer of data between remote private networks (LAN A and LAN B) and adds | + | An OpenVPN client is connected to an OpenVPN server (both hosted on RUT routers) via a TLS encrypted Stunnel connection. This allows the transfer of data between remote private networks (LAN A and LAN B) and adds a TLS security layer for the connection. |
==Server configuration== | ==Server configuration== | ||
| Line 46: | Line 46: | ||
Navigate to the <b>Services → VPN → Stunnel</b> page and enable the "Stunnel Globals" configuration: | Navigate to the <b>Services → VPN → Stunnel</b> page and enable the "Stunnel Globals" configuration: | ||
| − | [[File:Networking rutxxx configuration examples stunnel | + | [[File:Networking rutxxx configuration examples stunnel global enabled v1.jpg|border|class=tlt-border|1100px]] |
Click <b>Save</b>. | Click <b>Save</b>. | ||
| Line 54: | Line 54: | ||
The figure below displays the configuration used for our example. Take note of the comments that are provided next to fields that differ from the default value: | The figure below displays the configuration used for our example. Take note of the comments that are provided next to fields that differ from the default value: | ||
| − | [[File:Networking rutxxx configuration examples stunnel server settings v1.jpg|border|class=tlt-border]] | + | [[File:Networking rutxxx configuration examples stunnel server settings v1.jpg|border|class=tlt-border|1100px]] |
Don't forget to click the <b>Save</b> button located at the bottom-right side of the page. | Don't forget to click the <b>Save</b> button located at the bottom-right side of the page. | ||
| Line 64: | Line 64: | ||
To do this, navigate to the <b>Network → Firewall → Traffic Rules</b> page and scroll down until you see the <b>Open Ports On Router</b> section. Fill out the configuration fields as indicated in the figure above and click the 'Add' button: | To do this, navigate to the <b>Network → Firewall → Traffic Rules</b> page and scroll down until you see the <b>Open Ports On Router</b> section. Fill out the configuration fields as indicated in the figure above and click the 'Add' button: | ||
| − | [[File:Networking rutxxx configuration examples openvpn over stunnel firewall configuration v2.jpg|border|class=tlt-border| | + | [[File:Networking rutxxx configuration examples openvpn over stunnel firewall configuration v2.jpg|border|class=tlt-border|1100px]] |
==Client configuration== | ==Client configuration== | ||
| − | Configure the OpenVPN and Stunnel clients that will be connecting to the server. Unlike in the server, there is reason to configure Stunnel client before the OpenVPN client (the other way around will also work but an OpenVPN service restart may be required) so it is recommended to start with that. | + | Configure the OpenVPN and Stunnel clients that will be connecting to the server. Unlike in the server, there is a reason to configure the Stunnel client before the OpenVPN client (the other way around will also work but an OpenVPN service restart may be required) so it is recommended to start with that. |
The OpenVPN client will connect to <i>TCP port 1194</i> of the local host and the Stunnel client will connect to the WAN IP and Stunnel port (<i>192.168.10.1:9999</i> in this example) of the server router. | The OpenVPN client will connect to <i>TCP port 1194</i> of the local host and the Stunnel client will connect to the WAN IP and Stunnel port (<i>192.168.10.1:9999</i> in this example) of the server router. | ||
| Line 74: | Line 74: | ||
The logic of the entire connection can be visualized like this: | The logic of the entire connection can be visualized like this: | ||
| − | [[File: | + | [[File:Networking_device_vpn_stunnel_complete_configuration_scheme_v2.png]] |
===Stunnel client=== | ===Stunnel client=== | ||
| Line 80: | Line 80: | ||
Navigate to the <b>Services → VPN → Stunnel</b> page and enable the "Stunnel Globals" configuration: | Navigate to the <b>Services → VPN → Stunnel</b> page and enable the "Stunnel Globals" configuration: | ||
| − | [[File: | + | [[File:Networking rutxxx configuration examples stunnel global enabled v1.jpg|border|class=tlt-border|1100px]] |
Click <b>Save</b>. | Click <b>Save</b>. | ||
| Line 88: | Line 88: | ||
The figure below displays the configuration used for our example. Take note of the comments that are provided next to fields that differ from the default value: | The figure below displays the configuration used for our example. Take note of the comments that are provided next to fields that differ from the default value: | ||
| − | [[File: | + | [[File:Networking rutxxx configuration examples openvpn over stunnel stunnel client configuration v2.jpg|border|class=tlt-border|1100px]] |
Don't forget to click the <b>Save</b> button located at the bottom-right side of the page. | Don't forget to click the <b>Save</b> button located at the bottom-right side of the page. | ||
| Line 98: | Line 98: | ||
The figure below displays the configuration used for our example. Take note of the comments that are provided next to fields that differ from the default value: | The figure below displays the configuration used for our example. Take note of the comments that are provided next to fields that differ from the default value: | ||
| − | [[File: | + | [[File:Networking rutxxx configuration examples openvpn over stunnel openvpn client configuration v2.jpg|border|class=tlt-border|1100px]] |
Don't forget to click the <b>Save</b> button located at the bottom-right side of the page. | Don't forget to click the <b>Save</b> button located at the bottom-right side of the page. | ||
| Line 131: | Line 131: | ||
</li> | </li> | ||
---- | ---- | ||
| − | <li>Double check your configuration. Check for configuration mistakes, see if correct certificate files are uploaded onto each instance, make sure the Stunnel port is not used by another program, etc.</li> | + | <li> Double-check your configuration. Check for configuration mistakes, see if correct certificate files are uploaded onto each instance, make sure the Stunnel port is not used by another program, etc.</li> |
</ul> | </ul> | ||
| + | [[Category:VPN]] | ||
Latest revision as of 14:57, 2 August 2023
Main Page > General Information > Configuration Examples > VPN > OpenVPN over Stunnel RutOSIntroduction
Stunnel is an open-source proxy service that adds TLS encryption to clients and servers already existing on a VPN network. TLS encryption provided by Stunnel can be used as an additional layer of encryption for data sent by OpenVPN. This procedure increases the security of the established connection and provides higher chances of passing a Deep packet inspection (DPI) check.
This article contains instructions on how to configure an OpenVPN over the Stunnel topology.
Overview
You will need
- two routers of the RUTxxx series (except RUT850);
- at least one router (server) with a public IP;
- TLS certificates for the server and the client (for instructions on generating TLS certificates, click here).
Topology
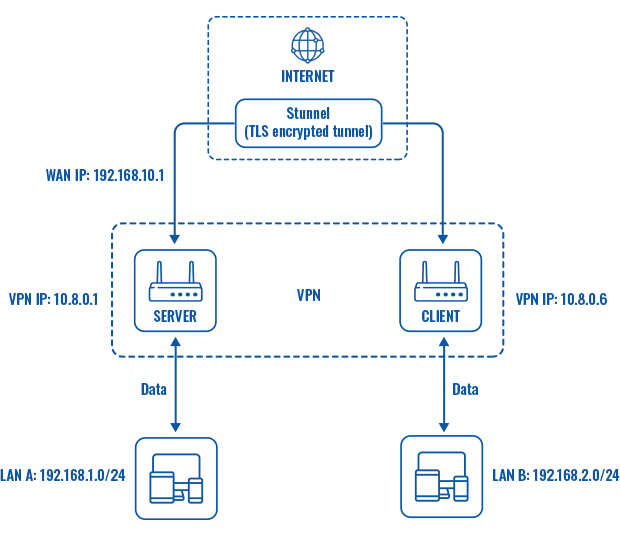
Explanation
An OpenVPN client is connected to an OpenVPN server (both hosted on RUT routers) via a TLS encrypted Stunnel connection. This allows the transfer of data between remote private networks (LAN A and LAN B) and adds a TLS security layer for the connection.
Server configuration
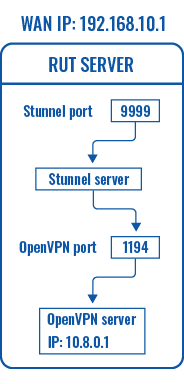
First, configure the OpenVPN and Stunnel servers. The Stunnel server will listen for incoming client connections on the specified TCP port (9999 in this example) and connect them to the OpenVPN server running on the local host.
The logic of the connection can be visualized like this:
OpenVPN server
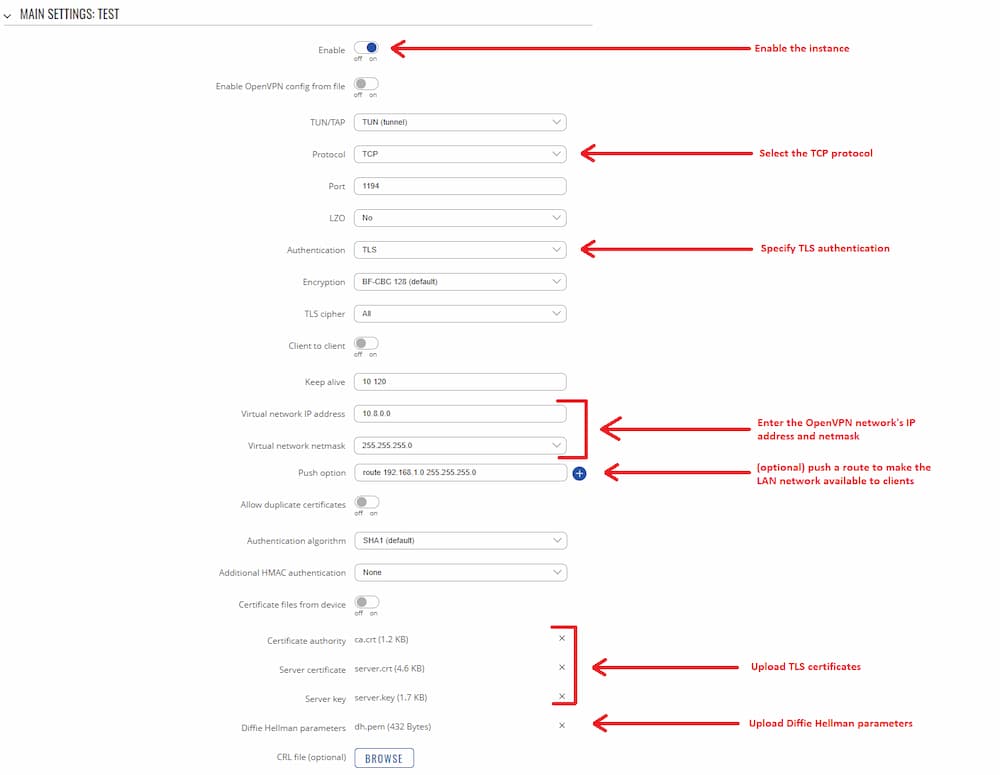
Navigate to the Services → VPN → OpenVPN page. Select Role: Server, enter a custom name and click the 'Add New' button. An OpenVPN server instance with the given name will appear in the "OpenVPN Configuration" list. To begin configuration, click the 'Edit' button next to the server instance.
The figure below displays the configuration used for our example. Take note of the comments that are provided next to fields that differ from the default value:
Don't forget to click the Save button located at the bottom-right side of the page.
Stunnel server
Navigate to the Services → VPN → Stunnel page and enable the "Stunnel Globals" configuration:
Click Save.
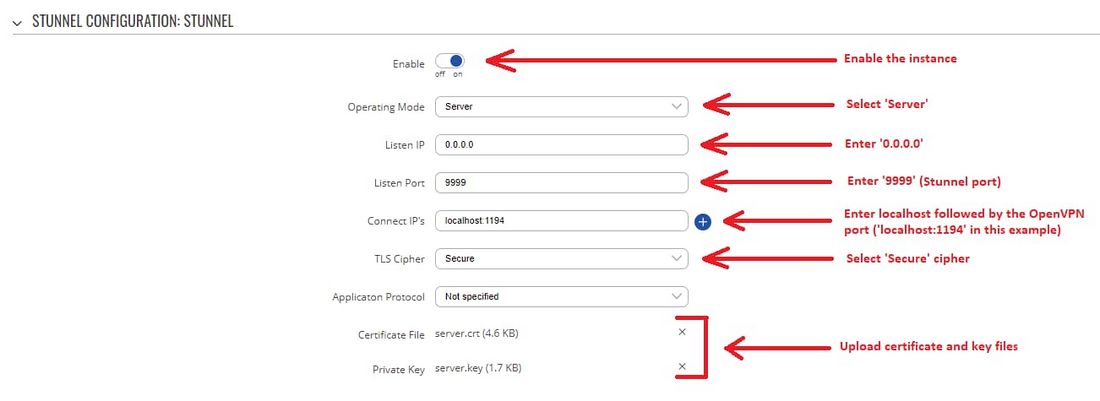
To create a new Stunnel instance, enter a custom name for it and click the 'Add' button. A new instance with the given name will appear in the "Stunnel Configuration" list. To begin configuration, click the 'Edit' button next to the instance.
The figure below displays the configuration used for our example. Take note of the comments that are provided next to fields that differ from the default value:
Don't forget to click the Save button located at the bottom-right side of the page.
Open Stunnel port
The OpenVPN default port (1194) is opened by default. But you will have manually open the select Stunnel port (9999 in this example).
To do this, navigate to the Network → Firewall → Traffic Rules page and scroll down until you see the Open Ports On Router section. Fill out the configuration fields as indicated in the figure above and click the 'Add' button:
Client configuration
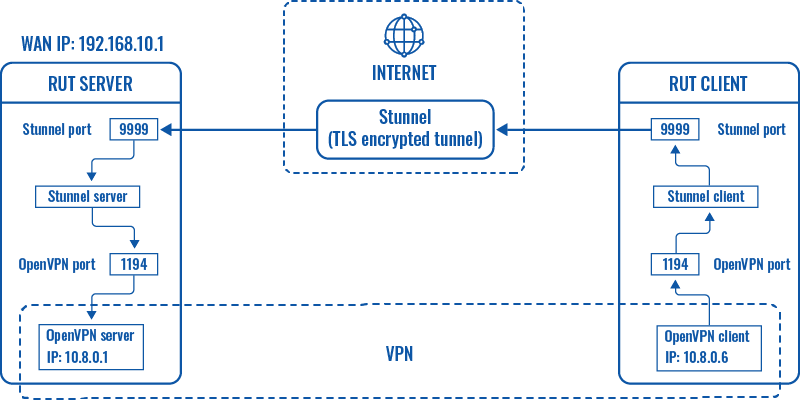
Configure the OpenVPN and Stunnel clients that will be connecting to the server. Unlike in the server, there is a reason to configure the Stunnel client before the OpenVPN client (the other way around will also work but an OpenVPN service restart may be required) so it is recommended to start with that.
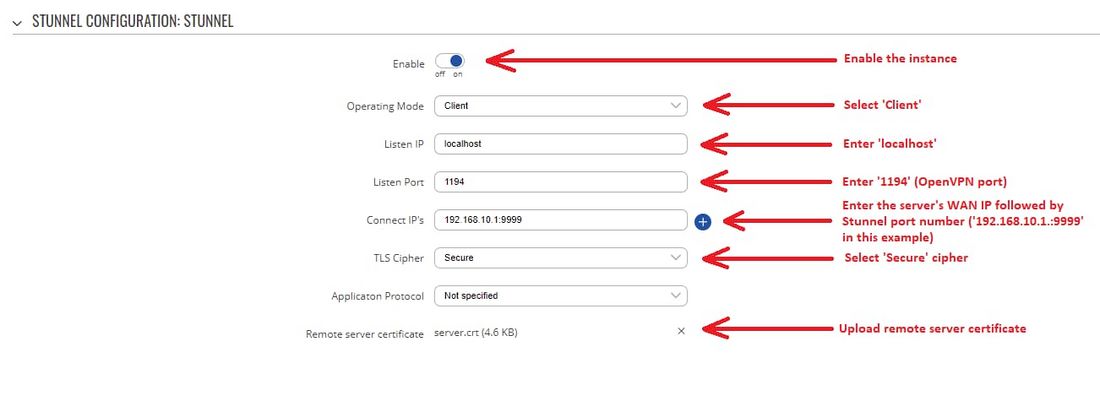
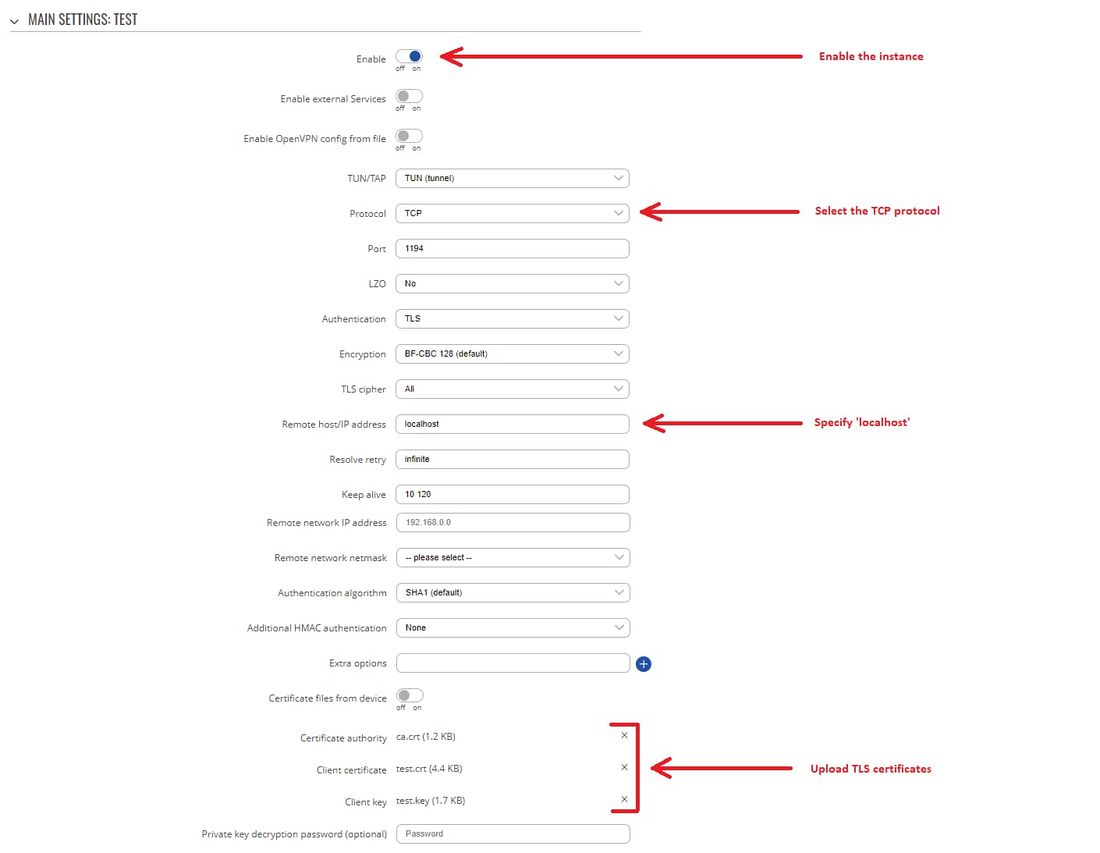
The OpenVPN client will connect to TCP port 1194 of the local host and the Stunnel client will connect to the WAN IP and Stunnel port (192.168.10.1:9999 in this example) of the server router.
The logic of the entire connection can be visualized like this:
Stunnel client
Navigate to the Services → VPN → Stunnel page and enable the "Stunnel Globals" configuration:
Click Save.
To create a new Stunnel instance, enter a custom name for it and click the 'Add' button. A new instance with the given name will appear in the "Stunnel Configuration" list. To begin configuration, click the 'Edit' button next to the instance.
The figure below displays the configuration used for our example. Take note of the comments that are provided next to fields that differ from the default value:
Don't forget to click the Save button located at the bottom-right side of the page.
OpenVPN client
Navigate to the Services → VPN → OpenVPN page. Select Role: Server, enter a custom name and click the 'Add New' button. An OpenVPN client instance with the given name will appear in the "OpenVPN Configuration" list. To begin configuration, click the 'Edit' button next to the client instance.
The figure below displays the configuration used for our example. Take note of the comments that are provided next to fields that differ from the default value:
Don't forget to click the Save button located at the bottom-right side of the page.
Testing and troubleshooting
If you have completed the steps presented above, your configuration is complete. This section provides tips on how to test and troubleshoot this OpenVPN over Stunnel connection.
- Check whether remote side is reachable by sending ICMP requests. To do that, go to the Services → CLI page. Login (username: root; password: router's password) and ping the opposite instance:
ping 10.8.0.6
Is the response looks like this, then the connection was established successfully:64 bytes from 10.8.0.6: seq=0 ttl=64 time=101.214 ms 64 bytes from 10.8.0.6: seq=1 ttl=64 time=91.018 ms 64 bytes from 10.8.0.6: seq=2 ttl=64 time=88.974 ms 64 bytes from 10.8.0.6: seq=3 ttl=64 time=502.781 ms - If there is no response to the ping requests, check whether Stunnel and OpenVPN services are running on the device. For Stunnel use this command:
ps | grep stunnel | grep -v grep
The output should look similar to this:16122 root 2992 S /usr/bin/stunnel /tmp/stunnel.confFor OpenVPN use this command:ps | grep openvpn | grep -v grep
The output should look similar to this:13034 root 3428 S /usr/sbin/openvpn --syslog openvpn(7365727665725F41)
- To restart OpenVPN or Stunnel services, use one of these commands:
/etc/init.d/openvpn restart
/etc/init.d/stunnel restart
- Double-check your configuration. Check for configuration mistakes, see if correct certificate files are uploaded onto each instance, make sure the Stunnel port is not used by another program, etc.
